


About
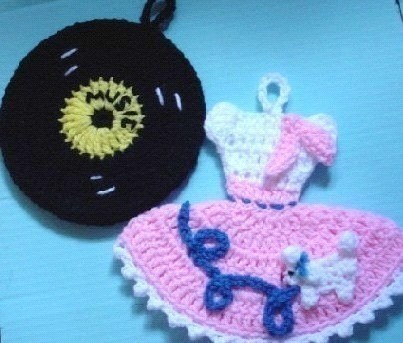
Rock around the clock with this cute "Fabulous 50's" potholder duo!
FABULOUS 50’S POTHOLDER DUO
*G hook
*F hook
*4 ply yarn- small amounts of
yellow, black, pink, white
scrap of blue and red
NOTE: F hook used only for poodle adornment for skirt
-
 Key West Witch favorited Cute Crocheted 50's Potholder Ensemble
08 Aug 03:13
Key West Witch favorited Cute Crocheted 50's Potholder Ensemble
08 Aug 03:13
-
 Pam added Cute Crocheted 50's Potholder Ensemble to Curious Kitchen
08 Nov 20:59
Pam added Cute Crocheted 50's Potholder Ensemble to Curious Kitchen
08 Nov 20:59
-
 Bea M. favorited Cute Crocheted 50's Potholder Ensemble
22 May 07:27
Bea M. favorited Cute Crocheted 50's Potholder Ensemble
22 May 07:27
-
 ZombieUnicorn favorited Cute Crocheted 50's Potholder Ensemble
14 Jan 22:57
ZombieUnicorn favorited Cute Crocheted 50's Potholder Ensemble
14 Jan 22:57
-
 Pauline G. favorited Cute Crocheted 50's Potholder Ensemble
21 Oct 12:41
Pauline G. favorited Cute Crocheted 50's Potholder Ensemble
21 Oct 12:41
-
 louella.adams.1 favorited Cute Crocheted 50's Potholder Ensemble
20 Dec 20:13
louella.adams.1 favorited Cute Crocheted 50's Potholder Ensemble
20 Dec 20:13
-
 Faith B. favorited Cute Crocheted 50's Potholder Ensemble
22 Oct 00:27
Faith B. favorited Cute Crocheted 50's Potholder Ensemble
22 Oct 00:27
-
 Sara R. favorited Cute Crocheted 50's Potholder Ensemble
27 Jul 19:43
Sara R. favorited Cute Crocheted 50's Potholder Ensemble
27 Jul 19:43
-
 Kim D. favorited Cute Crocheted 50's Potholder Ensemble
01 May 12:15
Kim D. favorited Cute Crocheted 50's Potholder Ensemble
01 May 12:15
-
 Jessica C. favorited Cute Crocheted 50's Potholder Ensemble
23 Feb 05:29
Jessica C. favorited Cute Crocheted 50's Potholder Ensemble
23 Feb 05:29
You Will Need
-
Step 1
BEGINNING WITH SKIRT
ROW 1: With pink, beg at waistline, ch 14, 1 dc in 4th ch from hk and in each ch across. This row is right side of work. Ch 3, turn. (12 dc counting ch 3)
ROW 2: 1 dc in same st as ch 3, 2 dc in next dc and in each dc across. Ch 3, turn. ( 24 dc)
ROW 3: 1 dc in same st as joining, *1 dc in next dc, 2 dc in next dc, rep from* across, ch 3, turn. (36 dc)
ROW 4: 1 dc in same st as ch 3, *1 dc in next 2 dc, 2 dc in next dc, rep from* across, ch 3, turn. (48 dc)
ROW 5: 1 dc in same st as ch 3, *1 dc in next 3 dc, 2 dc in next dc, rep from* across, ch 3, turn. (60 dc)
ROW 6: 1 dc in same st as ch 3, *1 dc in next 4 dc, 2 dc in next dc, rep from* across, ch 3, turn. (72 dc)ROW 7: Work 1 dec over next 2 dc, 1 dc in each dc across, working 1 dec over last 2 sts. Fasten off. Note that skirt now forms a large semi-circle. Next, bring the end edges of all 7 rows of skirt together to meet, being sure to evenly match row to row. Sew all these rows together to form one seam. Be sure to always keep this seam at center back of skirt as it is flattened.
BLOUSE
Make 2 pieces
ROW 1: With pink (this row actually forms waistband for skirt), ch 10, 1 dc in 4th ch from hk and in each ch across. (8 dc, counting ch 3), Fasten off pink, attach white. This is right side of work. Ch 3, turn.
ROW 2: With white, work 1 dc in each dc across, ch 3, turn.
ROW 3: Work 1 dc in same st as ch 3, 1 dc in each dc across, working 2 dc in last st. (10 dc)
ROWS 4&5: Work 1 dc in each dc across. Do not fasten off. With right side of work still facing, ch 3 and working over the end dc of row 5 just competed, work 4 dc over this end dc. (which is actually the sp formed between the 9th dc and last dc of this row) You have just made a 5 dc shell, counting the ch 3. Now sl st over the next end dc of row 4. Fasten off. This is the Left Sleeve of blouse that has now been completed. For right sleeve, attach white with a sl st, on the opposite end of row 4, over this end dc. Work a 5 dc shell over end dc of row 5, like for left sleeve, sl st in next dc, ( 2nd dc of row 5), fasten off. The Right Sleeve is now complete. Make another blouse piece like one just completed. When both pieces are completed, take each piece and place them together, wrong sides together. Beginning at either left or right hand side of blouse, you will sew pieces together. With your needle and yarn, begin sewing at the base of row 2. You are going to leave row 1, the waistband row, free for now. Matching sts carefully, sew around entire outer edge of blouse across to opposite side from where you began, ending at base of row 2 on this side. Fasten off.
BLOUSE & SKIRT ASSEMBLY
Take your completed skirt, flattened, with the seam at back center, and sandwich row 1 of the skirt between rows 1 of the front and back pieces of the blouse. Position skirt correctly so that row 1 of blouse pieces will blend into the skirt to look like the waistband of skirt. Sew through all thicknesses of skirt and blouse together in order to securely attach them. Note, that while you are attaching the skirt and blouse, you will, at the same time, finish sewing the free ends of row 1 of the blouse pieces together on each side.
SCARF
With pink, ch 18, sl st in 2nd ch from hk, 1 sc in next ch, hdc in next ch, 1 dc in next 2 chs, 1 sc in next 7 chs, 1 dc in next 2 chs, 1 hdc in next, 1 sc in next, sl st in last ch, fasten off. Sew scarf to blouse in desired position.POODLE
Note: Completed poodle will face left, head at left hand side and tail at right.
With F hook, beginning at top of tail, ch 4, 3 dc in 4th ch from hk, drop lp from hk and insert into the top of beg ch 3 and draw lp through this st. ( 4 dc popcorn stitch made, counting ch 3 as a st). Do not fasten off.
Beg of Hind Quarters:
ROW 1: Ch 4, 1 sc in 2nd ch from hk and in next 2 chs, ch 1, turn. (3 sc)
ROW 2: 1 sc in each sc across. Ch 3, turn.
ROW 3: 1 sc in 2nd ch from hk and in next ch (hind leg made), 1 sc in next 3 sc, ch 1, turn.
ROWS 4-6: 1 sc in each 3 sc across, ( be sure not to work in leg sts when working across row 4), ch 3, turn.
ROW 7: 1 sc in 2nd ch from hk and in next ch (front leg made), 1 sc in next 3 sc,
ch 4, turn.
ROW 8: Work a 6 dc popcorn st in 4th ch from hk. (simulates puffy poodle hair on top of head), sl st in next sc on row 7, ch 2, 2 hdc in same st as sl st (snout made), sl st in next sc, fasten off.
EAR & SKIRT ADORNMENT
Ear: Ch 5, join with sl st to 1st ch, fasten off. Sew ear to poodle head. Tie a piece of yarn around ear for a bow. With black yarn, work a French knot for poodle eye and with red yarn use straight stitches for nose and tongue. If desired, you may use small pieces of felt instead of making embroidered features. Sew poodle onto skirt. Make a chain of desired length and arrange to make several loops on the skirt. You can make any design that you like.
BOTTOM SKIRT EDGING
With bottom of skirt at top of work, front and back flattened together, attach white yarn with a sl st in the end right hand stitch. You will begin by working through both thicknesses at the same time, in order to complete trim and close bottom edge of skirt. *Ch 3, 1 sl st in 1st ch of ch 3 (picot made), sk 1 st, 1 sc in next st, working
through the inside lps only, the sc lps that meet tog down center to join the front and back of skirt hem, rep from* across entire bottom edge of skirt, fasten off.RECORD
RND 1: With black, ch 2, 8 sc in 2nd ch from hk, fasten off black, join yellow with a sl st in 1 sc.
RND 2: Ch 4 (counts as 1 trc), work 2 trc in same st as joining, 3 trc in next sc and in each sc around, join in top of ch 4, fasten off yellow, attach black. (24 trc)
RND 3: Ch 3, 1 dc in same st as joining, 2 dc in next trc and in each trc around, join. (48 dc)
RND 4: Working through back lps only, ch 3, 1 dc in same st a joining, *1 dc in next 2 dc, 2 dc in next dc, rep from* around, join. (64 dc)
RND 5: Working through back lps only, work 1 dc in each dc around, fasten off. Make another piece identical to this one, or make a solid black piece for backside. After completing second piece, finish all decorative stitches on front piece before sewing them together. On your front piece of the record, you can embroider a word or design on the yellow part to indicate writing or a design.
If desired, with white yarn, you can place a series of pairs of straight stitches around the record, parallel to one another. This gives the impression of reflecting light, like what would gleam off a real record. After placing décor on the record front, sew both front and back pieces of record together.
FINISHING
If desired, you can make hanging loops for your finished potholders. For skirt and blouse, join yarn with a sl st in top center of blouse, ch 12, sl st in same st, fasten off. Do same for record at any point along edge, unless you have worked a word or design that you want facing upright center. -
 Step 2
You may use any other word, besides music, in the center of the record, if desired. You could use a person's name as a gift idea, for example.
 1
Watercolor Art »
Watercolor Paints Made From Make Up
1
Watercolor Art »
Watercolor Paints Made From Make Up

You're a great crochet crafter!!!