About
Make a statement with this fun necklace!
How’s this for making a statement?! We love this wrapped swirl design – it is so striking, yet surprisingly so simple to make. We’ve used lovely natural Lapis Lazuli beads, Pyrite beads and crystals. However you can do any colour combination you like! We found that using two contrasting colour groups looks good, but you could even do a completely random rainbow coloured design if you liked! The main thing is we graduate the beads, so you will need beads including 4mm, 6mm and 8mm.
-
 DawnRedwood favorited Wired Swirl Statement Necklace
19 May 15:11
DawnRedwood favorited Wired Swirl Statement Necklace
19 May 15:11
-
 CiiMoore favorited Wired Swirl Statement Necklace
20 Jan 19:05
CiiMoore favorited Wired Swirl Statement Necklace
20 Jan 19:05
-
 beadmommie added Wired Swirl Statement Necklace to Jewelry Tutorials
23 Dec 00:26
beadmommie added Wired Swirl Statement Necklace to Jewelry Tutorials
23 Dec 00:26
-
 Melissa Beth favorited Wired Swirl Statement Necklace
02 Dec 22:56
Melissa Beth favorited Wired Swirl Statement Necklace
02 Dec 22:56
-
 Ligia O. favorited Wired Swirl Statement Necklace
14 Apr 09:22
Ligia O. favorited Wired Swirl Statement Necklace
14 Apr 09:22
-
 Lisa H. favorited Wired Swirl Statement Necklace
09 Apr 12:31
Lisa H. favorited Wired Swirl Statement Necklace
09 Apr 12:31
-
 Crafterella featured Wired Swirl Statement Necklace
06 Apr 23:00
Crafterella featured Wired Swirl Statement Necklace
06 Apr 23:00
-
 Michelle @ My Beads published her project Wired Swirl Statement Necklace
05 Apr 17:13
Michelle @ My Beads published her project Wired Swirl Statement Necklace
05 Apr 17:13
-
 Step 1
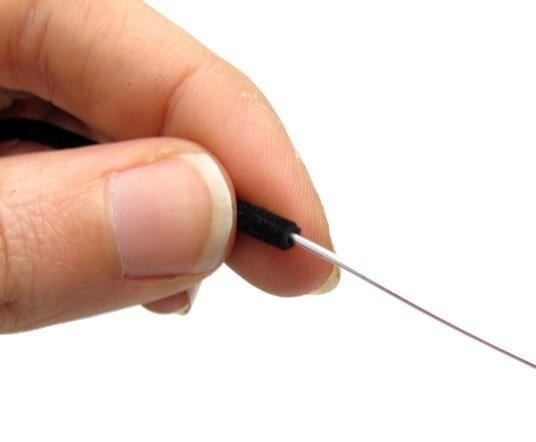
Cut your tubing to approx. 15 inches. Likewise, cut your 18ga wire to 15 inches. Carefully insert the wire the whole way into the tube.
-
 Step 2
Now form the shape using your fingers. You may like to use round nose pliers to get the swirl started, but it is not necessary. Although in theory you could actually make the shape last (after putting on all the beads), I find making it first gives more artistic control over the layout of the beads and getting it to look just right.
-
 Step 3
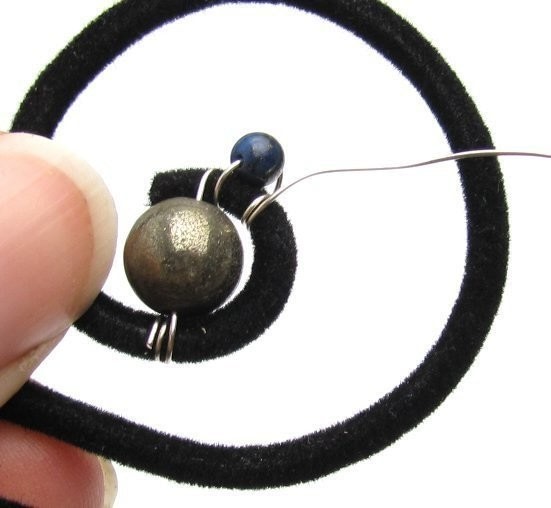
Take about 2 meters of 26 gauge wire, and wrap two or three around the tubing (about 1cm into the tube). Slide on the bead, then wrap twice around the tube on the other side of the bead. This will be the start of your wraps.
Hint: If working with two meters of wire is a bit fiddly for you, you can always start with less (say, a meter) and attach more later.
-
 Step 4
After the first two wraps on the tube, thread a 3mm bead onto the wire and wrap twice more around the tube (one complete wrap around the tube and the next wrap will hold the next bead). This is the basic technique for the rest of your beaded wraps.
-
 Step 5
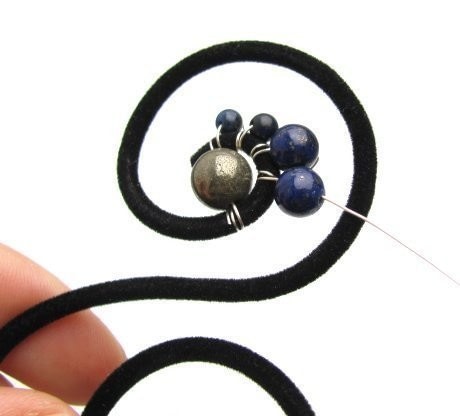
Because we want a graduated look for the beads, you will need to vary the size of the beads that you are threading on. In places that there is not much room (i.e. the start or inside of the swirl) we stick to the smaller beads. Then, as more room is available we can move the larger beads.
-
 Step 6
After completing the smaller side of the swirl, you will get to a point in the middle where you will have to swap to the other side of the tubing. This is simply done by doing one half less of a wrap before putting the next bead on.
-
 Step 7
Continue with your wrapping! On the bigger half of the swirl, we have gone up to the largest sized beads; 8mm.
-
 Step 8
After you have completed wrapping, you will need to attach the center 8mm bead in a similar way to the very first bead you put on. The difference being, this time you will wrap to the end of the tube then put the 8mm bead on. After which you will wrap a few times on the opposite side of this bead to secure it in place.
-
 Step 9
Using 6mm jump rings, attach a chain to the pendant. Simply open the jump ring up using flat nose pliers, slide the chain onto the jump ring, and find a good place to attach it to the pendant. You may have to adjust this a little to get it to hang correctly. If you make it long, you do not need clasp - just connect the chain together and slip over your head. Otherwise, it is simple to add a clasp using a couple more jump rings.
-
 Step 10
As you have been working, your swirl may have become a little misshapen, so it is a good idea to look back over it and make small adjustments so that it sits just right.
That's it!