


About
Screen Printed Storage Ottoman with Simply Screen by Plaid
I can’t tell you how long I’ve wanted to do two things: learn how to screen print, and incorporate the lovely birch trees in our backyard into one of my crafts. I have finally done both…all in one project!
In addition to the Simply Screen kit and the toy box, you will also need Simply Screen Silk Screening Paint (I used New Black, Fire Engine (red), and a blue that came with the kit), painter’s tape, a piece of glass (I used one from an 8x10 inch frame), 10-lb white paper (though I just used printer paper, which is 20 lb), a pencil, permanent pen, disappearing ink pen, white cotton fabric and a staple gun.
-
 Alissa B. favorited Screen Printed Storage Ottoman
23 Jul 19:29
Alissa B. favorited Screen Printed Storage Ottoman
23 Jul 19:29
-
 Pramodini Arela added Screen Printed Storage Ottoman to Marinette's Room (Miraculous ladybug)
08 Mar 01:40
Pramodini Arela added Screen Printed Storage Ottoman to Marinette's Room (Miraculous ladybug)
08 Mar 01:40
-
 TARA R. favorited Screen Printed Storage Ottoman
01 Jan 07:18
TARA R. favorited Screen Printed Storage Ottoman
01 Jan 07:18
-
 Syb' favorited Screen Printed Storage Ottoman
16 Oct 17:21
Syb' favorited Screen Printed Storage Ottoman
16 Oct 17:21
-
 Kitsuné favorited Screen Printed Storage Ottoman
21 Oct 02:42
Kitsuné favorited Screen Printed Storage Ottoman
21 Oct 02:42
-
marceline-the-vampire-queen m. favorited Screen Printed Storage Ottoman
16 Sep 04:00
-
 Claire M. favorited Screen Printed Storage Ottoman
12 Sep 08:30
Claire M. favorited Screen Printed Storage Ottoman
12 Sep 08:30
-
 bonii.thomson favorited Screen Printed Storage Ottoman
28 Aug 18:28
bonii.thomson favorited Screen Printed Storage Ottoman
28 Aug 18:28
-
 Amanda Wicked favorited Screen Printed Storage Ottoman
20 Aug 23:42
Amanda Wicked favorited Screen Printed Storage Ottoman
20 Aug 23:42
-
rachel a. favorited Screen Printed Storage Ottoman
20 Aug 04:47
-
 Step 1
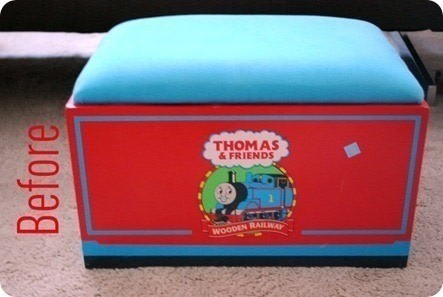
I found this toy box at Goodwill a few weeks ago. It was in really good condition, and boy do my girls love Thomas. But…I had other plans. I hid it in my bedroom closet with a tablecloth over it, so they wouldn’t see it and immediately claim it for themselves! I really wanted to use it to make something more grown-up for storage. So shhhhh…don’t tell my girls! I should mention that as I’m typing this, I’ve turned my laptop away from my girls who are sitting next to me. Despite my efforts, however, they have caught glimpses of it and exclaimed, “Thomas!” and I had to do Jedi mind tricks to put it out of their heads. Hey, can’t I have anything for myself?
-
 Step 2
To create the birch tree design, I snapped a picture of one of the trees.
-
 Step 3
I printed it out and traced an outline of the trunk and some of the branches with a permanent pen, so that I could trace it onto a piece of paper.
-
 Step 4
I manually added some texture on the tree, as well as some leaves.
-
 Step 5
Then I traced over the pencil with permanent ink. I also filled in the leaves in black. So this is one way you can create your design…you can also just print out a black and white image, and if necessary, darken the image with a permanent pen as this really helps the screen develop.
-
 Step 6
Wait til you are absolutely ready to get to work before removing your screen from the black bag in which it came, to keep it from developing prematurely. The pack that comes with the box comes with a few smaller screens that are great for testing, plus a few larger ones. I was kind of bummed that there was only one piece that was the maximum size, since my design was large. So I was nervous! They did also send a refill pack with a large piece too, but that meant I only had two chances for this design (the nearest Hobby Lobby is 1.5 hours away from me!).
-
 Step 7
As shown above, peel off the white piece of paper stuck to the screen. I expected the screen to be sticky, but it wasn’t.
-
 Step 8
Use the squeegee that comes with the kit to press down your paper, face side down, onto the screen (the side that had the paper on it).
-
 Step 9
The lack of stickiness is also why a piece of glass is useful here. You can use painters tape too, but the glass works really well to keep the paper in direct contact with the screen (to not let any light get in between the two), to get a good image on the screen.
-
 Step 10
Close the box and flip the light switch on, making sure you’re in a dim room. Allow to process for 25 minutes. I used a timer, to make sure I was exact with the time as possible (though if you let it go 30 seconds more or less, it should be ok).
-
 Step 11
After the 25 minutes, I took out the screen. I could see a faint yellow image on it (not sure if you can see it here!).
-
 Step 12
Then submerge the screen in the plastic tub that comes with the kit for 30 seconds, and start scrubbing lightly on your design. You can see on my sponge a little bit of blue on it, and the water will start to become cloudy. You’re basically removing the emulsion (the blue stuff) off the areas where your design has exposed.
What results should be a clear, silvery screen (think about your window screen…it’s like that but finer). I held up my screen out of the water a few times to check if I was removing the emulsion. Sometimes it would seem like I was removing it, but I could see some white residue on the screen still. So I kept gently scrubbing until it was as clear as possible. I think I scrubbed for 15 minutes. I would let it soak for another 30 seconds here and there. Don’t rub too hard or you might start rubbing off the emulsion on the non-exposed parts. When you’re done scrubbing, gently dry off the screen with a paper towel.
-
 Step 13
It’s time to apply the paint!!! I removed the blue cover on that came with the toy box (the cushion was still good), and wrapped my fabric around the cushion. I marked where I wanted the design to go with a disappearing ink pen.
-
 Step 14
Then I taped it down. This is why the instructions say to leave a 1/2 inch border around your design! It was hard to tape it down well because I had no space at the edges. The tape would also serve as extra “breathing room” for painting i.e. to help prevent getting ink on the sides of the design. Oh well. And…for some reason I used my design is upside down. The instructions say you don’t have to print out lettering in a mirror image. I guess the screen works on both sides!
-
 Step 15
Squirt a bead of ink along the top of the design. I was particularly nervous here about getting ink on the fabric where I didn’t want it!
-
 Step 16
Tilt the squeegee at 45 degrees and drag the paint down the screen. Using the above amount of ink, I only got halfway down the design. But it’s ok…just squirt another bead where the first dragging ended and keep going.
-
 Step 17
Remove the screen when you’re done. The moment of truth…EEK! It worked!!!
-
 Step 18
I was unhappy with the top…i guess because I was nervous about getting ink on my fabric over the top edge of the screen, I didn’t get enough ink up there.
-
 Step 19
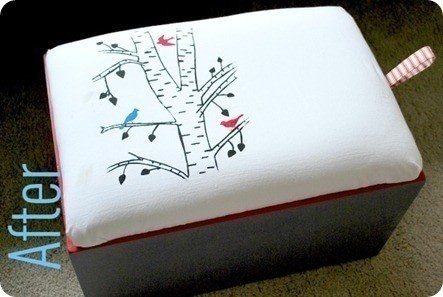
For color, I added some birds to commemorate the ones in real life that visit our trees. Birch trees produce these teeny little pine cones and they love to hang out on the branches and eat the seeds. I burned images of different bird silhouettes that I got from picnik.com. The birds were also my test to see if this would work.
-
 Step 20
I stapled the fabric onto the cushion and also added a handle on the side to help remove the lid. By the way, this was my first time reupholstering something! In addition, I covered up Thomas (sorry man, no offense) with some grey paint and kept the top edge red for some contrast.


 1
Books & Journals »
Locking Box And Journal
1
Books & Journals »
Locking Box And Journal
 2
Babies & Kids »
A Toy Kitchen For A Child
2
Babies & Kids »
A Toy Kitchen For A Child
 3
Origami Flowers »
Origami Orchid
3
Origami Flowers »
Origami Orchid
 4
Office »
Pretty Sketchbooks
4
Office »
Pretty Sketchbooks
 5
Charms & Keyrings »
Shugo Chara Inspired Pop It
5
Charms & Keyrings »
Shugo Chara Inspired Pop It
