


About
i'm only a recylced pettoy;-D We'll find a way out.!!!
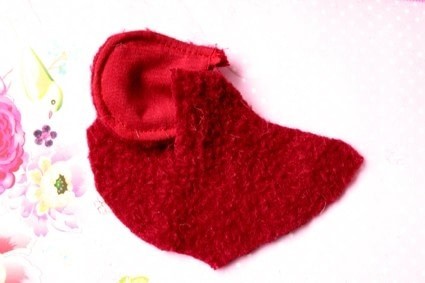
Some years ago i had made the sweater for John.
I didn't liked it to throw or give the sweater away, and because one of Johns nicknames for me was mouse, i loved to make this mouse of it.
I have made it from just one sleeve and used the old interlining as well.
for the paws and the tail and the inner ears.
Because i didn't had the right moveable parts to make the tools i have made them of other scraps i had laying around on this link you can found out that tute:
And how i made the tail you can find that part of the tute on here:
the pattern i have found many years ago in a dutch book, i didn't have written down the autor of it.
I'm sorry about that, because i knew she deserved the credit of it.
if somebody know her name, please tell me so i can give her the credit of her pattern.
i did the ears wrong i found out later but.... my sis told me he is just adorable this way.
She told me don't make for it some cloths it's allready adorable.
This kind of toys are not tooo dificult to make, so i wanted to show you how you can make your own mouse or bear by following my steps.
I wish you much fun with making your own moveable plushie toy and be creative and have fun.
I think by using differend materials it will look the whole time differend.
and of course you can blow up the pattern as well;-D
thank you for stopping by, and feel free to ask me questions;-D
Tags
Downloads
- muis_onderdelen_lijf_copyflat.pdf 589 KB [ Download ]
- been_muis_copyflat.pdf 665 KB [ Download ]
- laatste_onderdelen_muis_copyflat.pdf 318 KB [ Download ]
-
 Ec T. favorited Mouse Plushie With Moveable Limbs
23 Feb 14:25
Ec T. favorited Mouse Plushie With Moveable Limbs
23 Feb 14:25
-
 irma p. favorited Mouse Plushie With Moveable Limbs
10 May 07:49
irma p. favorited Mouse Plushie With Moveable Limbs
10 May 07:49
-
 glynisd favorited Mouse Plushie With Moveable Limbs
08 May 13:48
glynisd favorited Mouse Plushie With Moveable Limbs
08 May 13:48
-
 Wanda B. favorited Mouse Plushie With Moveable Limbs
24 Nov 19:56
Wanda B. favorited Mouse Plushie With Moveable Limbs
24 Nov 19:56
You Will Need
-
 Step 1
Download the attachments of the pattern
Print all the paterns out on paper.
Cut them out and trace them out of scraps of carton , it's much smarter to do when you will use the pattern oftenly. -
 Step 2
Lay the pattern parts on fabric which is folded in two, so you will have less problems with the revereableness of some of the parts.
like the arms , and hands the ears and both sides of the head, the legs and the under feets, the body.
i have add on every pattern piece the number how many you need of them to cut out.
Pin them down or trace them with a pen out of the fabric on the left side of the fabric.
and cut all the parts out. -
 Step 3
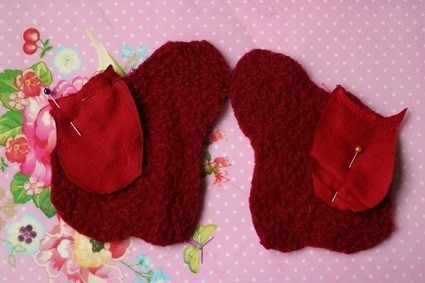
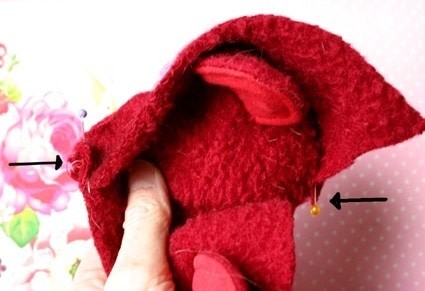
Okay we start with the arms:
you need to pin the paws on the arms like you can see on the picture.
At the left side you can see i have pin them down and on the right side i have sewed the parts together.
Do this with both arm parts.
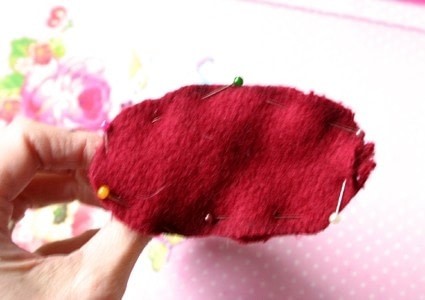
fold them out . Mayby it's smart to iron it flat. I hate ironing so i didn't have done this.LOL -
 Step 4
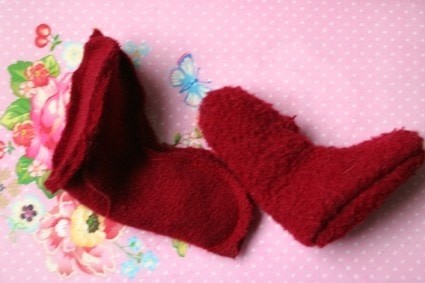
Fold the made arms in two, watch the picture.
Pin it down and sew those parts,
The space between the pins don't sew them, left that part open!!!!!! -
 Step 5
Turn the arms outside and your done with this part for now.
-
 Step 6
The body:
You have 4 parts for the body
two of A
an two of B
Pin the A part on the backside side together.
Do the same with the B parts.
by the line part you must left an open side for the tail.
watch the picture. -
 Step 7
sew those parts together , be sure you will have on the mark line a small hole for the tail later!!!
-
 Step 8
pin the both open parts together.
start by the neckparts and the bottom of both parts to pin them correctly. -
 Step 9
Sew the parts togehter
-
 Step 10
Turn the inside out, now you're done with this for now.;-D
-
 Step 11
Making the legs.
You need for the legs two leg parts and two soles.
But you must start with the leg parts.
Fold them in in two and pin the the sides down, let the sole of the legs open. and let in the middle of the leg some space free as well. -
 Step 12
Sew this part
-
 Step 13
Pick up the Sole and pin the middle of it on the top of the feet and the end. Watch the picture;-D
-
 Step 14
Pin the whole sole down on the leg.
-
 Step 15
Sew the soles on the legs and turn them inside out.
-
 Step 16
Now you have made the body and the legs and the arms.
and we must add the parts moveable on the body.
Pick up one of the legs and make with a awl a hole for the moveable tool you have made allready..
you can work the best on the left side of the parts. -
 Step 17
Slide the pin with the first disk inside the leg .
the pin will stick outside on the right side.
Turn the parts right.
. -
 Step 18
take the body and just beside the sewing line on the side of the body you must make with the awl a hole.
-
 Step 19
this is a difficult picture, you must turn a piece of the body outside to slide the pin in the body.
watch the picture. -
 Step 20
Slip the seccond disk on the pin in the inside of t he body.
You're almost done;-D!!! -
 Step 21
First spread the pinlegs and bend the legs back to the middle.
and your done with this part.
Follow for the other leg and the arms the same steps. -
 Step 22
So in the end you have something like this.
-
 Step 23
time to make the head.
At first we start with making the ears.
you need the four ears for the inner side and the outside.
Pin them together. -
 Step 24
Sew the round edges together and turn them inside out and sew this round part as well on the edge.
-
 Step 25
Pick up the sides of the head.
You have a cut inside it were the ears must be sewed. -
 Step 26
Fold the ears in a plate so they will have the same size as the cut.
pin them down and sew them.
you must do that with the other half of the side head as well. -
 Step 27
Pin the nose of both side till the neck togeher of the sidepieces. adn sew them.
watch the picture!!!!! -
 Step 28
pick up the middle part for the head.
Start to pin by the neck and the nose of the sidehead..
First you pin one side head on the middle part , -
 Step 29
Pin the other sidehead as well on the same way.
You will become something like this: -
 Step 30
sew the parts together.
-
 Step 31
turn the head inside out.
-
 Step 32
stufl the head with the polyesterstuffing.
put the first disk with the pin in the middle and pin the head closed around the pin. -
 Step 33
sew the head closed around this pin.
-
 Step 34
add the seccond disk on the pin
-
 Step 35
spread the legs of the pin and fold them down towards the middle.
Now you must lay this part in the open side of the body . -
 Step 36
Sew the body neck closed around the pin.
this is a tricky part!!!
so be patiencend.;-D -
 Step 37
stuff all the rest of the parts of your mouse.
-
 Step 38
sew the tail, and turn it inside out.
i liked it to gave the tail some body.
so i have stuffed the tail a tiny bit. -
 Step 39
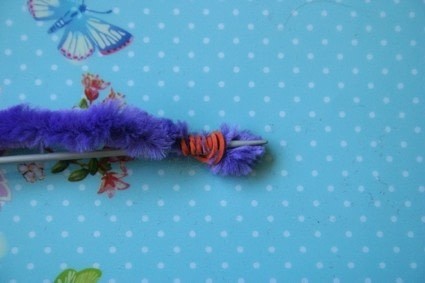
Pick a small knitting n eedle a chenille wire and a rubber band
Wrapp the end of the chenille wire on the beginning of the knitting needle with the rubber band. -
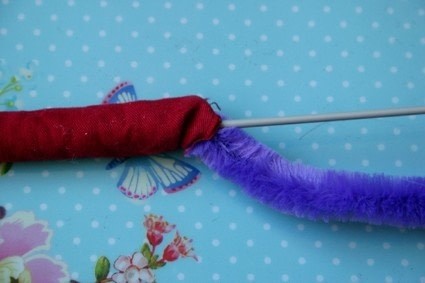
 Step 40
Pick a small knitting n eedle a chenille wire and a rubber band
Wrapp the end of the chenille wire on the beginning of the knitting needle with the rubber band. -
 Step 41
so you have stuffed your tail;-D
easy piecy.LOL -
 Step 42
Add the tail in the back hole and sew it down.
do the same with all the other holes. -
 Step 43
Okay you can use textile paint, i didn't had that, because that kind of paint was allready wrapped as well.
so i used some white glue , and paint and mixed it well. -
 Step 44
Paint the part of the mouse the nose the hands the feets the ears a little.
-
 Step 45
Eembroiding the nails on the feets and hands and the nose and mouth on the mouse.
-
 Step 46
Make with thin ironwire were you lay in some knots on both sides of the nose as winkers.
-
 Step 47
glue some gems on the head like eyes.
-
 Step 48
because i like plushies that have a looking eye i added first some white 3d paint and then some black tiny spots in it.
let it dry. -
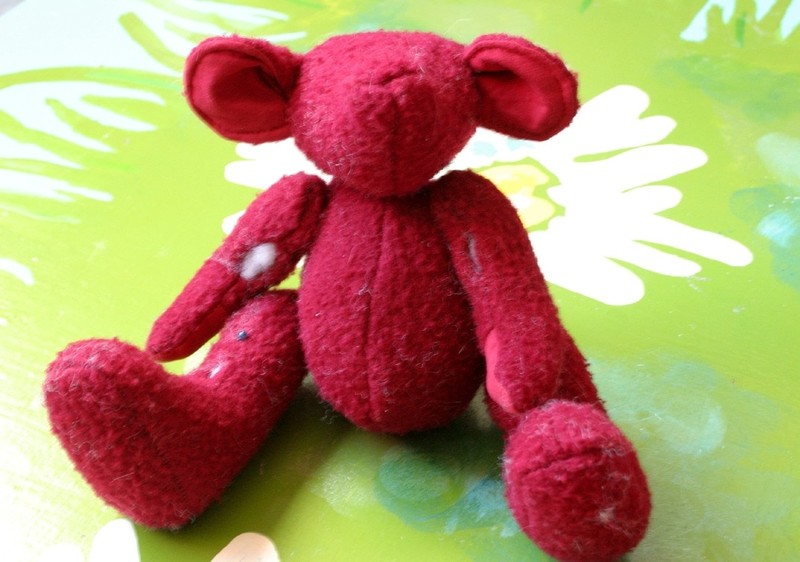
 Step 49
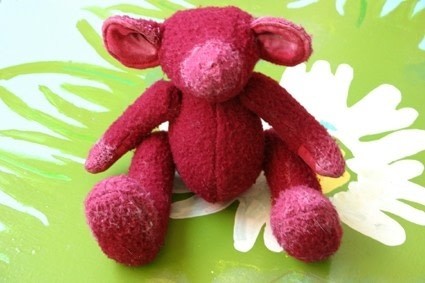
i think you are finished. i hope the tute wa s helpfull to make your own plushie with moveable limbs
be creative and have fun enjoy the new friend of yours of give him /her away.
Of course you can give the mouse some cloths to weare, but i found this must be it.thank you for stopping by;-D


 1
Watercolor Art »
Watercolor Paints Made From Make Up
1
Watercolor Art »
Watercolor Paints Made From Make Up

Well done! ^_^