


About
Halloween Glow-in-the-dark Spider in its Web
Scare your neighbours, kids and trick-or-treaters…
The spooky and scary night of Halloween which falls on the 31st October is a growing tradition that kids just love! Dressing up as a ghoul, ghost, skeleton or vampire provides fun for everyone whether trick-or-treating for sweets or simply having a party at home with a carved and lit pumpkin at the centre of your feast! So, how do you decorate your house to give it the frightening look and atmosphere that you’re after? Simply follow our step-by-step guide and create the scariest giant spider in its glow-in-the-dark web you’ll ever see! All you need is your Dremel® Glue Gun and some special glow-in-the-dark hot glue sticks which are re-activated by light to make this spooky addition to your porch or window.
You can check out more fantastic projects on the Dremel website.
Tags
-
 marie w. added Glow In The Dark Spider Web to Halloween
19 Sep 09:45
marie w. added Glow In The Dark Spider Web to Halloween
19 Sep 09:45
-
 PixieFey added Glow In The Dark Spider Web to Happy Halloween
09 Jun 09:18
PixieFey added Glow In The Dark Spider Web to Happy Halloween
09 Jun 09:18
-
 Rainbow Wyvern favorited Glow In The Dark Spider Web
05 Mar 20:55
Rainbow Wyvern favorited Glow In The Dark Spider Web
05 Mar 20:55
-
 Meow Mew commented on Glow In The Dark Spider Web
17 Aug 12:04
Meow Mew commented on Glow In The Dark Spider Web
17 Aug 12:04
-
 clarisse.cramer favorited Glow In The Dark Spider Web
30 Mar 02:36
clarisse.cramer favorited Glow In The Dark Spider Web
30 Mar 02:36
-
 Zombie Babe added Glow In The Dark Spider Web to All Hallow's Eve
03 Oct 09:11
Zombie Babe added Glow In The Dark Spider Web to All Hallow's Eve
03 Oct 09:11
-
 CookieBird Lover added Glow In The Dark Spider Web to halloween bash
03 Oct 03:05
CookieBird Lover added Glow In The Dark Spider Web to halloween bash
03 Oct 03:05
-
CookieBird Lover added Glow In The Dark Spider Web to other
08 Sep 20:02
-
CookieBird Lover added Glow In The Dark Spider Web to thing im going to make this week
08 Sep 01:17
-
CookieBird Lover favorited Glow In The Dark Spider Web
08 Sep 01:17
You Will Need
-
 Step 1
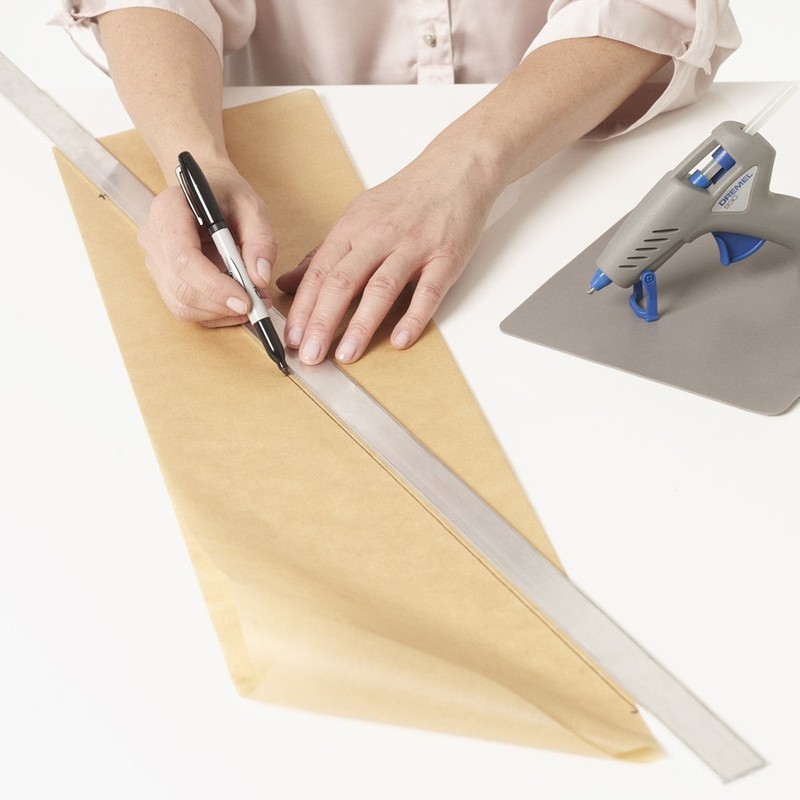
To make the spider’s web
Cut a 70cm piece of the baking parchment and fold it in half lengthways. Make a mark on the folded edge approximately 3cm in from one end. Then measure 62cm along the fold from this first mark. At right angles from this point, measure in 17cm on the parchment and mark this. Then simply draw a line to connect the 3cm mark on the fold with the 17cm in mark using a straight edge and marker pen, as shown below.
-
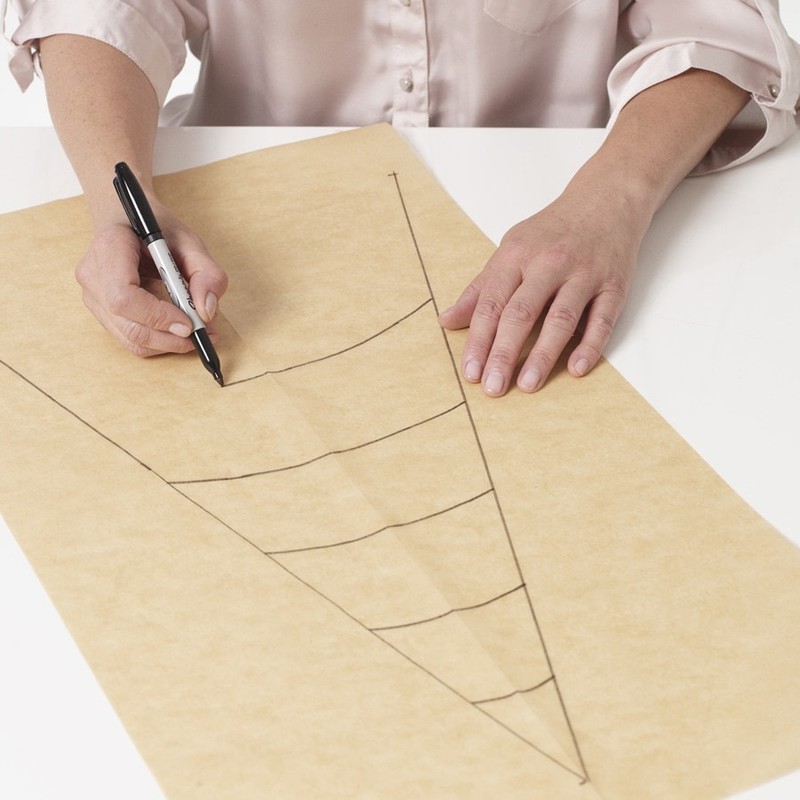
 Step 2
Then, turn the folded paper over and trace the line to transfer it onto the opposite side of the paper so that you end up with a V shape, as shown below. Using our picture as a guide, draw five slightly curved lines between V shape, making sure they begin and end at equal points on the V.
-
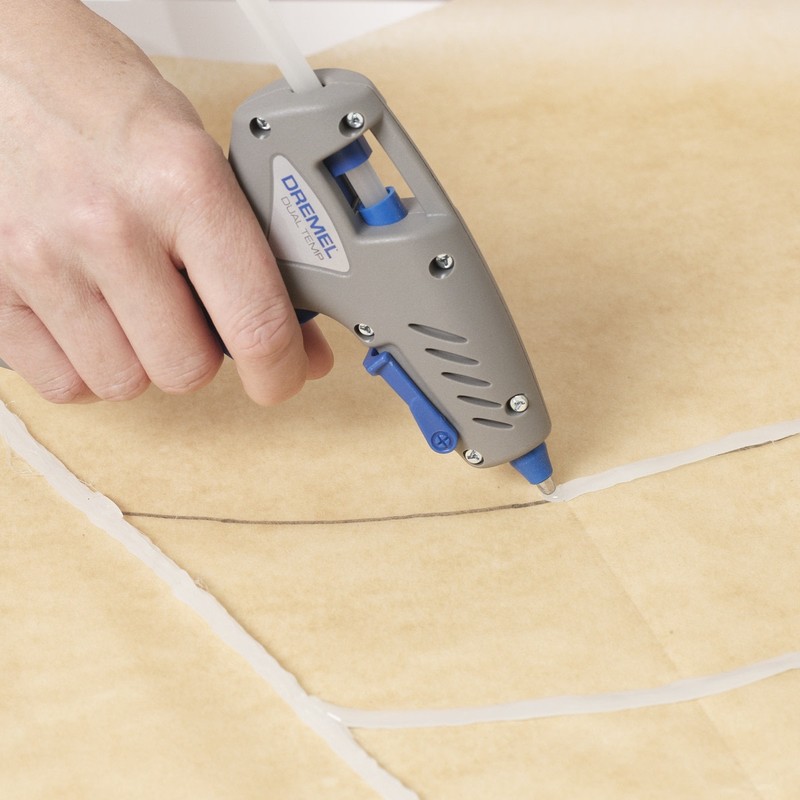
 Step 3
Now, insert a 7mm Glow-in-the-Dark glue stick into your Dremel Glue Gun and set it on the high temperature. Turn the paper over and ‘pipe’ lines of glue along the long lines marked, repeating the process two or three times to thicken the lines and create a stronger result. Connect the long lines of glue by ‘piping’ the short curved lines in between, making sure the lines connect effectively where they meet. Repeat this process five more times to make a total of six web sections.
-
 Step 4
You need to end up with 12 sections, so place a section of web either side of another V drawn onto the paper parchment as before, matching the edges. Use more glue to ‘pipe’ the curved lines in between the two sections to connect them together. This will create the first quarter of the web. To complete your web, repeat with the other sections, then join the three larger sections altogether using the same technique of aligning the sections on either side of the original drawing and using more lines of glue to fill in the gaps. Your web should be complete.
-
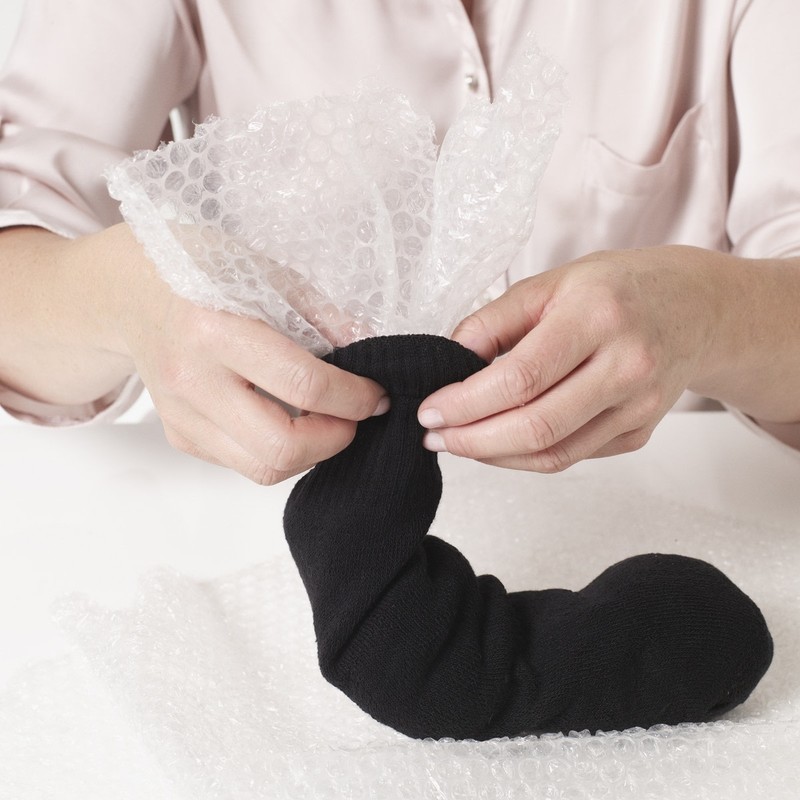
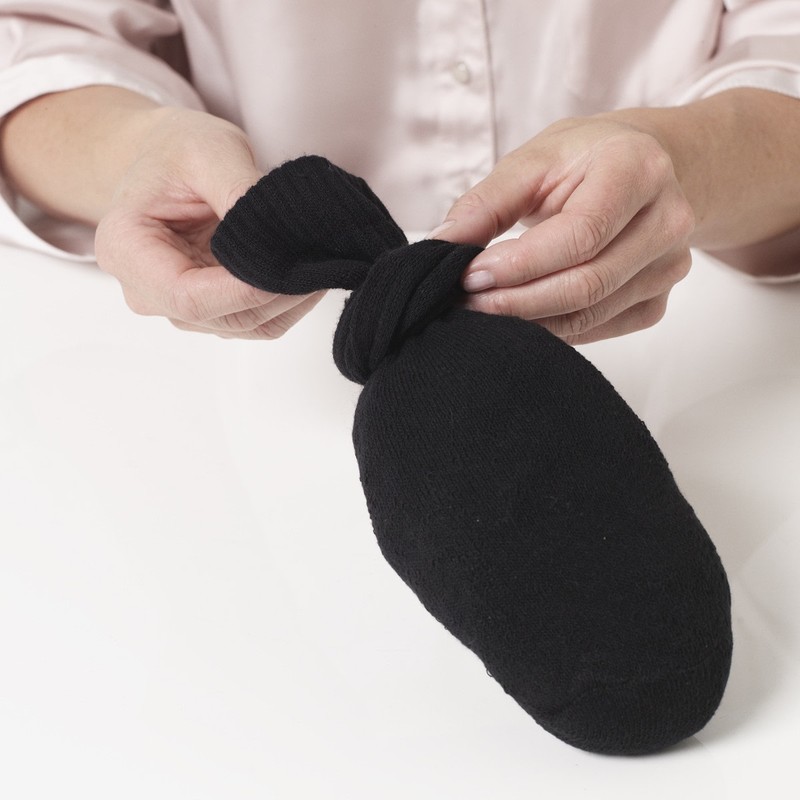
 Step 5
To make the spider :
Create the abdomen section by pushing bubble wrap inside the sock, packing it tightly to make a firm shape.
-
 Step 6
Knot the sock to contain the stuffing, making an abdomen section that is approximately 20cm long.
-
 Step 7
Take the second sock and wrap it around the knot then turn back the cuff of the first sock over the wrapped knot to form the thorax/head of the spider; the cuff will grip onto the beginning of the abdomen section and keep the contents secure.
-
 Step 8
Push the pipe cleaner through the tip of the head/thorax section and bend it to represent the feelers of the spider.
-
 Step 9
Fit a Glow in the dark glue stick into your Dremel Glue Gun and set in on a low temperature. Use the glue to outline the abdomen of the spider, applying several lines together to add definition, as shown below. Outline the thorax/head section by applying more glue in an oval shape. Apply a line of glue along each feeler.
-
Step 10
‘Scribble’ more glue onto the spiders abdomen and drop a short length of hairy yarn onto the glue, allowing it to fall randomly. Repeat the process to apply hairy yarn to the beginning of the head section, keeping it close to the abdomen.
-
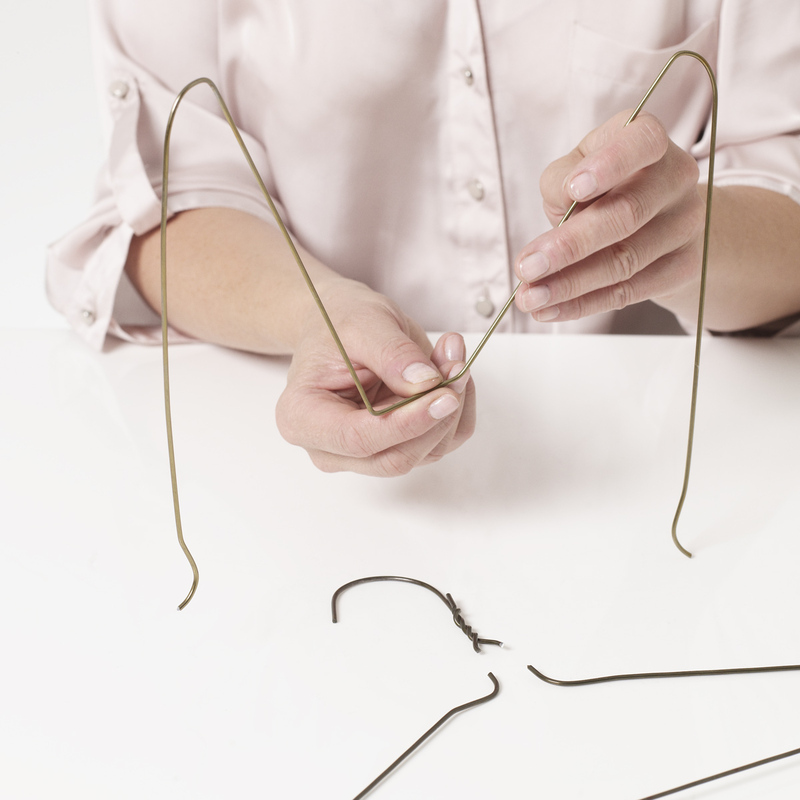
 Step 11
To make the legs, cut the hooks off four coat hangers (each coat hanger will make a pair of legs). Find the centre of the lower bar and measure and mark points approximately 2cm either side of this point. Holding the coat hanger upside-down, use your hands or pliers to bend the wire at the points marked so that the free ends open out and form an M-shape with a 4cm wide straight section in the centre. Repeat with the other three hangers.
TIP: Metal coat hangers are perfect for making the spiders legs, but if you don’t have any available you can use any metal wire that is approximately 13 gauge. -
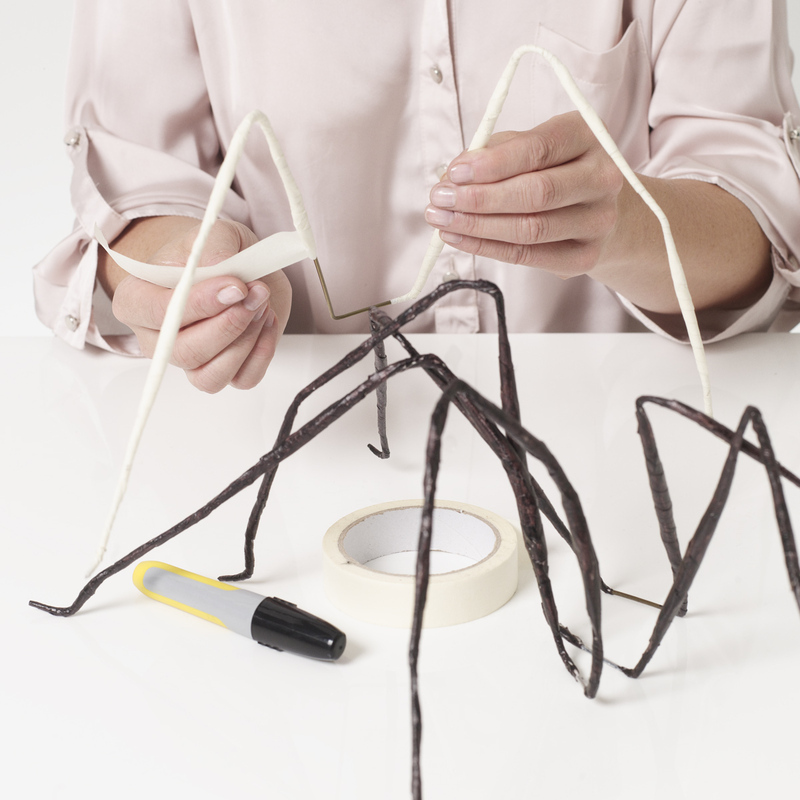
 Step 12
Wrap all the pairs of legs in masking tape, sculpting the legs to shape and making them thicker as they approach the centre section. Use the thick marker pen to colour the legs black. Place the centre wire sections together so that they are aligned. Wrap a length of masking tape around the centre sections to bind them together securely, then colour the tape as before.
-
 Step 13
Use the Glue Gun to apply glow in the dark glue to each leg, applying several lines where the legs are thicker.
Position the spiders body into the leg structure so that the legs appear to emerge from the thorax section, then glue it securely in place where the body touches the leg frame.
-
Step 14
Hanging up your cobweb and spider
To hang up your cobweb and spider, use a staple gun to staple the ends of your web onto the corners of an outside porch or stick over a window.Then open out a couple of paper clips and hook them through the knitted body of the spider, hooking the opposite ends of the paper fastener onto the web and tucking the legs on top of or behind the web to further support the spider as necessary.
Beyond that it is simply a question waiting for darkness to fall! Your web should automatically start to glow as darkness falls because it has absorbed daylight. It may only last for around 30 minutes at a time but you can reactivate it by taking pictures of it using a strong camera flashlight.


Comments


