Deer Blanket
Extract from Fairytale Blankets to Crochet • By Rowe, Lynne • Published by Search Press


About
Fairytale Blankets to Crochet
With their fluffy tails and gentle nature, it’s hard not to love a deer, especially the most important deer of all, Rudolph, who always saves the day by pulling Santa’s sleigh. I’ve added teeny antlers, cute little ears and a pompom tail to this authentic blanket that will add a spring to the step of anyone who wears it.
construction
A square-shaped corner to corner (C2C) blanket with the pockets, hood, ears and antlers crocheted separately and attached.
With pompom bunting to match the pompom tail.
skill level
Intermediate – 3
Size
To fit approximate ages: 2–4 [5–7] years
To fit height: 90–95cm (35½–37½in) [100–105cm (39½–41¼in)]
actual size
58cm (23in) [68cm (27in)] square excluding the border.
63cm (25in) [73cm (29in)] square including the border.
Hood measures approximately 37cm (14½in [41cm (16in)] across at the widest point (when measured flat).
bunting
Pompoms measure approximately 5cm (2in) (small), 7cm (2¾in) (medium) and 9cm (3½in) (large) in diameter.
Special stitches
Popcorn stitch (p-st) Using yarn B, make 5 tr, remove the hook from the working stitch, insert the hook into the top of the first of these 5 tr, replace the working loop back onto the hook and pull it all the way through the top of the first tr (1 loop on hook).
Yarn note
I used:
Yarn A: Scheepjes Stone Washed XL –
Boulder Opal (844)
Yarn B: Scheepjes Stone Washed XL – Axinite (871)
Tension
Scheepjes Stone Washed XL, approximately 5 C2C blocks to 10cm (4in) square using 5mm hook
- note -
You will refer to the basic square pattern for
the blanket.
Tags
Downloads
- 2021-05-17-124158-Chart+for+Large+Blanket.jpg 533 KB [ Download ]
- 2021-05-17-124237-Deer+chart+small_adjusted.tif 14.5 MB [ Download ]
-
 SilverSnake S. favorited Deer Blanket
30 Sep 21:45
SilverSnake S. favorited Deer Blanket
30 Sep 21:45
-
 Key West Witch favorited Deer Blanket
08 Aug 05:20
Key West Witch favorited Deer Blanket
08 Aug 05:20
-
 Beth Ann E. favorited Deer Blanket
17 Jul 05:55
Beth Ann E. favorited Deer Blanket
17 Jul 05:55
-
 Carla B. favorited Deer Blanket
19 Jun 18:47
Carla B. favorited Deer Blanket
19 Jun 18:47
-
 leentje.gorissen favorited Deer Blanket
01 Jun 19:38
leentje.gorissen favorited Deer Blanket
01 Jun 19:38
-
 Delicate Stitches favorited Deer Blanket
01 Jun 12:09
Delicate Stitches favorited Deer Blanket
01 Jun 12:09
-
 Country Mouse favorited Deer Blanket
31 May 00:26
Country Mouse favorited Deer Blanket
31 May 00:26
-
 C.J. M. added Deer Blanket to Crochet
28 May 12:30
C.J. M. added Deer Blanket to Crochet
28 May 12:30
-
C.J. M. favorited Deer Blanket
28 May 12:30
-
 Crafterella featured Deer Blanket
25 May 23:00
Crafterella featured Deer Blanket
25 May 23:00
You Will Need
-
 Step 1
Basic Square Pattern
Square pattern
With specified hook and yarn, make a slip knot.
Increasing rows
Row 1 (RS): 6 ch, tr in fourth ch from the hook, tr in each of the next 2 ch, turn (one block made) (see Basic techniques: C2C increasing, steps 1–4).
Row 2: 6 ch, tr in fourth ch from the hook, tr in each of the next 2 ch (one block made), miss the next 3 tr of the next block, sl st into the space before the 3 ch at end of same block, (3 ch, 3 tr) in the 3-ch sp (one block made), turn (two blocks in total) (see Basic techniques: C2C increasing, steps 5–9).
Row 3: 6 ch, tr in fourth ch from the hook, tr in each of the next 2 ch (one block made), *miss the next 3 tr of the next block, sl st into the space before the 3 ch at end of same block, (3 ch, 3 tr) in the 3-ch sp (one block made); rep from * to the end, turn (three blocks in total) (see Basic techniques: C2C increasing, steps 10 and 11).
Row 3 sets the C2C pattern, which increases one C2C block at the beginning of each row.
Continue to repeat row 3, thus increasing by one C2C block on each row, until you have worked the specified number of rows, or reached the specified length as given in your pattern.
Now you will decrease as follows:
Decreasing rows
Next row: sl st into each of the next 3 tr, *sl st into the space before the next 3 ch at the end of the block, work (3 ch, 3 tr) into the same space (one block made); rep from * until one block remains, sl st into the space before the 3 ch at end of last block, turn (without creating a block in the last space) (see Basic techniques: C2C decreasing, steps 1–5).
Repeat the last row until you have decreased to just one block (see Basic techniques: C2C decreasing, step 6).
Fasten off. -
Step 2
Main blanket
Using yarn A and 5mm hook, make a slip knot.
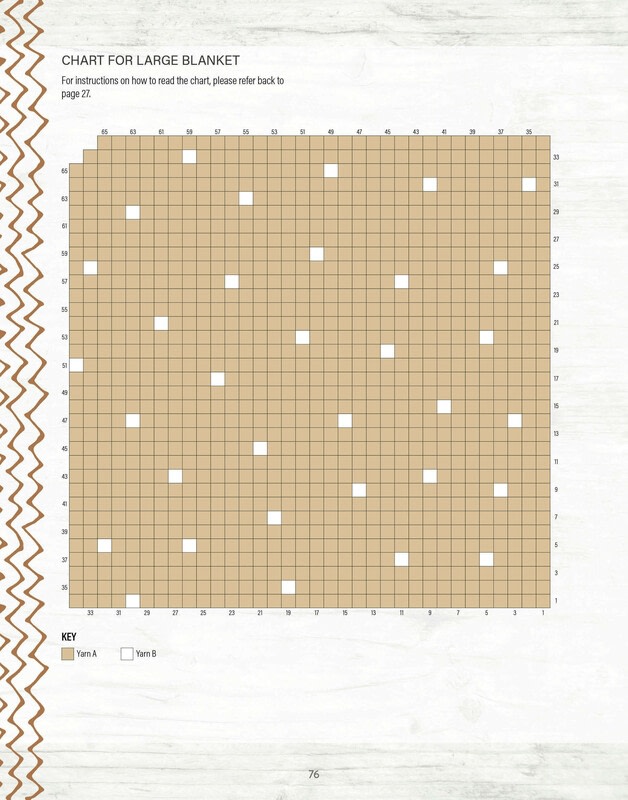
Work a basic square blanket as directed below and at the same time, follow the chart for your chosen size, making the yarn B ‘spots’ where positioned on the chart. Note that the charts are provided as a guide for placement and, if desired, you can simply position your spots randomly instead of following the charts provided.
Work each yarn B spot as follows:
Change to yarn B before working the beginning sl st of the C2C block (see Basic techniques: Changing colour when following a chart).
In yarn B, 3 ch, p-st into the same 3-ch sp, change back to yarn A before working the first sl st of next block.
Continue in yarn A until you reach the next yarn B spot on the chart, and work as above.
Follow the basic square blanket pattern:
• Increase to 29 [34] blocks (or until straight sides measure 58cm (23in) [68cm (27in)]).
• Decrease to 3 [3] blocks.
Next row (to straighten the edge): sl st in each of the next 3 tr, sl st into the top of the 3 ch at the end of the block, now working along the zigzag edge, *tr in the next st, htr in the next st, dc in the next st, sl st into the top of the next 3 ch (one block filled in); rep from * to the end (see Basic techniques: Straightening the zigzag edge). This is the hood edge.
Fasten off. -
Step 3
For instructions on how to read the chart, please refer back to the chart.
With RS facing, rejoin yarn A at the tail end of the blanket (the opposite end to the hood), by working a sl st into the st at the tip of blanket.
-
Step 4
foundation edge
Round 1: 1 ch (does not count as a st), (dc, 2 ch, dc) in the same st, 2 ch, *dc between next C2C blocks, 2 ch*; rep from * to * along the first edge of the blanket to next point (this will be the tip of the pocket), work (dc, 2 ch, dc) into the pocket tip, 2 ch, then work from * to * until you reach the straight edge for the hood, dc in the first stitch of the straight edge, 2 ch, (miss next 2 sts, dc in next st, 2 ch) to the end of the straight edge, rep from * to * until you reach the tip of where the next pocket will be, work (dc, 2 ch, dc) into the pocket tip, 2 ch, then work from * to * until you reach the end, sl st in the first dc. -
Step 5
blanket border
Next round: sl st in the next 2-ch sp of corner, (3 ch, 2 tr) in the same corner sp, 2 tr in each ch sp and 1 tr in each dc around, working 3 tr in each corner sp, sl st into the top of the beginning 3 ch.
Next round (worked in BLO throughout): sl st in the next tr, 1 ch, 3 dc in the next tr (this is the centre tr of the corner sts), dc in BLO of each st around and 3 dc in each corner st, sl st in the first dc and fasten off. -
Step 6
Pockets (make two)
Using yarn A and 5mm hook, make a slip knot.
Follow the basic square blanket pattern:
• Work 8 [10] rows.
Next row (to straighten the edge): sl st in each of the next 3 tr, sl st into the top of the 3 ch at the end of the block, now working along the zigzag edge, *tr in the next st, htr in the next st, dc in the next st, sl st into the top of the next 3 ch (one block filled in); rep from * to the end (see Basic techniques: Straightening the zigzag edge).
Do not fasten off, instead continue with the border (around the first two sides of pocket only).
First border row: 1 ch (does not count as a st throughout), (dc, 2 ch, dc) in the same st, 2 ch, *dc between next C2C blocks, 2 ch*; rep from * to * along the first edge of the pocket to the tip of the pocket, work (dc, 2 ch, dc) into the pocket tip then work from * to * along the next edge of the pocket, turn and leave remaining edge unworked.
Second border row: sl st in the first dc and sl st into the 2-ch sp of corner, (3 ch, 2 tr) in the same corner sp, 2 tr in each ch sp and 1 tr in each dc around, working 3 tr in each corner sp, turn and leave remaining edge unworked.
Third border row (worked in BLO throughout): 1 ch, dc in BLO of each st around, when you reach the end of the second edge, do not turn, work along the unworked straight edge of pocket by working in dc evenly along, working into the sides of the sts from the border rows at each end and working into the back loop of each st from the long straight edge of the pocket. When you reach the opposite side, fasten off.
Place blanket flat with WS uppermost. Position the pockets at opposite edges of the blanket (placing WS of pockets to WS of blanket). Use stitch markers to hold in place and whip stitch together using matching yarn, through the BLO of the corresponding stitches (see Basic techniques: Joining pieces). -
Step 7
Hood
Using yarn A and 5mm hook, make 14 ch.
Row 1: tr in fourth ch from hook, tr in each of the next 2 ch (first C2C block made), sl st in next ch, 3 ch, tr in each of the next 3 ch, sl st in next ch, 3 ch, tr in each of last 3 ch, turn (three blocks made).
Next rows: continue as given for basic square blanket for row 3, until 12 [14] C2C blocks have been made.
Do not fasten off, instead continue with the border, following the first and second border rows as given for the pockets, but do not turn at the end of the second border row, instead continue along the unworked straight edge of the hood, by working in dc evenly along, working into the sides of the sts from the border rows at each end and working into the back loops of each st from the long edge of the hood. When you reach the opposite side, fasten off.
Position hood in place, following instructions for pockets and whip stitch to main blanket through BLO of the corresponding stitches. -
 Step 8
Ears
Outer ears (make two)
Using yarn A and 5mm hook, make a magic loop (see Basic techniques: Making a magic loop). Work in rows, turning after each row.
Row 1 (RS): 3 ch (counts as a first tr throughout), 9 tr into the loop, turn (10 sts).
Row 2: 4 ch (counts as first dtr), dtr in the same st at the base of the beginning 4 ch, 2 dtr in each of the next 2 sts, 2 tr in each of the next 2 sts, 2 ch, 2 tr in each of the next 2 sts, 2 dtr in each of the next 3 sts, turn (20 sts and a 2-ch sp).
Row 3: 3 ch, tr in the same st at the base of the beginning 3 ch, (tr in the next st, 2 tr in the next st) twice, dtr in the next st, (2 dtr in the next st, dtr in the next st) twice, 3 dtr in the centre 2-ch sp, (dtr in the next st, 2 dtr in the next st) twice, dtr in the next st, (2 tr in the next st, tr in the next st) twice, 2 tr in the last st (33 sts).
Fasten off. Pinch the base together and sew for approximately 1.5cm (½in) to create a small pocket to slide the inner ear into.
Inner ears (make two)
Using yarn B and 5mm hook, make a magic loop (see Basic techniques: Making a magic loop). Work in rows, turning after each row.
Row 1 (RS): 3 ch (counts as first tr), 9 tr into the loop, turn (10 sts).
Row 2: 4 ch (counts as first dtr), dtr in the same st at the base of the beginning 4 ch, 2 dtr in each of the next 2 sts, 2 tr in each of the next 4 sts, 2 dtr in each of the next 3 sts, turn (20 sts).
Row 3: 1 ch (does not count as a st), dc in the same st at the base of the beginning 1 ch, dc in each of the next 6 sts, 2 htr in each of the next 6 sts, dc in each of the next 7 sts (26 sts).
Fasten off. Pinch the base together and sew for approximately 1.5cm (½in).
Slide the inner ear into the outer ear and sew a few stitches at the base to secure the pieces together. -
Step 9
Antlers (make two)
Short pieces
Using yarn B and 5mm hook, make a magic loop and work in a spiral (see Basic techniques: Making a magic loop).
Round 1: 6 dc into the loop (6 sts).
Rounds 2–5 [6]: dc in each st, sl st in next st on the last round and fasten off.
Long pieces
Work exactly as given for short pieces to the end of round 5 [6], do not sl st into next st.
Next 3 [4] rounds: dc in each st.
Next round (joining round): working into long piece, dc in the next st, dc2tog, dc in each of the next 2 sts, dc2tog over the last st of the long piece and the first st of the short piece, dc in each of the next 2 sts of short piece, dc2tog, dc in last st of short piece (9 sts).
Next round (dec round): dc2tog, dc in each remaining st (8 sts).
Next 2 rounds: dc in each st.
Fill both pieces firmly with toy filling.
Next round (dec round): dc2tog, dc in each remaining st (7 sts).
Next 3 [4] rounds: dc in each st, sl st in next st on the last round and fasten off.
Add more toy filling to create a firm piece.
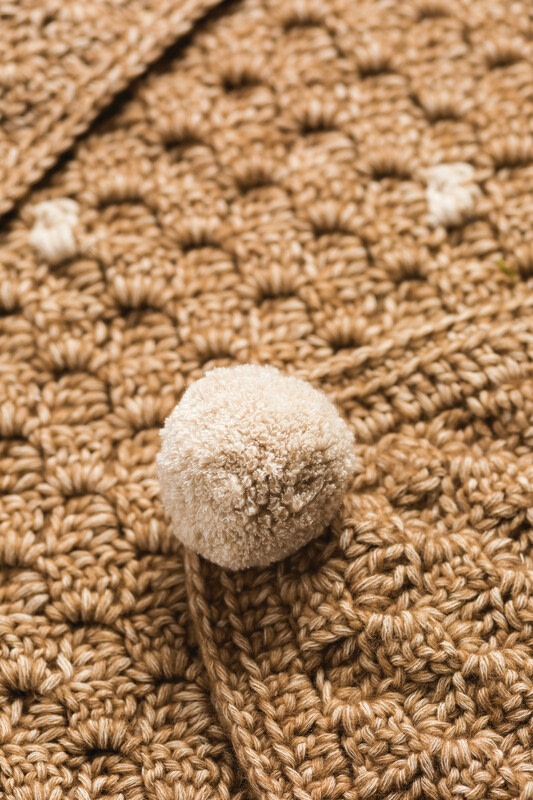
Place each antler behind the base of each ear and sew in place. Pin into position on head using the photo as a guide and sew firmly in place to blanket, so that the ears and antlers do not fall forward (see Basic techniques: Joining pieces). -
 Step 10
Pompom tail
Using yarn B, make a medium sized pompom and sew it to the tail end of the blanket. You can leave it rounded in shape or, if desired, you could carefully trim it into a tear-shaped pompom by trimming one half into a point.