


About
Carve a crested bird
The three bird projects in this chapter are very simple to carve, relying mostly on paring cuts. You don’t even need to use a professional knife—an X-ACTO hobby knife will do just fine, so you can try out the carving techniques before committing yourself to purchasing any expensive equipment. Carving the three birds will also help you to build your hand strength and control— crucial factors when you come to the more complex projects later in the book.
TIP
As a general tip, always carve the most intricate details last, because they are the most delicate.
-
 Sarah Sylvia S. favorited Crested Bird
20 Jul 23:55
Sarah Sylvia S. favorited Crested Bird
20 Jul 23:55
-
 Emma H. favorited Crested Bird
27 May 13:18
Emma H. favorited Crested Bird
27 May 13:18
-
 Sandra C. added Crested Bird to Manualitats
18 May 16:32
Sandra C. added Crested Bird to Manualitats
18 May 16:32
-
 Millie H. added Crested Bird to cool ideas
22 Mar 16:13
Millie H. added Crested Bird to cool ideas
22 Mar 16:13
-
 Kelly K. favorited Crested Bird
02 Dec 01:00
Kelly K. favorited Crested Bird
02 Dec 01:00
-
 Karen Davis favorited Crested Bird
19 Nov 01:46
Karen Davis favorited Crested Bird
19 Nov 01:46
-
 ale_corason favorited Crested Bird
13 Nov 06:44
ale_corason favorited Crested Bird
13 Nov 06:44
-
 Pam ^_^ favorited Crested Bird
13 Nov 06:12
Pam ^_^ favorited Crested Bird
13 Nov 06:12
-
 Regina K. favorited Crested Bird
12 Nov 20:22
Regina K. favorited Crested Bird
12 Nov 20:22
-
 Step 1
First, use a pencil to draw
a rough outline of the bird onto the longest side of your wood block—the long dimension should also be in the direction of the wood grain. The drawing will serve as a rough guide for the carving. -
 Step 2
Establish the tail by carving out a large chunk under the tail, using your drawing as a guide. Make smooth, straight paring cuts along the diagonal line from the bottom to the tip.
-
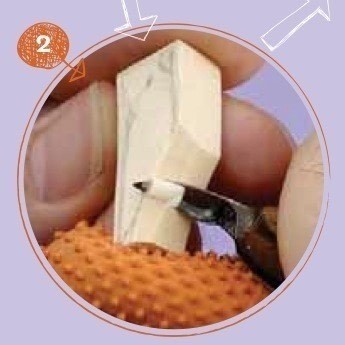
 Step 3
Narrow the sides of the head 5 by cutting away a small section from each side. Use paring
strokes and only cut a small amount at a time. Leave the
tip (where the beak will be) blunt for now, and don’t worry about creating too much detail—we will return to the head later. -
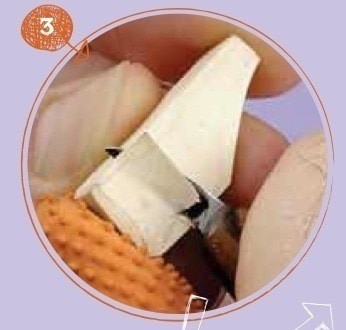
 Step 4
Round off the bird’s belly— the area between the head and the bottom of the tail. Cut away the straight edges on both sides and aim for a plump, rounded look—but again, don’t worry too much about the finer details at this stage.
-
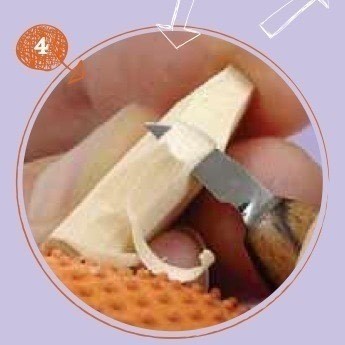
 Step 5
Still using the paring technique, cut away the sharper angles along the top and bottom to round out the overall bird shape. Keep referring back to the picture of the finished figure so you can see the end result you’re aiming for.
-
 Step 6
Establish the crest on the top of the bird’s head, using a notch cut. Cut into the wood at an angle from one side, then the opposite side, to create a point on the top of the head. Don’t do it all at once—make two, three, or four notch cuts until you reach the required depth.
-
 Step 7
Make a small notch cut to establish the neck, creating
a clear division between the crest and the bird’s back. This requires control—don’t go too deep, but cut the notch from both sides, gently. (You may find it easier to turn the figure around instead of the knife, so you are making both cuts in the same direction.) -
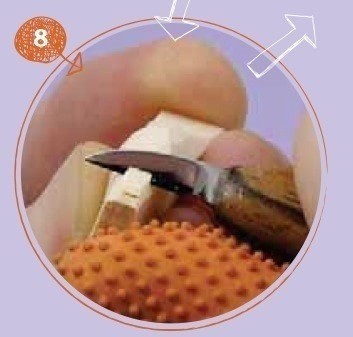
 Step 8
Make further notch cuts to create the bottom of the beak, where it points forward from the head. Be careful not to cut off the beak section, and don’t try to do it all at once—it may take up to six small notch cuts to achieve the desired angle.
-
 Step 9
Establish the top of the
beak, using notch cuts to differentiate it from the bottom of the crest. You’ll be cutting into the grain, so cut in from the edges to make it easier. Make sure your blade is really sharp; if it’s too blunt, you will lack control and you’ll have to push too hard, which may break the wood. -
 Step 10
Taper the tail by cutting
away the sharp edges, using smooth paring strokes to give the bird a more streamlined appearance. This stage may require six or more cuts. -
 Step 11
Round off the underside of the tail. Make 20 or so very small paring cuts to tidy up the tail and blend it in with the belly.
-
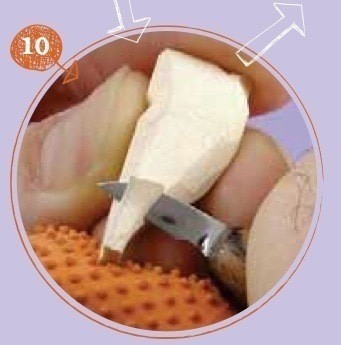
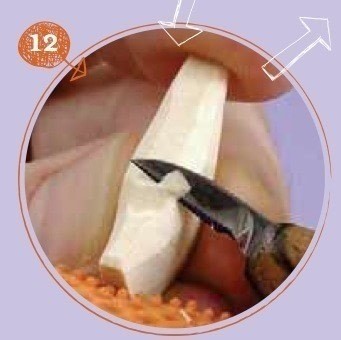
 Step 12
Round off the edges of the notch at the top of the neck, where it meets the bottom
of the crest. Cut toward the crest, but be careful not to
cut into the crest itself. The shavings may need to be sliced off from the other side so that you don’t smooth away the clear division between the neck and the crest. -
 Step 13
Clean up the bottom of the neck in the same way, cutting toward the beak. Again, be careful not to cut off the beak or overwork the area. Eight small cuts should be enough.
-
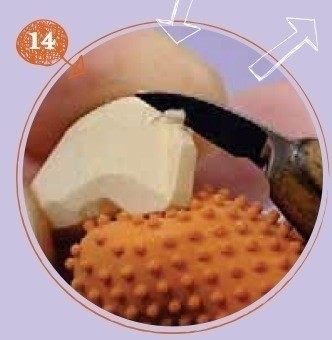
 Step 14
Add detail to the beak. Just
as when you established the beak, you’ll be cutting into the grain, so be extra careful. Give the beak four clear sides, making refined cuts in from the tip of the beak toward
the head. You may want
to remove the shavings by cutting in from the head end instead of scooping them away with the blade at the end of the cut. -
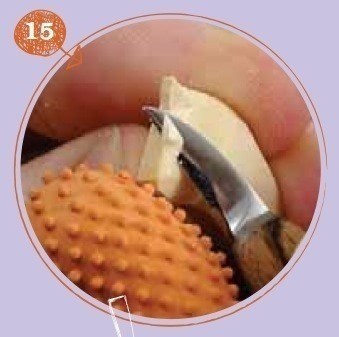
 Step 15
Round off the edges of the crest, using paring cuts to remove any sharp angles.
-
 Step 16
Take a good look at your figure and round off any edges that look too square, such as the front of the crest in this example. But don’t get carried away—if you cut off any of the detail, you can’t put it back! Finish with sandpaper, drill a hole for your toothpick, and you’re ready to paint.


 1
Home Accessories »
Diy Jewelry Box
1
Home Accessories »
Diy Jewelry Box
