
Classic Zombie
Extract from Zombie Felties • By Nicola Tedman and Sarah Skeate • Published by Andrews McMeel Publishing


About
Sew a zombie feltie.
Graying flesh dropping from exposed teeth? Check. Spiky wisps of hair sticking out all over? Check. Moldy bandages trailing around lurching limbs? Check. It's a classic zombie: the one's that's graced a thousand B movies. Coming soon to a sewing table near you.
Tags
© 2024 Nicola Tedman & Sarah Skeate / Andrews McMeel Publishing · Reproduced with permission.
-
 Key West Witch favorited Classic Zombie
05 May 07:36
Key West Witch favorited Classic Zombie
05 May 07:36
-
 Pilar G. favorited Classic Zombie
16 Feb 02:21
Pilar G. favorited Classic Zombie
16 Feb 02:21
-
 olivoyle favorited Classic Zombie
29 May 09:45
olivoyle favorited Classic Zombie
29 May 09:45
-
 Lauren H. favorited Classic Zombie
21 Jun 23:52
Lauren H. favorited Classic Zombie
21 Jun 23:52
-
 Crafty Bashly favorited Classic Zombie
11 Feb 21:33
Crafty Bashly favorited Classic Zombie
11 Feb 21:33
-
 allyson_wunderland favorited Classic Zombie
14 Sep 04:15
allyson_wunderland favorited Classic Zombie
14 Sep 04:15
-
 AIcha C. favorited Classic Zombie
14 Jun 15:06
AIcha C. favorited Classic Zombie
14 Jun 15:06
-
 Rosie R. favorited Classic Zombie
21 Apr 21:47
Rosie R. favorited Classic Zombie
21 Apr 21:47
-
 Kayleigh W. favorited Classic Zombie
13 Mar 20:36
Kayleigh W. favorited Classic Zombie
13 Mar 20:36
-
 DMGINC favorited Classic Zombie
11 Feb 23:46
DMGINC favorited Classic Zombie
11 Feb 23:46
You Will Need
-
 Step 1
Cut out all the felt pieces as marked. Stick the nose piece in place on one of the head pieces with craft glue. Thread a beading needle with 2 strand of black floss and stitch the black bugle beads in place on the nose piece.
-
 Step 2
Thread a beading needle with 1 strand of white floss and stitch the 4 white bugle beads in place under the nose to make teeth. Thread an embroidery needle with 6 strands of black floss and sew a large cross stitch where the zombie's left eye will dangle. Thread a beading needle with 2 strands of black floss and sew the right eye in place by taking the needle through the felt, then through the black sequin, the smaller of the 2 round white beads, and one of the tiny black beads, then back through the larger bead, the sequin, and the felt.
-
 Step 3
Add the dangling eyeball; Thread a beading needle with 2 strands of red floss and push it from the wrong side of the felt through the center of the cross stitch the makes the left eye. Feed first the second tiny black bed and then the larger round white bead onto it. Thread the needle back through the center of the white bead, then sew the floss back through the felt, leaving enough slack for the eyeball to dangle to the cheek. When the loop is the right length, bring the floss back through from the wrong side of the felt and wind more red floss around the loop of the eyeball to strengthen it. Finish off the floss on the wrong side of the felt.
Glue the bandage across the left-hand top of the head, taking the ends around to the back.
-
 Step 4
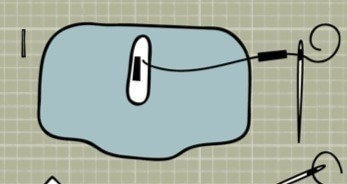
Cut the necklace cord into 10 even lengths an glue them in place on the inside of the second head piece. Thread an embroidery needle with 1 strand of pale gray floss, align the 2 head pieces, and sew them together with a small overstitch. Leave a gap at the base and pad the head lightly with wisps of stuffing, using a matchstick or tweezers to help you. Then stitch the gap closed.
-
 Step 5
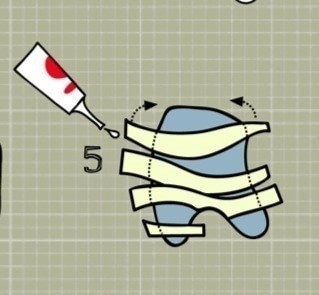
Add the 4 body bandages to the front of one of the body pieces, glueing them in place and taking the ends around to the wrong side of the felt.
-
 Step 6
Glue the single arm unit to the wrong side of the second body piece, very slightly below the top edge. Wrap and glue the arm bandage twice around the right arm.
-
 Step 7
Thread an embroidery needle with 1 strand of dark gray floss, align the body pieces, and stitch them together using a small overstitch. Pass the needle to the side of the bandages so that the stitches don't show. Leave the neck open. Pad the body with wisps of stuffing, using a matchstick or tweezers to fill it evenly. Stitch the body closed.
-
 Step 8
Thread an embroidery needle with 2 strands of dark gray floss and stitch the body to the back of the head. Finally, trim the spikes of hair to make raggedly different lengths.


love it!