


About
'Tis ALMOST the season
Just a cute little addition to your Christmas table. It's a very versatile way to decorate a cake, so go nuts and have fun! This will be a tutorial for how to achieve the basic structure and decoration of the cake, not a recipe for the cake itself. You can use any recipe you like, choose your favourite! I went with classic chocolate.
Tags
-
 hannah g. published her project Christmas Wreath Cake
09 Oct 07:37
hannah g. published her project Christmas Wreath Cake
09 Oct 07:37
-
 Step 1
Mix cake batter using your chosen recipe. Be sure to properly prepare your Bundt cake pan, coating the inside with butter to prevent your cake from sticking. It's necessary that you use this kind of pan or a similar one in order to achieve the rounded shape with a hole in the middle. However, in a pinch you can use whatever you have at hand and then carve the shape out for yourself.
Be sure to make extra batter to make a few small cupcakes, or save those carved off pieces. We'll need the extra cake later!
-
Step 2
Once baked, allow your cake to cool and prepare your buttercream (whether store-bought or homemade). Take green food colouring and some buttercream, mixing it until you achieve an even and smooth colour throughout it. Cover the whole cake in a thin coating (ensuring that its completely cool or it'll all melt off!). Allow this crumb coating to sit and turn to your extra cake bits.
These will be made into cake pops and turned into the Christmas baubles on the cake. There are plenty of cake-pop tutorials out there, but basically, you'll be crumbling the cake down and mixing it with buttercream to create a mouldable cake mixture which you will roll into small balls. Compare these to the size of your cake to ensure they aren't too big to fit on, but they can be whatever size you like. I would refrain from making them too big, else it may become difficult to stick them on the cake if they are heavy.
Roll out your fondant and cut circles big enough to cover your cake pops. Smooth it nicely and shape it to the cake, don't worry if the pop is slightly exposed at the back, that won't be seen once its stuck to the cake.
-
 Step 3
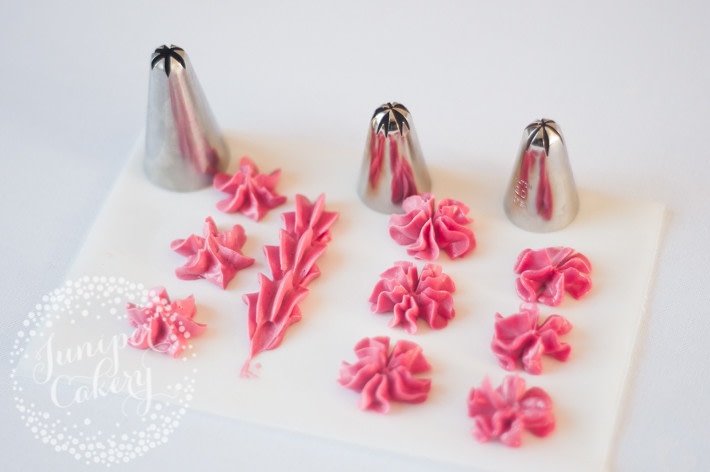
Fill your piping bag with green buttercream icing and prepare yourself for the longest portion of this process. Using a tip similar to those pictured here, you will be piping small spikes all over the cake. This is a simple step (as long as your buttercream is the correct consistency), but can be time-consuming. The hardest part is piping inside the hole, be careful not to touch the side of your bag or hands against the cake and ruin your work!
-
Step 4
Once the whole cake is covered, you can add on your cake pops. Place them where desired, sticking them down using buttercream (edible glue may also help, and if you're having real difficulty you can use small wooden dowling rods). Be sure to leave room for other embellishments and a big Christmas bow if you intend on using them.
-
 Step 5
Get out your edible cake decorations and go nuts! Sprinkles, pearls, the whole lot. I went very simple with mine and just used small golden sugar confetti pieces.
-
 Step 6
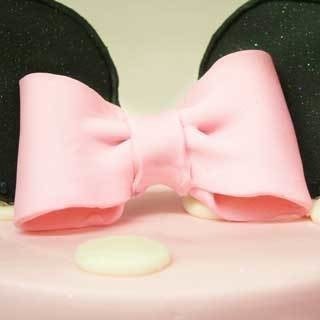
To make your 3D fondant bow, simply roll your fondant out until its relatively thin, then cut out a long rectangle ensuring that it isn't too thick. Take either side of the rectangle strip and pull them towards the middle of the strip until they meet (as if you're making a fondant ring), then gently press the ends down into the middle of the strip. Cut a smaller band of fondant and lay this over the section where the ends meet, pinching it inwards as you do so. The ends of this smaller strip should be hidden behind the bow and thus not be seen.
If you'd like strands of ribbon coming down from the bow like on my cake, simply roll and cut those strips, attach them underneath the bow and ensure that the ends cannot be seen. You can choose to cut a small 'V' shape into the end of the ribbon, or leave it as is. Once you've added your fondant bow, you're done! If this step was too hard, you can try a 2D bow or even purchase bow fondant moulds to help you out. There are many ways to create a fondant bow, this one is just the one I use.


 1
Home Accessories »
Diy Jewelry Box
1
Home Accessories »
Diy Jewelry Box


