


About
Fresh herbs, at your fingertips!
I love fresh herbs, fruit and vegetables-- I grew up used to having a huge garden in the yard. Now, I live in a townhouse where groundspace is at a premium (and most of the good stuff doesn't belong to me.) I tried a small herb garden last summer in a plastic sweater container, but didn't really get it started soon enough. This year, I vowed to start early.
Some of these pictures are staged-- I wanted to wait until something started growing to make sure it would work. Further, the main picture isn't mine-- my herbs aren't that big yet, but I wanted to give you an idea of what it might/could look like at the end.
-
 Key West Witch favorited Windowsill Herb Garden
26 Jun 09:42
Key West Witch favorited Windowsill Herb Garden
26 Jun 09:42
-
 Pam added Windowsill Herb Garden to Hobbit Hole
22 Mar 20:15
Pam added Windowsill Herb Garden to Hobbit Hole
22 Mar 20:15
-
 Cat Morley added Windowsill Herb Garden to Balcony Garden
09 Feb 17:03
Cat Morley added Windowsill Herb Garden to Balcony Garden
09 Feb 17:03
-
Cat Morley commented on Windowsill Herb Garden
09 Feb 17:03
-
 Denise favorited Windowsill Herb Garden
14 Jan 19:56
Denise favorited Windowsill Herb Garden
14 Jan 19:56
-
 zoegirl221 added Windowsill Herb Garden to Garden
15 Sep 22:52
zoegirl221 added Windowsill Herb Garden to Garden
15 Sep 22:52
-
 greenstyle favorited Windowsill Herb Garden
21 Jul 19:48
greenstyle favorited Windowsill Herb Garden
21 Jul 19:48
-
 Tina L. favorited Windowsill Herb Garden
21 Jul 03:50
Tina L. favorited Windowsill Herb Garden
21 Jul 03:50
-
 notdeadredhead added Windowsill Herb Garden to Gardening
19 Jul 02:52
notdeadredhead added Windowsill Herb Garden to Gardening
19 Jul 02:52
-
notdeadredhead favorited Windowsill Herb Garden
19 Jul 02:51
-
 Step 1
Gather your materials:
1. Potting soil
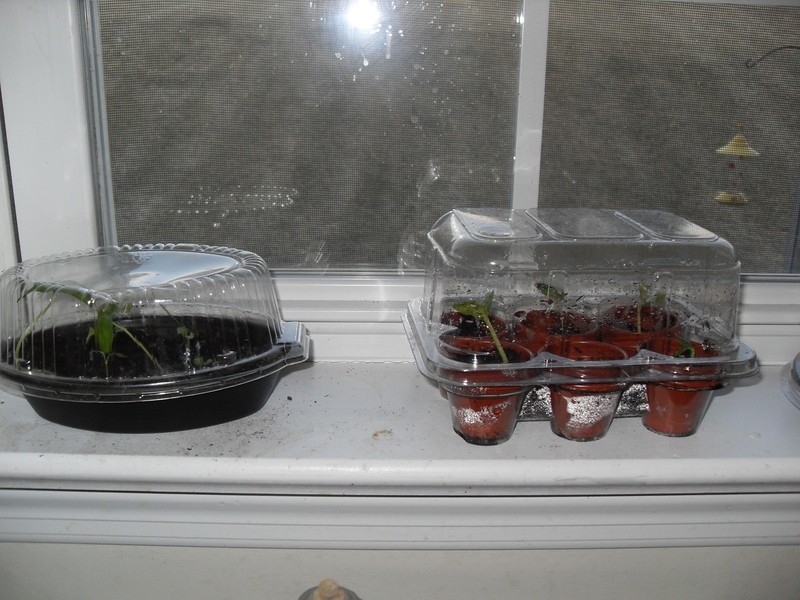
2. Container with a clear plastic dome lid (I really like Taco Bell nacho containers for this purpose, but you can also buy little plastic greenhouses with tiny pots in them at Lowes or other home improvement stores.)
3. Seeds
4. Newspaper or something to cover your worksurface (things can get slightly messy).
5. Various sized larger pots for re-planting when things get bigger (ideally, they should have a hole in the bottom for drainage. If they don't, and they happen to be terracotta pots, you can scrape a hole in the bottom with a metal nail file, if you've got some time on your hands.) -
 Step 2
Fill your greenhouse (or the mini pots in your greenhouse, whichever you're using) about 1/3 to 1/2 full of potting soil.
-
 Step 3
Carefully put a little water in the pots/greenhouse. You may have to swish it around a little with your finger to make sure it circulates. You may also have to let it sit for a few minutes so the potting soil absorbs all the water.
What you're going for in this step is damp soil-- not bone dry, but not dripping wet either. (The soil in the little pot is about the right dampness.)
-
 Step 4
Plant your seeds in your greenhouse. If you're using little pots, I'd recommend three or four seeds per pot (they may or may not all germinate.) Space them out as much as you can within the pot so that they'll be easy to repot later. If you're using a Taco Bell or other kind of container, just space your seeds about 1/2 inch or so apart (just enough that they're not too close together.) If you're using a seed mix, just sprinkle some in each pot or spread it out over your container. Make sure your seeds are covered with a light layer of soil--the farther down you plant them, the longer they'll take to come up.
-
Step 5
Water the seeds again, if so desired, but don't overwater. Again, the aim here is to have the soil just a little more than slightly damp-- the greenhouse will keep them moist.
-
 Step 6
Put the lid on your greenhouse, and put it on your sunniest windowsill (mine is in my kitchen. Also, I have a small light over the sink that I leave on all the time when I'm trying to germinate things. Don't know if it works, but it seems to help a little. Might just be a placebo effect, but it reminds me a little of growlights, like my mom used to use in the basement.)
-
 Step 7
Plants should germinate anywhere from three days to two weeks (depends on how far down you planted them, the amount of light they're getting, the type of seed you used, etc.) Don't get discouraged if you don't see anything right away-- some seeds just take longer than others. I'd think, though, that if you don't see anything within two weeks, you might have gotten some bad seeds. It's kind of cheating, but you can gently push some of the soil away to check the status of the seeds, to see if they're germinating. :)
The plants won't need to be watered as long as they're in the greenhouse-- the condensation keeps the soil moist.
-
 Step 8
When the plants grow too tall for your greenhouse, you've got a couple of choices. You can just take the lid off and let them grow in the greenhouse (they'll need to be watered now), or you can repot them into larger pots.
If you choose to repot them, just follow the same general steps you took to prepare your greenhouse, then gently remove each plant from the soil, make a little hole in your new pot with a finger and tuck the plant into the hole, filling it up again with dirt around the stem of the plant.
-
 Step 9
Put the new pots (if you repotted) or the greenhouse (if you just took the lid off) on your windowsill. Now you've got fresh herbs for all your cooking needs! Enjoy, and don't forget to water!
(These are actually some pepper plants that I've repotted into a larger pot while I'm waiting for it to get a little warmer outside-- I'm eventually going to split them into two or three pots and put them outside on the patio, but you get the idea.)


 1
Home Accessories »
Diy Jewelry Box
1
Home Accessories »
Diy Jewelry Box

Those takeout containers sure are handy-- I've actually stopped eating takeout and was at a loss for what to use now, but I'll have to try the plastic wrap! So thanks for YOUR tip!
Good Job!