About
Willow
MAKING A SHALLOW TRAY with willow can be a clumsy process. This Breakfast Tray employs just two sets of Three-rod Wale and a Five-pair Border, which makes this low, square piece manageable and uncomplicated to make, but also strong in structure. With this design it would be very simple to increase the height by adding more sets of wale or introducing a rand, if you wanted to create a deeper-sided basket for storing logs, shoes or toys. If you do this, remember to increase the size of your stakes for the border, so that when you come to weave the border the rods are thick enough to make a solid rim.
Once constructed a tray has many uses. We regularly have our lunch outdoors and so use our trays not just for breakfast, but to carry food to and from the kitchen. And having a tray sitting at the bottom of the stairs to collect all sorts of sundries that have made their way down really helps to keep domestic life in order.
-
 Elin H. favorited Willow Breakfast Tray
13 Jul 00:38
Elin H. favorited Willow Breakfast Tray
13 Jul 00:38
-
 C.J. M. added Willow Breakfast Tray to DIY The Room
23 Apr 18:14
C.J. M. added Willow Breakfast Tray to DIY The Room
23 Apr 18:14
-
C.J. M. added Willow Breakfast Tray to Wicker Weaving
20 Apr 13:40
-
C.J. M. favorited Willow Breakfast Tray
17 Apr 21:32
-
 Lydia L. added Willow Breakfast Tray to DIY the Room
01 Dec 15:02
Lydia L. added Willow Breakfast Tray to DIY the Room
01 Dec 15:02
-
 Aurum Press published her project Willow Breakfast Tray
28 Oct 09:00
Aurum Press published her project Willow Breakfast Tray
28 Oct 09:00
You Will Need
-
 Step 1
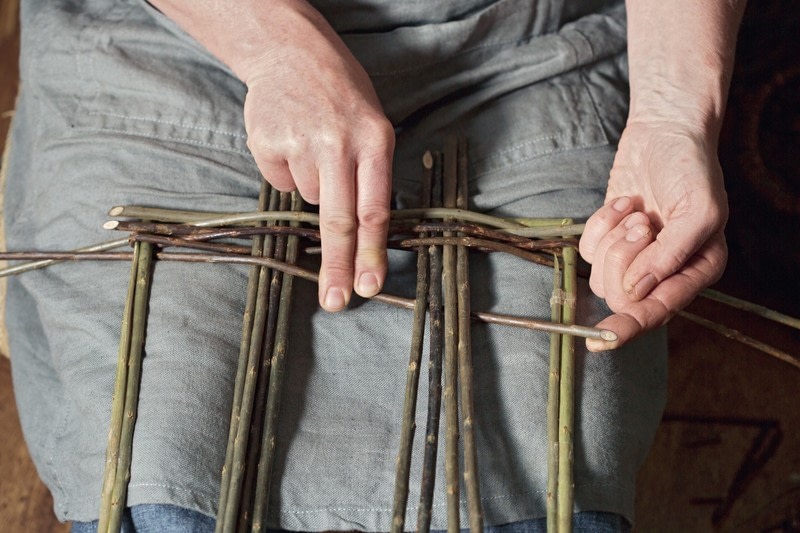
Before you start to weave, separate out 8 of the dry sticks into 2 sets of 4. Holding the template on your lap, lay the sticks across the template. Using 2 of your 38 stakes, position the first 1 so that the butt sits on the right-hand side of the template, travels under the first set of 4 dry sticks and over the second, ending with the rod underneath the template on the left-hand side. Do the opposite with the second stake. These are your first 2 stakes, which are now securely woven into the base. Position them as close to the bottom of the template frame as you can.
-
 Step 2
Once constructed a tray has many uses. We regularly have our lunch outdoors and so use our trays not just for breakfast, but to carry food to and from the kitchen. And having a tray sitting at the bottom of the stairs to collect all sorts of sundries that have made their way down really helps to keep domestic life in order.
-
 Step 3
Add 2 more stakes as in Step 1. For clarity I have woven this base using green willows for the stakes and brown willows for the weavers. As you weave, keep checking that the dry sticks stay belly down.
-
 Step 4
When you have woven halfway, you need to add in 4 more dry sticks to the base so that your 2 pairs of 4 become 2 pairs of 6. This gives a more solid weave in the base and, more importantly, it creates the correct spacing for inserting the stakes on the short side later. Cut a 2cm (3⁄4in) slype on 1 end in order to push them through the weave. Sometimes tapping them through with the beater is easier. Make sure they sit with the belly down, and adjust the other sticks if necessary. Continue to weave the same pattern for the rest of the template, making sure you end with 2 stakes, as you started. You should have all the butts sitting on the top of the template frame and all the tips underneath.
-
 Step 5
Now its time to bring up all the stakes on the long sides to create the sides of your basket. When you have bent all the stakes, secure them as shown with a round template or tie them into position with string. With your secateurs trim all the ends, including the 2 sets of dry sticks.
-
 Step 6
Cut a short slype on 1 end of each of the remaining 16 stakes and push 8 into each of the short ends through the weaving in the positions shown. You may need to use your bodkin to create a space first. Drive them in some way to make them secure.
-
 Step 7
Kink up these stakes as you did for the long sides. Tuck all the stakes into the hoop with the others.
-
 Step 8
Fix your basket to the board with a bodkin and a weight inside, then you are ready to add the first wale. Start the 2 sets of wales on the left side of the each of the long sides. As you weave the sides of a square object you need to over-accentuate the position of the stakes by pushing them in toward the centre of the basket. Use one hand to control the stakes while the other hand selects the next weaver to be woven.
-
 Step 9
As you approach the corner keep paying attention to the position of the stakes as you weave. The wale continues in the same pattern, but as you lay the rods around the stakes, keep a firm idea in your mind of where the corner stakes need to be, and use the weaving to control this. Complete the wale with
all 12 rods. Check the height is level with the beater. Then add another wale with another 12 rods. At this point the tray should be about 5–6cm (2–21⁄2in) high. Checked the wale is level. -
 Step 10
To start a border on a square piece, always begin on the left-hand side of a longer side so you can establish the pattern before you reach the corner. Starting at a corner would make the piece less fluent. Follow Steps 1–9 of Five-pair Border.
-
 Step 11
Most square work requires you to change the pattern of the weave as you travel around a corner. With this method you simply carry on with the same pattern. It will feel a little different because the spacing changes, and a little more care is needed to keep the horizontals smooth as you place them into the correct space. Before the basket dries press it out firmly on a flat surface.