


About
Cute Wire Wrapped Button Valentine's Day Bracelet!
This will make a 6 inch bracelet. If you need a different size just cute your chain to be 1 inch less than what you need, that way when you add your jump rings and clasp it wont be too big.
I love these tiny button craft packs you can get at any craft store, there are soooo many ideas for them!
As far as supplies you should be able to get everything at one store, they are very common jewelry making items. You can even find them at wal*mart.
They have been really popular this year in my shop, so I decided to do a how-to for anyone who wants to get their craft on!
Tags
-
 Key West Witch favorited Valentine Button Bracelet
07 May 12:24
Key West Witch favorited Valentine Button Bracelet
07 May 12:24
-
 Brenda A. favorited Valentine Button Bracelet
26 Jun 06:52
Brenda A. favorited Valentine Button Bracelet
26 Jun 06:52
-
Christina F. favorited Valentine Button Bracelet
27 Sep 10:25
-
 lucilapereira favorited Valentine Button Bracelet
16 Jan 12:11
lucilapereira favorited Valentine Button Bracelet
16 Jan 12:11
-
lucilapereira added Valentine Button Bracelet to joyas
16 Jan 12:11
-
 jackie c. favorited Valentine Button Bracelet
02 Aug 23:21
jackie c. favorited Valentine Button Bracelet
02 Aug 23:21
-
 deb.mathenia favorited Valentine Button Bracelet
23 Feb 01:30
deb.mathenia favorited Valentine Button Bracelet
23 Feb 01:30
-
 Syeyon K. added Valentine Button Bracelet to Bracelets!!
23 Dec 07:06
Syeyon K. added Valentine Button Bracelet to Bracelets!!
23 Dec 07:06
-
 Pam ^_^ entered her project Valentine Button Bracelet to Lots Of Buttons
04 Oct 21:27
Pam ^_^ entered her project Valentine Button Bracelet to Lots Of Buttons
04 Oct 21:27
-
 karen.rich.125 favorited Valentine Button Bracelet
04 Sep 12:30
karen.rich.125 favorited Valentine Button Bracelet
04 Sep 12:30
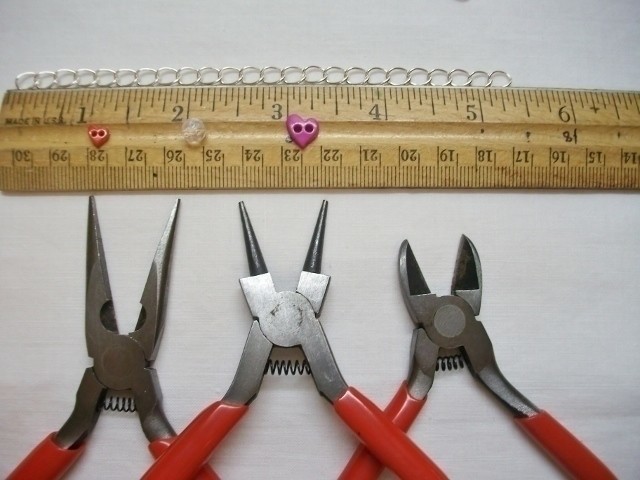
You Will Need
-
 Step 1
For Step One just open your jump rings using the pliers and attach your chain to your clasp using one jump ring on each end!
-
 Step 2
For Step Two you will need to wire wrap your glass beads and buttons to make them into charms.
Take one glass bead and place it on on a headpin, bend the pin backwards 90' with pliers.
Then using the round nose pliers placed at the top of the bend, wrap the pin up and around the top of the round nose pliers making a circle.
With pin still on round nose pliers, use the needel nose pliers in your other hand to help shape and wrap the pin around the straight part.
Continue this step with all the glass beads.
-
 Step 3
For Step Three you will be using the same basic method as in Step Two, to wire wrap the buttons into charms.
This time you will use one button and cut off a length of wire from the spool you feel comfortable handling. Also remember that it is easier to have excess wire to trim in the end rather then being to short.
So start out by making the loop around the round nose pliers, then while still holding on with same wires use your needled nose pliers (or your fingers) to wrap about three times aound the base of the wire.
Then lace the button through once and slide it up the wire, leaving about .25inch of space on the wire below where you just got done wrapping.
Loop your wire through the button holes once more to keep it secure, and finish by wrapping back up the base of the wire. Meeting the other part of the wrap.
Trim any excess wire very close to base and smooth down any pieces sticking out.
Finish all the other buttons this way. If your smaller buttons are really tiny only loop the wire through once.
-
 Step 4
In Step Four you should have your bracelet chain ready to go and all your charms made.
Lay out your chain flat and play with the arrangment of the charms, and colors until you found a pattern you like.
For mine I had one tiny heart, one regular heart, and one glass bead for EACH link in the chain. I made it look fuller by placing charms on both sides of the link (see picture) and also alternating they way they went.
For a thinner bracelet just do every other link in the chain.
-
 Step 5
For Step Five you will attach your charms to your chain, slowly working from one end to the other. (
this picture is of a necklace I did, I just used it because it had a good view of the chain within the charms)
-
 Step 6
In Step Six.... ENJOY!
I know it can take a while to get the hang of but when you do it goes by much faster and there are sooo many ideas for this style of jewelry!
For earrings just attach 1 inch of chain to the earwires and use the same pattern!
For a necklace use the chain for the whole necklace but only put charms on the middle 3 inches. Or make a dangly charm using 1 inch of chain attached with a jump ring to the middle of your necklace.


Versions

Comments