About
Have blank holiday/thank you cards lying around? Quickly turn them into a simple, handy folder!
I started this project because I really needed something to help keep my grocery lists and coupons together. I can't be the only one with a dozen extra Thank You cards lying around in drawers. Put them to use with this quick and easy DIY!
Tags
-
 Jacky C. favorited Turn Spare Cards Into Pocket Organizers
19 Apr 05:31
Jacky C. favorited Turn Spare Cards Into Pocket Organizers
19 Apr 05:31
-
 caroline s. added Turn Spare Cards Into Pocket Organizers to paper craft
15 Apr 07:03
caroline s. added Turn Spare Cards Into Pocket Organizers to paper craft
15 Apr 07:03
-
caroline s. added Turn Spare Cards Into Pocket Organizers to organizers
15 Apr 07:03
-
 MysticRose29 added Turn Spare Cards Into Pocket Organizers to Upcycling Crafts
30 Mar 16:14
MysticRose29 added Turn Spare Cards Into Pocket Organizers to Upcycling Crafts
30 Mar 16:14
-
MysticRose29 added Turn Spare Cards Into Pocket Organizers to Misc. Papercraft
30 Mar 16:14
- Josaurus20 added Turn Spare Cards Into Pocket Organizers to To make 08 Mar 07:51
-
 shelby m. favorited Turn Spare Cards Into Pocket Organizers
03 Mar 04:55
shelby m. favorited Turn Spare Cards Into Pocket Organizers
03 Mar 04:55
-
Carly H. favorited Turn Spare Cards Into Pocket Organizers
23 Feb 19:20
-
 Djamilah W. favorited Turn Spare Cards Into Pocket Organizers
23 Jan 19:44
Djamilah W. favorited Turn Spare Cards Into Pocket Organizers
23 Jan 19:44
-
 Ichigo M. favorited Turn Spare Cards Into Pocket Organizers
30 Dec 02:38
Ichigo M. favorited Turn Spare Cards Into Pocket Organizers
30 Dec 02:38
-
 Step 1
Gather your supplies.
-
 Step 2
The envelope will be used to create a pocket for your folder. For your reference, lay your envelope over your card and align it so that the open edge of the envelope faces the crease of the card; you want the contents of your folder to be secure.
-
 Step 3
Once you have positioned your envelope, cut it in half, width-wise. (You may use a ruler to guide your cuts, but I chose not to for this tutorial).
-
Step 4
Discard the top of the envelope, or the half that does not allow for the open edge to face the crease when placed at the base of the card.
-
 Step 5
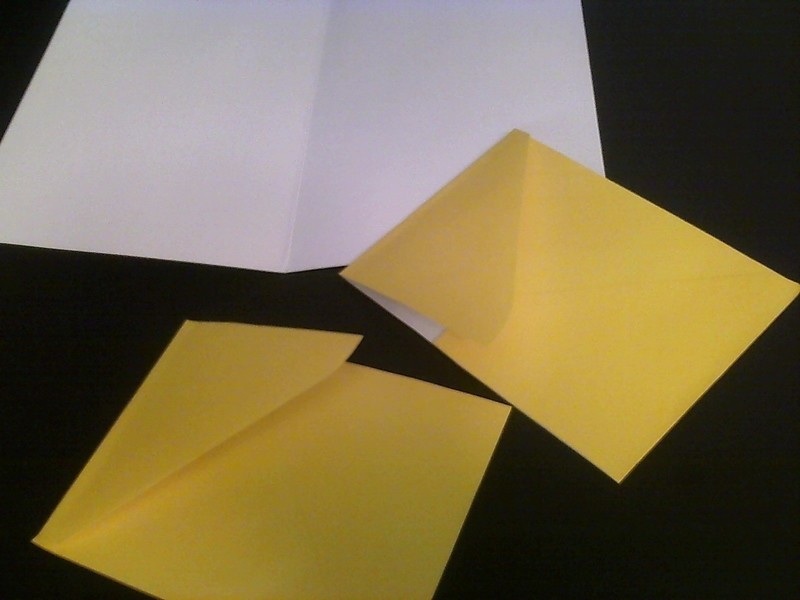
Next, you must trim the envelope to fit inside the card. To make my cutting easier, I flipped my envelope over and aligned it with the crease. Trim the excess envelope to be square with the side of the card.
-
 Step 6
Flip your envelope back over, open side facing the crease. Trim the excess off the top and back of the envelope, so that all the edges are even
-
 Step 7
Your envelope pocket should now look like this.
-
 Step 8
Place a thin layer of glue on the back of your envelope pocket, and align it (open edge facing crease) so that the bottom and right-hand side of the card and envelope are even. Press and smooth down to remove air bubbles and distribute glue evenly. *Note: tape also works just fine, if you don’t have any glue.*
-
Step 9
Your folder now has a pocket. It is not necessary to let the pocket dry before continuing, but be mindful that the pocket doesn’t become displaced. While the following steps are also not necessary, I chose to dress up my folder a bit. I started with a simple tie closure.
-
 Step 10
Close the card. Punch a hole in the middle of the card, near the open edge. *Note I only have this massive three-hole puncher, but I made do. This would be much easier with a single-hole puncher.
-
 Step 11
Cut a length of cord or string to tie the folder closed. I happened to have some yellow hemp cord. The length of the string is entirely up to you; I didn’t really measure mine. Next, simply thread the string through the hole you just punched, and tie a bow.
-
 Step 12
And, finito! You’ve got a handy organizer. You may choose to embellish the card as you wish, or not (I used hot glue to add plastic gems to the front of my folder).