


About
isn't it squee?
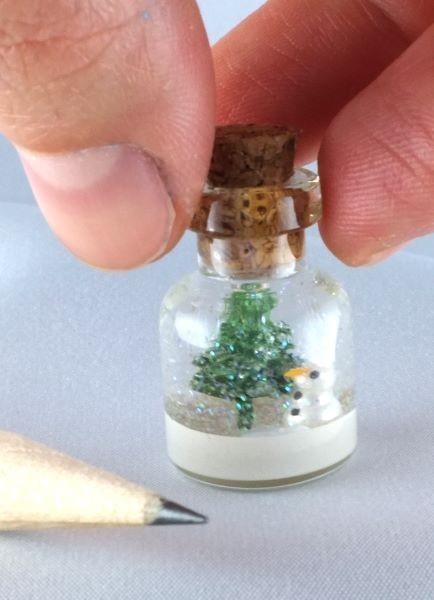
Look what I made - it's tiny, and if I shake it, it snows inside.
Tags
Downloads
- Missing file
-
 Kinhime Dragon favorited Tiny Snowman In A Tiny Snow Globe
25 Nov 15:38
Kinhime Dragon favorited Tiny Snowman In A Tiny Snow Globe
25 Nov 15:38
-
 Mariah E. favorited Tiny Snowman In A Tiny Snow Globe
14 Nov 22:47
Mariah E. favorited Tiny Snowman In A Tiny Snow Globe
14 Nov 22:47
-
 amanda.shillito favorited Tiny Snowman In A Tiny Snow Globe
15 Dec 14:17
amanda.shillito favorited Tiny Snowman In A Tiny Snow Globe
15 Dec 14:17
-
 Maggs favorited Tiny Snowman In A Tiny Snow Globe
07 Dec 19:54
Maggs favorited Tiny Snowman In A Tiny Snow Globe
07 Dec 19:54
-
 Georgiiee F. favorited Tiny Snowman In A Tiny Snow Globe
23 Jul 15:06
Georgiiee F. favorited Tiny Snowman In A Tiny Snow Globe
23 Jul 15:06
-
Alissa B. favorited Tiny Snowman In A Tiny Snow Globe
06 May 06:38
-
 Caaryn S. favorited Tiny Snowman In A Tiny Snow Globe
22 Feb 08:23
Caaryn S. favorited Tiny Snowman In A Tiny Snow Globe
22 Feb 08:23
-
 faye.pow.1 favorited Tiny Snowman In A Tiny Snow Globe
24 Dec 14:22
faye.pow.1 favorited Tiny Snowman In A Tiny Snow Globe
24 Dec 14:22
-
 Bree favorited Tiny Snowman In A Tiny Snow Globe
20 Dec 18:39
Bree favorited Tiny Snowman In A Tiny Snow Globe
20 Dec 18:39
-
 Phoebe O. favorited Tiny Snowman In A Tiny Snow Globe
18 Dec 14:10
Phoebe O. favorited Tiny Snowman In A Tiny Snow Globe
18 Dec 14:10
-
Step 1
Take an interdental brush and cut the thread with a pair of pliers to a lenght of 1/3 inch.
-
Step 2
With some small scissors, trim the bristles until they are pointed on top and look fir tree-ish.
Take green nail polish (I had to mix it from yellow and blue) and firmly work the polish into the bristles. Hold your tree with some pliers and turn it slowly around while painting. Let it dry for a minute and apply a second layer until you're satisfied with the look. Let it dry completely over night - you can stick it into a piece of styrofoam. -
Step 3
Meanwhile, you can prepare your snowman.
Take a small white bead (choose one which looks like the paint of your pearl maker pen). Set it on a piece of double-sided tape so it won't roll away.
On top of it, squeeze a little of your pearl maker pen mimicking the second snowball of a snowman. Let it dry completely over night. -
Step 4
On the next day, you'll need to make a carrot nose for your snowman. At first I had planned to take the tip of a toothpick, but then I remembered that it wouldn't be waterproof. So
I melted some orange plastic I had and pulled a "strand" from it.
From this, I could cut a small conic piece which I then carefully stuck into the third pearl on my snowman. Let it dry completely. -
Step 5
Take a toothpick or a blunt needle and dip it into black nail polish. Softly add eyes and buttons on your snowman.
-
Step 6
Open your glass bottle and pour some white embossing powder in. Make a funnel of paper so the bottle's walls stay free of the powder.
-
Step 7
Prepare your fir tree: Leaving a little stump underneath the bristles, bend the rest of the thread in a 90° angle to the side.
-
Step 8
Use long pliers to hold your bottle. With a heat gun, melt the powder inside your bottle. Don't overdo it, it shouldn't start to bubble. When all powder has melted, set the heat gun aside and carefully grip your little fir tree with a second set of pliers. Put it inside your bottle so that the bent piece of thread is covered with melted embossing powder. Make sure it stands straight in the bottle and hold it in the correct position until the hot stuff has cooled down.
-
Step 9
Set a drop of pearl maker next to your tree. You might want to use a long dowel for that, otherwise you would smear the bottle's walls.
Into this drop, carefully place the snowman. Don't panic if your snowman tumbles to one side, simply straightened it with the help of a toothpick and gently move it in the right place. -
Step 10
Again, let it dry.
Then add some white glitter to your bottle. I added a few drops of glycerine, it helps to make the snow fall slower. Fill the bottle with water and put the cork on top. I covered the base of my cork with super glue to keep any air bubbles out, but it developed an air bubble in the meanwhile.
Now shake it and enjoy your tiny snowglobe!
 1
Books & Journals »
Locking Box And Journal
1
Books & Journals »
Locking Box And Journal
 2
Babies & Kids »
A Toy Kitchen For A Child
2
Babies & Kids »
A Toy Kitchen For A Child
 3
Origami Flowers »
Origami Orchid
3
Origami Flowers »
Origami Orchid
 4
Office »
Pretty Sketchbooks
4
Office »
Pretty Sketchbooks
 5
Charms & Keyrings »
Shugo Chara Inspired Pop It
5
Charms & Keyrings »
Shugo Chara Inspired Pop It

http://wp.me/p1IEN3-hb
1)how do you glue them to the bottom? hot glue?
thank you! ^^