About
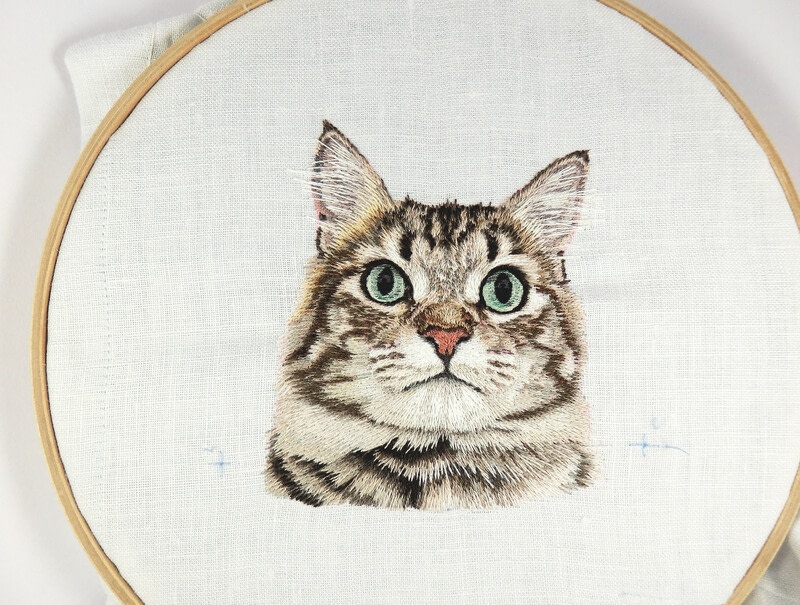
Embroidered Cat In My Pocket
I especially enjoy embroidering tabby cats, perhaps because I do so many of them. You can use different colours – sometimes reds, maybe yellows – so each stripy cat is unique. I enjoy the challenge of planning the colours beforehand and am grateful for the lessons I inevitably learn as the project progresses.
TEMPLATE
Transfer the outline to the fabric using an iron and the transfer sheet provided. Alternatively, use transfer paper and a copy of the template.
Tags
Downloads
- 2020-07-14-140404-Tabby+Template.jpg 43.6 KB [ Download ]
-
 Saskia v. favorited Tabby Pocket Cat
22 Jan 21:41
Saskia v. favorited Tabby Pocket Cat
22 Jan 21:41
-
 mmotse03 favorited Tabby Pocket Cat
19 Sep 01:37
mmotse03 favorited Tabby Pocket Cat
19 Sep 01:37
-
 Crafterella featured Tabby Pocket Cat
06 Aug 23:00
Crafterella featured Tabby Pocket Cat
06 Aug 23:00
-
C.J. M. added Tabby Pocket Cat to Embroidery
05 Aug 15:48
-
C.J. M. favorited Tabby Pocket Cat
05 Aug 15:48
-
 Search Press published her project Tabby Pocket Cat
05 Aug 09:00
Search Press published her project Tabby Pocket Cat
05 Aug 09:00
-
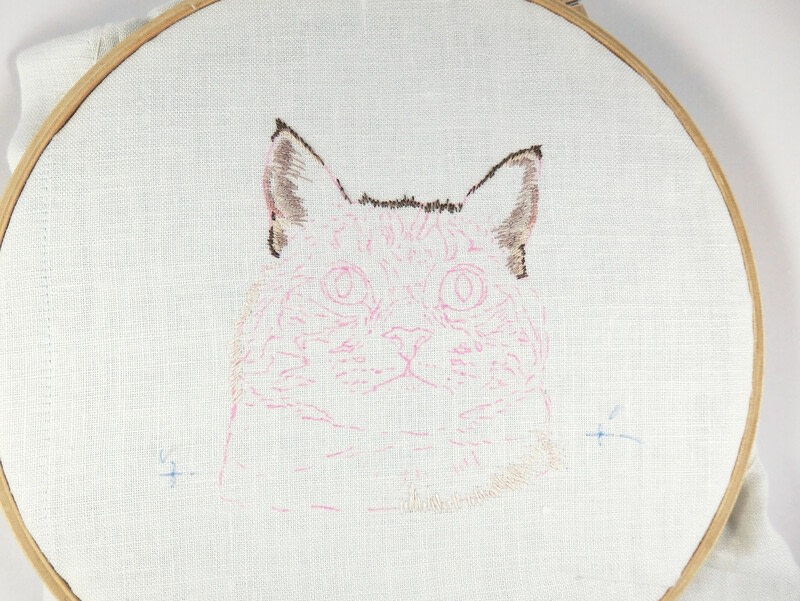
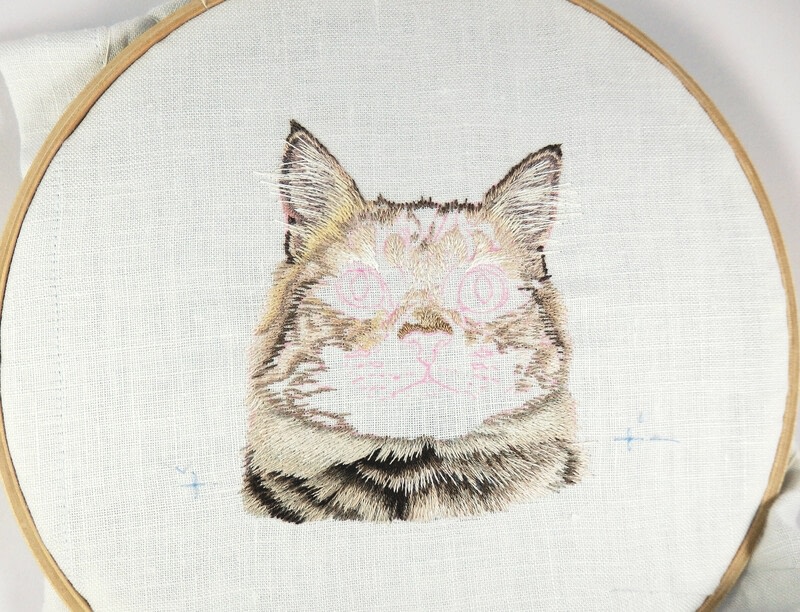
 Step 1
THREAD COLOURS USED
Single strands of size 25 embroidery thread
-
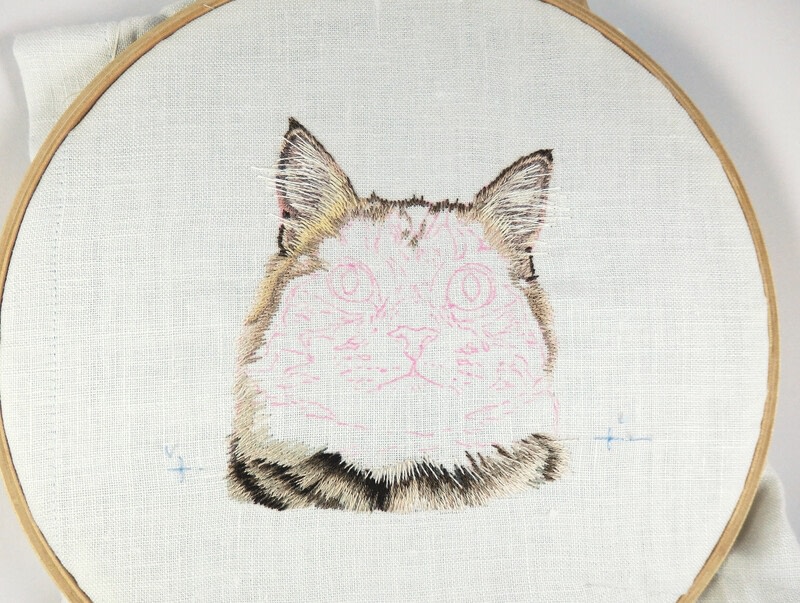
 Step 2
Use O741 to begin outlining the tops of the ears, and again to start filling in the edges close to the head. Add the dark pink of O793 above this, and O451 just inside the O793.
-
 Step 3
Add D08 to the ear outline, and across the top of the head. Use D3861 inside the ears. More stitches will be added over these, but don’t worry, as the pinkish hue will still shine through. Use O740 to outline the cheek on the left and the neck on the right.
-
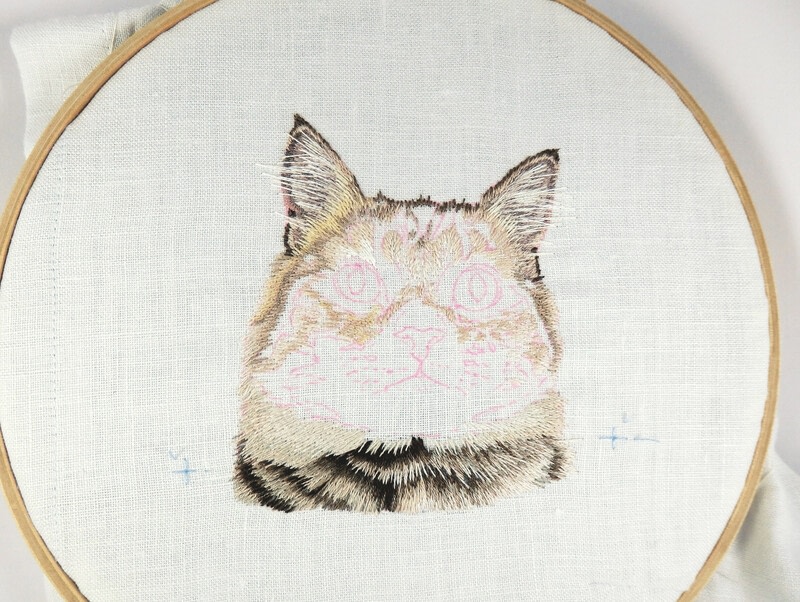
 Step 4
Use O453 to stitch the darker areas inside the ears, sparingly in places. Work O741 in patches on the left side of the neck.
-
 Step 5
On the neck, use O413 on the right and O414 on the left to lightly stitch in the beginnings of the stripes. Complete the outside edges of the ear tips using O742.
-
 Step 6
Stitch long hairs in the ears using O810, and add O742 to the inside edges of each ear. Use O741 to outline the cheek on the right. On the neck, colour bright areas of the stripe pattern using D842 on the left and O810 on the right.
-
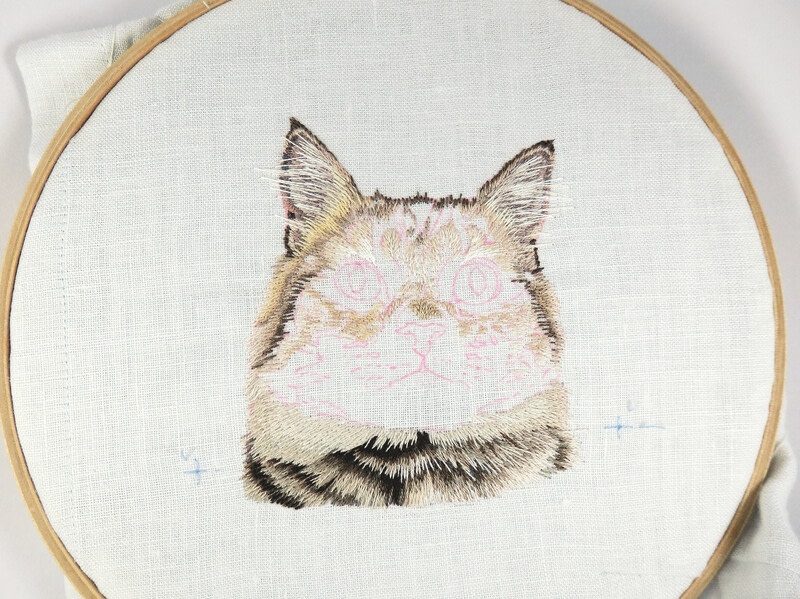
 Step 7
Now to add highlights, using intermediate colours so there are no sudden colour changes between stripes. Continuing with the neck, use D06 on the right and D07 on the left. Build up the cheek outlines using D07 and O743 on the right and D738 on the left. Add bright, long hairs in the ears using O850.
-
 Step 8
Add D07 to the right side of the neck. Continue blending the left outline below the ear using O743. Above that, and in the same place on the other ear, put in some O416, plus a tiny bit more on the very tip of each ear. Add O451 to begin filling in the ears under the long hairs.
-
 Step 9
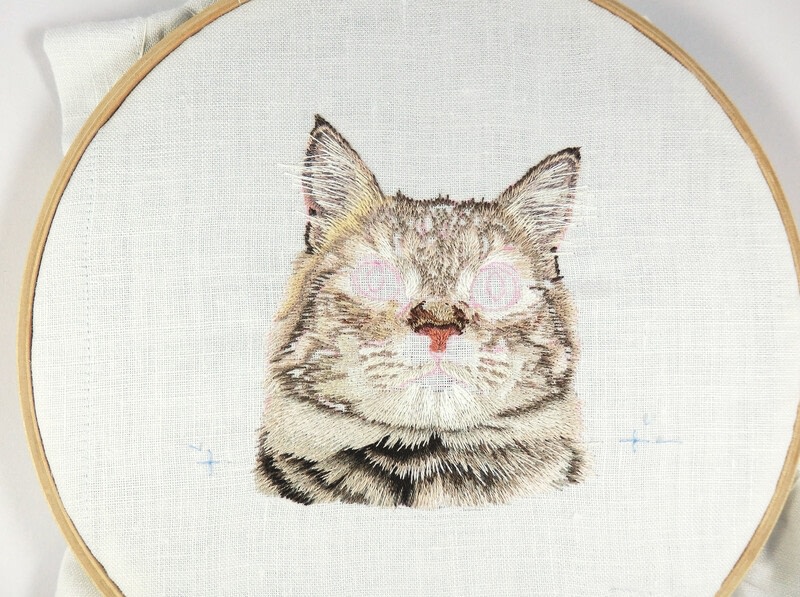
Continue filling in the ears using D738 for the one on the left and D712 on the right. Finish with a little D07 at the corners of both ears. Work D08 into the neck to continue establishing the stripes. On the left side of the face add D06 and D07 to the areas you have been steadily building up here.
-
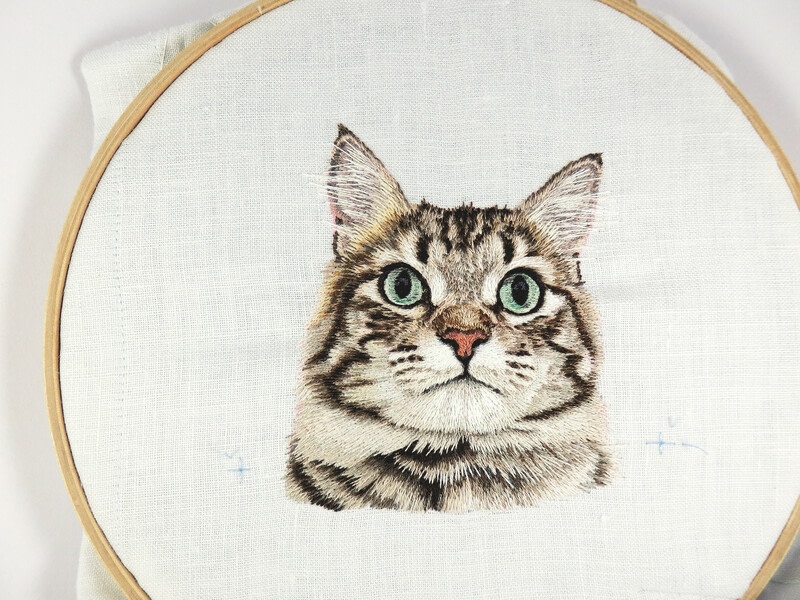
 Step 10
Add O742 to the area under the ears on both sides, and down the left side of the face: this really brings out the yellow of the previously applied D738, which you can see in the completed embroidery.
-
 Step 11
Use A382 to stitch darks into all the stripes on the left of the neck, and add some O415 to the stripe just right of the neck centre. The light area to the far left of the neck is not pure white, so start with O741 here. Continue working inward from the left side of the cheek using D07.
-
 Step 12
Complete the very dark area under the chin using A382, and use O741 on the far right of the neck. Add a little D738 under the eye on the left, and O740 above the same eye and across the top of the nose. To continue the neck, use D06 at the right edge and O810 on top of the darker stripes. Add some O740 above the eye on the right and bright O850 above the eye on the left.
-
 Step 13
Use O740 for the bright areas of the cheeks. In order to recreate the pattern and avoid drastic colour changes, this area will be built up using multiple colours as the project progresses. Add O430 under the chin on the left and D08 along the stripes working towards the right side of the neck.
-
 Step 14
Continue working the stripes under the chin with O416 to the left and O413 to the right. Add O742 to the sides of the cheeks and under the eyes.
-
 Step 15
Use O741 for the bright parts of the forehead pattern. Continuing with the neck, add O740 to the left side and D07 on the right.
-
 Step 16
Use O411 and O412 to continue building up the far left side of the neck, then bring in a little D05 towards the centre and on the right side. Use D07 under the ear on the left and to begin the forehead pattern.
-
 Step 17
Use D06 to fill in the gaps under the chin, and add some O850 above the eye on the right. Begin to fill in the nose using D3864. Mark in the darkest stripes on either cheek using D08.
-
 Step 18
Continue to darken the pattern under the chin using O412 on the left side and O411 on the right. Outline the area above the tip of the nose with D3863. Fill the small gap under the ear on the left using O740.
-
 Step 19
Use D07 to map out the pattern lines on the left cheek, and all along the line of the chin.
-
 Step 20
Add O811 under the chin, and O841 to the cheek on the left. I often use O841 for tabby cats, although this tabby has a subtle reddish shade, so in fact this is the only place I have used it!
-
 Step 21
Add D07 to the forehead pattern.
-
 Step 22
Continue with D07 where the ear on the right meets the head.
-
 Step 23
Now use D07 for the pattern lines on the right cheek.
-
 Step 24
Now add the slightly darker D08 along the line of the chin.
-
 Step 25
Use D06 for the light areas of the cheeks, close to the muzzle, then O745 to bring in a little dark under the eyes, and a more solid application over the nose.
-
 Step 26
Back with the D07 again! Add it to the bridge of the nose and on the cheeks, bordering the patterned areas to provide gradation between light and dark tones.
-
 Step 27
Dot D07 into the whisker lines on the muzzle, and add O810 to the lower jaw.
-
 Step 28
Use D06 to begin filling in the areas around the eyes, close to the bridge of the nose. Add some O740 to the muzzle.
-
 Step 29
Use O811 to fill in the small gaps to the left of the O745 added in step 25. Work a little D06 around the muzzle.
-
 Step 30
Add D712 to both sides of the muzzle, with a little O810 on the right side as well. Use bright white O850 for the central highlights on the chin.
-
 Step 31
Stitch O811 along the top of the mouth, O741 below the left eye, and O740 below the eye on the right. Begin the nose tip with a bold application of O767.
-
 Step 32
Add O794 to each side of the tip of the nose, and use O850 under the eyes.
-
 Step 33
Use more O850 for the bright spots around the muzzle, and O810 above the O811 already in place for the mouth. Blend the colours of the nose tip together using O795.
-
 Step 34
Outline the top of the nose tip with dark brown O738, and bring this around both sides of the nose towards the corners of the eyes. Use a mix of O741 and O742 below the eyes around the edges of the nose.
-
 Step 35
Add highlights using D3865 under the nose and D05 under the mouth. Use O251 for the sparkle in the eyes.
-
 Step 36
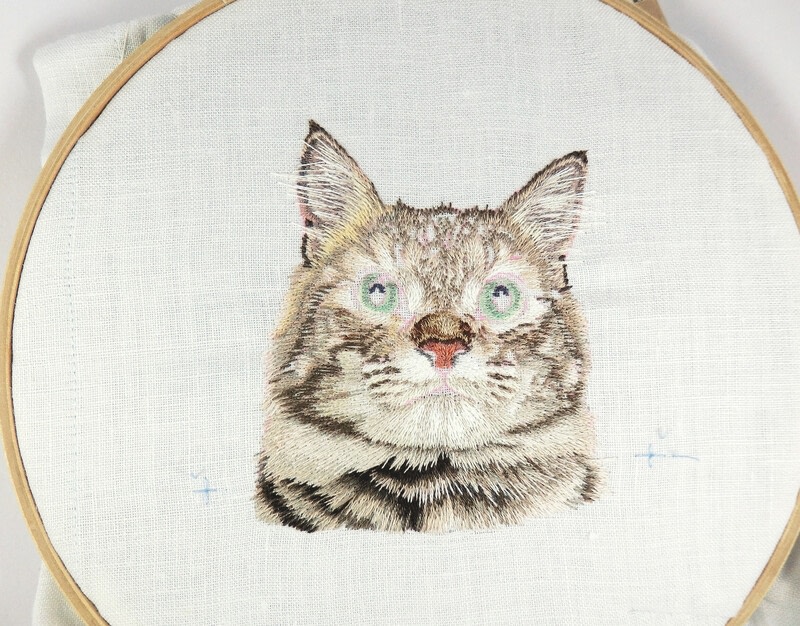
Add O414 to the broad area of the forehead, and D07 in a line around the eyes. Continue to build the green of the eyes using O2445.
-
 Step 37
Here I corrected the eye on the right by adding more O251 to the area applied in step 35, to make the
eye a little larger. Use O244 to add more green to both eyes, and O414 under the nose. Add D08 to the patterns on the cheek on the right. -
 Step 38
Use O487 for the brightest parts of the pupils, and O413 to blur the green of the eyes. Add in O412 on the cheeks and forehead as a highlight and to introduce gradation across the patterns.
-
 Step 39
Use D08 to fill in the remaining stripe on the left and add it to the whisker lines as well. Fill in the little gap at the top of the nose tip with D3863, and use O812 in places under the mouth. Use O243 for the first green of the eyes.
-
 Step 40
More details! Work A1088 around the eyes and O741 into the nose. Add O412 to the fur under the mouth and O742 to the forehead, filling in some of the gaps. Use some D07 in the centre of the forehead to blend colours together.
-
 Step 41
Add brown shading on the sides of the forehead below the ears using O736, and add more definition to the mouth with O414. Add A1088 to the long stripe on the left. Use O900 inside the outline of A1088 around the eyes added in step 40, and to complete the pupils.
-
 Step 42
Work A1088 into the forehead pattern, and add O737 in the same way for the stripes on both cheeks. Use O416 to fill in the mouth.
-
 Step 43
Use A382 for the darkest areas of the forehead pattern and to mark the nostrils. Use O415 to put in the shadow areas on the green of the eyes, and fill the gaps on the right of the muzzle and below the right ear with O741. Add A1084 to the lighter stripe on the left of the nose.
-
 Step 44
Now it’s really up to you to judge what needs to be done. Stand back and look at the overall colour
tones. Add in A1084, A1086, and A1088 to the patterns between the eyebrows and on both cheeks where necessary. Add a little O900 to the nostrils and mouth line. -
 Step 45
I chose to add in A382 and just a little bit of O900 to enliven the darker stripes on the cheeks and forehead. Only apply small amounts if you think it is necessary; you don’t want to overdo it and ruin the gradations you have worked so hard to create.
-
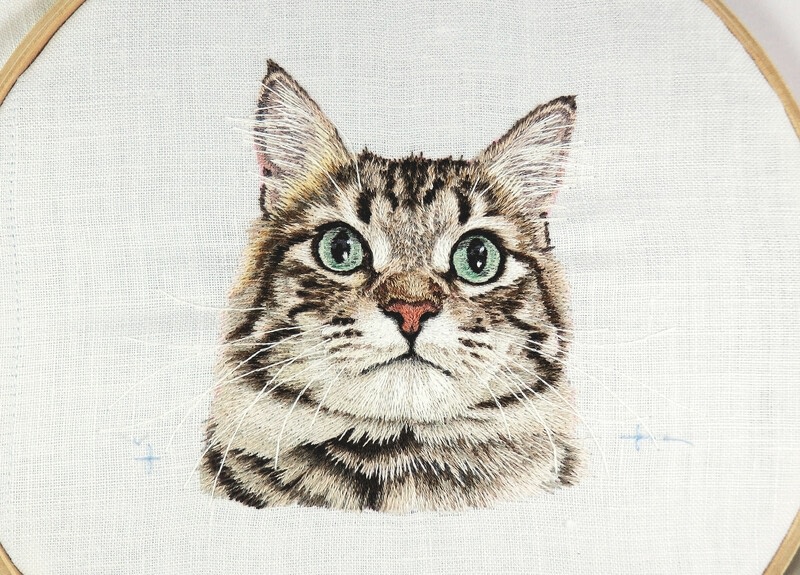
 Step 46
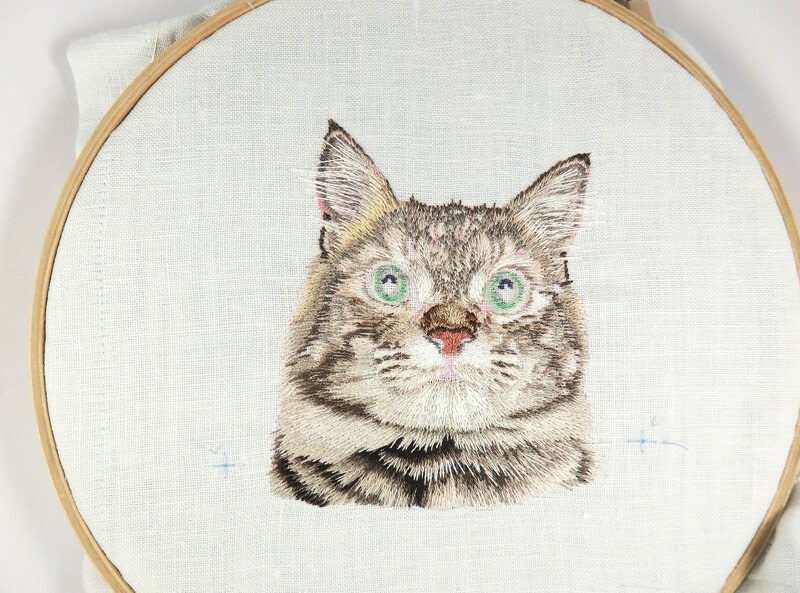
Now for the finishing touches. For the highlights in the eyes, use O361 at the top and O850 below, and use O850 and split stitch to put in the whiskers on the muzzle and above the eyes.
Now it’s really up to you to judge what needs to be done. Stand back and look at the overall colour tones. Add in A1084, A1086, and A1088 to the patterns between the eyebrows and on both cheeks where necessary. Add a little O900 to the nostrils and mouth line.