


About
Put a spring in your step with this bright and colourful statement jewellery set.
Lengths of chain are joined with jump rings to create loops with wire wrapped squares as the focal point. Folded ribbon is made into delicate flowers, with trimmed pieces of ribbon added throughout the necklace to add a splash of colour. An attractive bracelet is made by adding roses to the centre of wire wrapped squares and squeezing into place.
-
 Key West Witch added Springtime Ribbon Flowers to Jewelry Necklaces
30 Jun 12:39
Key West Witch added Springtime Ribbon Flowers to Jewelry Necklaces
30 Jun 12:39
-
Krystal W. added Springtime Ribbon Flowers to Jewelry
19 Mar 03:38
-
 VillainousNinja added Springtime Ribbon Flowers to Jewelry/Accessory
17 Feb 23:20
VillainousNinja added Springtime Ribbon Flowers to Jewelry/Accessory
17 Feb 23:20
-
 Rachel B. favorited Springtime Ribbon Flowers
15 Aug 18:12
Rachel B. favorited Springtime Ribbon Flowers
15 Aug 18:12
-
 Donna W. favorited Springtime Ribbon Flowers
10 Mar 02:14
Donna W. favorited Springtime Ribbon Flowers
10 Mar 02:14
-
Tierney R. favorited Springtime Ribbon Flowers
17 Oct 07:59
-
jen s. favorited Springtime Ribbon Flowers
06 Oct 14:55
-
Raven B. added Springtime Ribbon Flowers to Xmas presents
17 Aug 09:52
-
 cristinakilljoyway favorited Springtime Ribbon Flowers
18 Mar 18:09
cristinakilljoyway favorited Springtime Ribbon Flowers
18 Mar 18:09
-
 jaclyn.koerber favorited Springtime Ribbon Flowers
30 Sep 16:44
jaclyn.koerber favorited Springtime Ribbon Flowers
30 Sep 16:44
You Will Need
-
 Step 1
Cut 30cm each of pink and white ribbon. Fold it in half and make an “L” shape. Next, take the half of the ribbon that’s pointing down and fold it over so it’s pointing up. You need to fold the ribbon on top of itself, alternating ribbon ends. Always alternate the two pieces of ribbon. Keep the ribbon pinched together. Fold the ribbon together until you reach the end.
-
 Step 2
Hold the ends of the ribbon in one hand, pull one half gently so that it gathers the ribbon into a flower shape.
-
 Step 3
Still holding the ribbon tightly, place a crimp with the loop end at the top as close to the underneath of the flower as you can. Using flat nosed pliers squeeze both sides of the crimp one at a time. Trim the ribbon at an angle leaving one tail 3cm longer. Put the scrap ribbon aside. Make three more flowers.
-
 Step 4
Cut two 15cm lengths of chain. Open a 7mm jump ring, attach to one of the pieces of chain and join a trigger clasp, close the jump ring. Add a jump ring on the end of the other piece of chain. Thread on two Pandora style beads on both pieces of chain.
-
 Step 5
Open a 7mm jump ring, attach to the last link of one of the 15cm pieces of chain, join to the corner of a wire square and close the jump ring. Repeat for the other 15cm chain. Open another jump ring, join the top corner of one square and a middle square. Repeat to join the other side.
-
 Step 6
Cut 30cm of chain. Open a 7mm jump ring, attach the end link of the chain to the bottom left corner of the left square. Loop around and attach the other end with a jump ring to the bottom right corner of the square. Cut 22cm and 18cm, join the ends with a jump ring and attach to the bottom corner of the left square. Repeat for the right side.
-
 Step 7
Cut 5cm of each coloured scrap ribbon, fold in half. Put the folded end into the crimp with the loop at the top and squeeze flat. Trim the ribbon at an angle about 2mm from the crimp. Make 5 more. Join with a 5mm jump ring to the chain at random intervals. Join one flower to the jump ring at the bottom left side of your right hand square.
-
 Step 8
To make the bracelet join six wire squares together with a jump ring at each corner. To add the clasp attach a jump ring in the centre of the end square, join a trigger clasp and close the loop. Repeat on the other end to add a second jump ring.
-
 Step 9
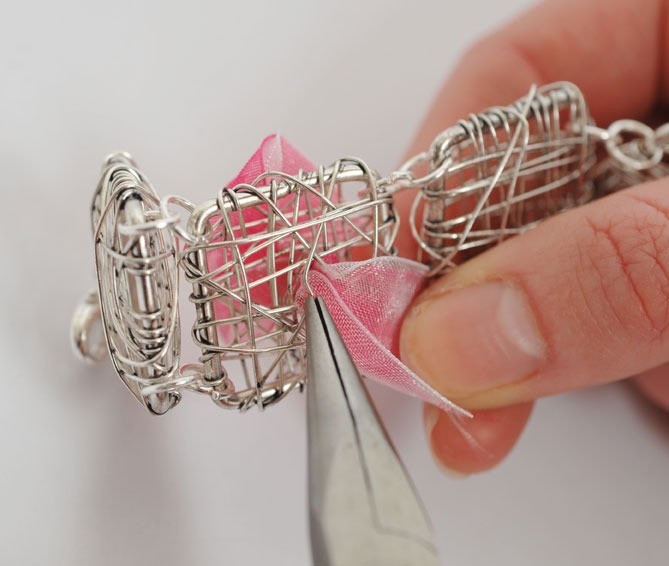
To join the flowers to the bracelet, make a space with your flat nosed pliers in the centre of a square, push the tails through with the pliers, pull tight so the crimp fits snugly inside the wire square. Tweak the wire so that the crimp cannot come back through. Trim any excess ribbon.
-
 Step 10
This is what your finished set should look like.


 1
Home Accessories »
Diy Jewelry Box
1
Home Accessories »
Diy Jewelry Box
