About
Furnishings from the Forest
Are you cutting down a favorite tree that holds sentimental value? Are you just looking to add a rustic touch to your living room coffee table? Either way, this is a great project for even the novice woodworker. This tutorial will teach you step by step how to create these unique coasters, and what tools are best to use in the process.
-
 Tess added Rustic Coasters to House
29 Apr 01:55
Tess added Rustic Coasters to House
29 Apr 01:55
-
 Alyssa D. added Rustic Coasters to Makeup space
08 Feb 15:04
Alyssa D. added Rustic Coasters to Makeup space
08 Feb 15:04
-
 Katelyn T. favorited Rustic Coasters
22 Aug 23:56
Katelyn T. favorited Rustic Coasters
22 Aug 23:56
-
 Bigger Than The Three Of Us added Rustic Coasters to Blake Lively
01 Apr 12:13
Bigger Than The Three Of Us added Rustic Coasters to Blake Lively
01 Apr 12:13
-
 Vonnie S. favorited Rustic Coasters
05 Mar 21:28
Vonnie S. favorited Rustic Coasters
05 Mar 21:28
-
Alyssa D. favorited Rustic Coasters
18 Jan 01:40
-
 Javabean favorited Rustic Coasters
30 Dec 14:23
Javabean favorited Rustic Coasters
30 Dec 14:23
-
 jaitaesmom added Rustic Coasters to Woodwork
29 Dec 03:52
jaitaesmom added Rustic Coasters to Woodwork
29 Dec 03:52
-
jaitaesmom favorited Rustic Coasters
29 Dec 03:52
-
 Jes S. favorited Rustic Coasters
22 Dec 19:28
Jes S. favorited Rustic Coasters
22 Dec 19:28
You Will Need
-
 Step 1
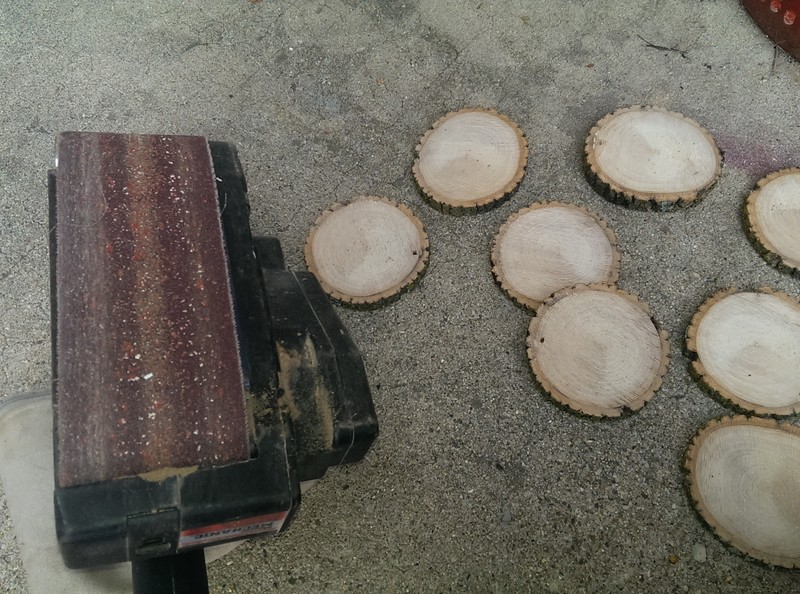
Begin by picking a branch/log that will be big enough to be a coaster. You can carry a cup or beer can out to the and measured that way, or eyeball it and choose something about 4-5" in diameter. Try to find the straightest piece without any extra branches and an even thickness.
-
 Step 2
With a band saw, cut slices roughly 1/2" thick pieces as evenly as you can. The band saw was easiest for this particular project, mainly because the size of the wood I was cutting. The log was too thick to fit under a small miter saw I'd recently purchased, and a jig saw blade wouldn’t be long enough either. You could use a skil saw, just be sure to clamp your wood to something. With round pieces, and fragile bark, clamping long-ways is difficult. You could also use a hand saw, not a power tool, but it will take longer. The band saw was easy and involved no clamping.
-
 Step 3
The next part is the longest and hardest part of the process. This is the sanding part. You want these to be as smooth as possible. You’ll notice the lines in the pieces above. Those are from the saw blades, and you need to get rid of those before putting the clear coat on them or it will not dry the way you want it to and will remain rough. Once sanded completely, you can see the age circles in the tree. It is very important to sand these as much as you can.
A trick I used for sanding was to hold a hand sander upside down in my lap and place the individual slices one at a time on the sander and press down (use work gloves if you are afraid of getting your hands sanded). This method of applying the wood to the sander is much easier than trying to apply the sander to the wood. Another option is to use a vice and be sure your coaster slab is secured tightly to another board or table and stand it that way. You can also choose to sand these by hand if you don’t have a sander. It will take quite a while to get them smooth, though.
-
 Step 4
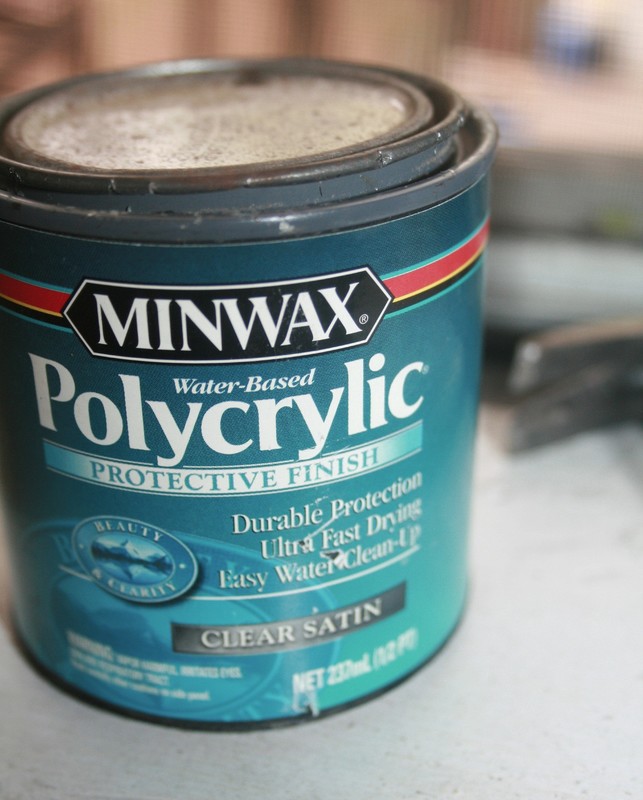
Once you’ve got them perfectly smooth, it is time to apply the clear-coat. If you want to stain them before this step, you can. I chose not to. What kind of clear-coat you apply is up to you. I chose a brush-on water-based Polycrylic, but you can use a lacquer, or varnish. Polyurethane allowed me to brush on (most lacquers are spray on and you need to buy a sprayer) and it was water-based, so it goes on very light. I chose water-based because I was afraid of yellowing over time, which a water-based polyurethane has less chance of doing. I’ve known varnish to yellow over time, so I didn’t want to use that either. I ended up applying A LOT of coats (follow directions on the can of whatever finish you purchase).
-
 Step 5
Apply coats on one side at a time. Allow each coat to dry before applying another coat. You can do the first side over newspaper. You may have to resand the bottom side again after you've finished the coats on the top side, in case newspaper gets stuck to it, or in case there are drips of clear coat. When you do the second side, be sure to rest it on something that it can't stick to, or that if it does stick to it you can easily peel it off. A slab of wood works nicely. You also want to be sure it coats all of it, the edges too, and is a thick enough layer that it holds the edges together. You don't want the bark to chip off later. If the bark happens to chip off while cutting or sanding, you can use wood glue to put it back together before the clear-coat step. I also had a moss-like material on parts of the tree bark that I chose to keep, so it was necessary to apply enough of the finish to these areas so it wasn't exposed to air and would not rot over time.
-
 Step 6
Let the clear coat cure (harden) over a period of several days before using the coasters. Then, set them out, and wait for all of your friends to comment on how great they look!