About
Save your candle stumps!
Here is an easy craft project to reuse the leftover wax from burned out candles. We use candles as secondary heat when the room is cold. They are also useful when the power is out. I find ugly/distorted candles at yard sales for free or next to nothing, at the dollar store or purchased with doubled coupons. Here are the directions for making the thriftiest candles!
-
 Key West Witch favorited Recycled Candle Jars
05 May 09:32
Key West Witch favorited Recycled Candle Jars
05 May 09:32
-
 Len favorited Recycled Candle Jars
12 Feb 22:50
Len favorited Recycled Candle Jars
12 Feb 22:50
-
Ali P added Recycled Candle Jars to Stuff I need to make!
19 Oct 12:37
-
 MaybeAViking favorited Recycled Candle Jars
26 Jun 02:04
MaybeAViking favorited Recycled Candle Jars
26 Jun 02:04
-
 Saigeness M. favorited Recycled Candle Jars
24 Nov 18:23
Saigeness M. favorited Recycled Candle Jars
24 Nov 18:23
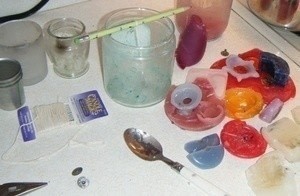
You Will Need
-
 Step 1
Get your wax gathered and break into smaller pieces (the smaller, the faster they melt) and removing the metal clip and any remainder wick or charred bits. Remember if you can't get the stump out of the holder: put it in the freezer for a bit and it should pop out relatively easy. If you must use a knife, be REALLY careful, using gentle pushes with dull knife.
-
Step 2
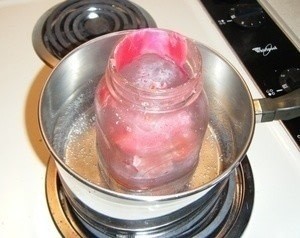
Boil water in your saucepan (make sure the jar will fit and not float) or double boiler. When it begins to boil turn heat to low-medium.
-
 Step 3
You can now begin to add wax. As it melts add more, until the desired amount of wax is melted.
-
Step 4
While wax is melting, you need to prepare for the pouring: First take metal clip and open with pliers.
-
Step 5
Thread metal clip with candle wicking, pinch it shut again (tip: dip end in melting wax to make a "needle" to thread through hole). You should still have plenty of excess wick hanging off, do not cut yet.
-
 Step 6
Hang your clip/wick in the candle jar to see what length you will need. Tie around a pencil at this length. Test the length: drop wick in again leaving the pencil to lay on top. Wick should be straight, not too loose or short. Once the correct length is found, you can clip access.
-
Step 7
Ladle a small amount of wax in candle jar. Take another pencil and press the metal clip into the fresh wax, being sure to center the clip. Once set, you are ready to pour!
-
Step 8
Be sure NOT to nudge the pencil (that wick hangs from)once you start to pour, this could remove it from base and lead to an uneven wick causing all kinds of problems. So POUR! Fill your candle jars up, being careful not to spill.
-
Step 9
Set aside to cool. Enjoy cheap heat!