


About
Cute Critter Crochet
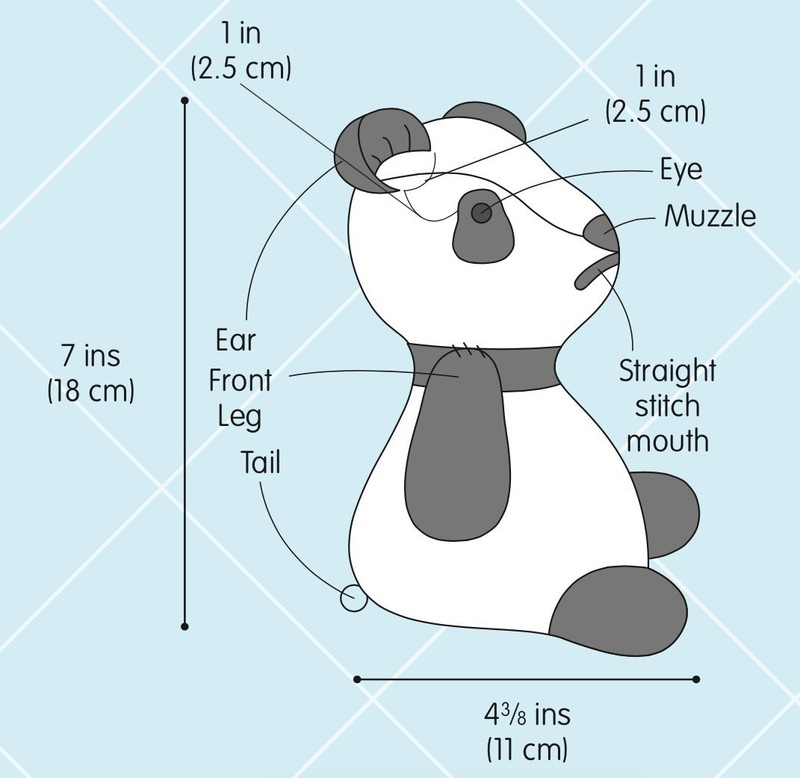
Measurements
Finished size is 43/8 ins (11 cm) long x 7 ins (18 cm) tall
Stitches Used
Crochet: chain stitch (ch), single crochet (sc), single crochet increase (sc inc), single crochet decrease (sc2tog), slip stitch (sl st). Piecing: whipstitch.
Pattern Notes
1. All measurements are approximate, and will vary depending on tension and yarn choice.
2. To change color, work last stitch of old color to last yarn over. Yarn over with new color and draw through all loops on hook. Proceed with new color. Carry color not in use across wrong side of piece until next needed. Refer to charts for color changes.
3. Panda is made from 12 pieces: 2 Side Body pieces, 1 Underbody, 2 Hind Legs, 2 Front Legs, 2 Ears, 1 Back of Head, 1 Muzzle, and 1 Tail. The Hind Legs are worked directly onto the side edges of the Underbody,
to help reduce the amount of seaming needed to finish the Panda. All remaining pieces are sewn together.
Tags
© 2024 Maki Oomachi / Quarto · Reproduced with permission.
-
 Maria José L. favorited Panda
14 Nov 17:43
Maria José L. favorited Panda
14 Nov 17:43
-
 Sofia favorited Panda
12 Mar 14:17
Sofia favorited Panda
12 Mar 14:17
-
 Carla B. favorited Panda
07 Dec 02:44
Carla B. favorited Panda
07 Dec 02:44
-
Pamela J. favorited Panda
20 Oct 11:57
-
Sarah J. favorited Panda
03 Jun 12:49
-
 Chudames favorited Panda
06 Apr 21:42
Chudames favorited Panda
06 Apr 21:42
-
 WerewolfCas favorited Panda
29 Mar 09:09
WerewolfCas favorited Panda
29 Mar 09:09
-
Jan M. added Panda to yarn
14 Mar 00:52
-
 Kat S. favorited Panda
04 Mar 16:15
Kat S. favorited Panda
04 Mar 16:15
-
 julie.sheridan.522 added Panda to crochet
16 Feb 15:33
julie.sheridan.522 added Panda to crochet
16 Feb 15:33
You Will Need
-
 Step 1
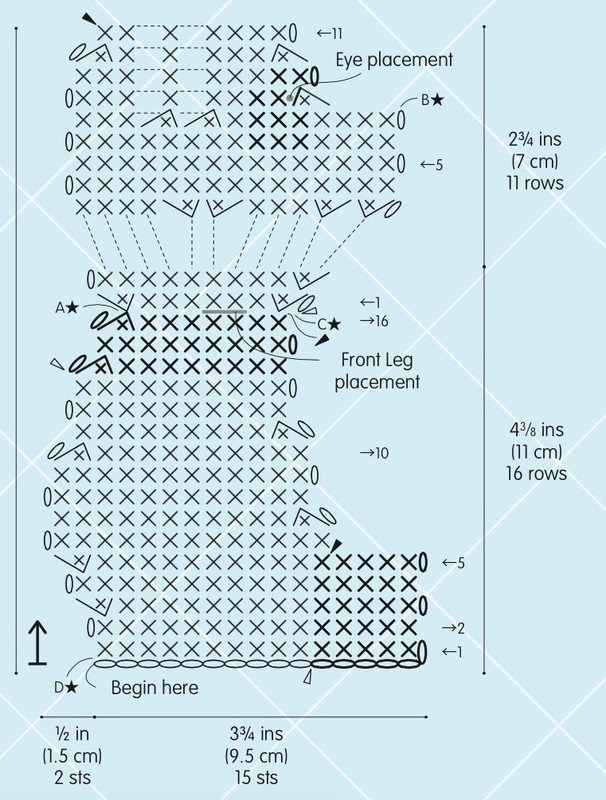
Side Body
(make 2)
With larger hook and white, ch 10; with black, ch 6 more—16 ch. -
Step 2
Hind Leg
Row 1: With black, sc in 2nd ch from hook and next 4
ch; with white, sc in last 10 ch—15 sc.
Row 2: With white, ch 1, turn, sc in first 10 sts; with black, sc in last 5 sts.
Row 3: With black, ch 1, turn, sc in first 5 sts; with white, sc in next 9 sts, sc inc in last st—16 sc.
Row 4: With white, ch 1, turn, sc in first 11 sts; with black, sc in last 5 sts.
Do not fasten off. -
Step 3
Body
Row 5: With black, ch 1, turn, sc in first 5 sts; with white, sc in next 10 sts, sc inc in last st—17 sc. Fasten off black. Continue with white only until next instructed to change to black.
Row 6: Ch 1, turn, sc in first 13 sts; leave remaining sts unworked—13 sc.
Row 7: Ch 1, turn, sc2tog, sc in each st across—12 sc.
Rows 8 and 9: Ch 1, turn, sc in each st across.
Row 10: Ch 1, turn, sc2tog, sc in each st across—11 sc.
Row 11: Ch 1, turn, sc2tog, sc in each st across—10 sc.
Rows 12 and 13: Ch 1, turn, sc in each st across; change to black at end of row.
Row 14: With black, ch 1, turn, sc2tog, sc in each st across—9 sc.
Row 15: With black, ch 1, turn, sc in each st across.
Row 16: With black, ch 1, turn, sc2tog, sc in each
st across; change to white at end of row—8 sc. Fasten off black. Continue with white only until next instructed to change to black. -
Step 4
Head
Row 1: Ch 1, turn, sc inc in first st, sc in next 6 sts, sc inc
in last st—10 sc.
Row 2: Ch 1, turn, sc first 9 sts, sc inc in last st—11 sc.
Row 3: Ch 1, turn, [sc inc in next 2 sts, sc in next 3 sts] twice, sc in last st—15 sc.
Rows 4 and 5: Ch 1, turn, sc in each st across.
Row 6: Ch 1, turn, sc in first 8 sts; with black, sc in next 3 sts; with white, sc in last 4 sts.
Row 7: With white, ch 1, turn, sc in first 4 sts; with black, sc in next 3 sts; with white, sc in next st, [sc2tog] twice, sc in last 3 sts—13 sc.
Row 8: With white, ch 1, turn, sc in first 6 sts; with black, sc in next 2 sts, sc2tog; leave remaining sts unworked—9 sc.
Row 9: With black, ch 1, turn, sc in first 2 sts; with white, sc in next 7 sts. Fasten off black. Continue with white only.
Row 10: Ch 1, turn, sc2tog, sc in next 5 sts, sc2tog—7 sc.
Row 11: Ch 1, turn, sc in each st across. Fasten off. -
 Step 5
Back of Head
With larger hook and white, ch 2.
Row 1: Sc in 2nd ch from hook—1 sc.
Row 2: Ch 1, turn, sc inc in st—2 sc.
Row 3: Ch 1, turn, sc inc in first st, sc in last st—3 sc.
Row 4: Ch 1, turn, sc inc in first st, sc in next 2 sts—4 sc.
Row 5: Ch 1, turn, sc inc in first st, sc in next 3 sts—5 sc.
Row 6: Ch 1, turn, sc inc in first st, sc in next 4 sts—6 sc.
Row 7: Ch 1, turn, sc inc in first st, sc in next 5 sts—7 sc.
Rows 8–15: Ch 1, turn, sc in each st across.
Row 16: Ch 1, turn, sc in first 2 sts, sc2tog, sc in last 3 sts—6 sc. Row 17: Ch 1, turn, sc2tog, sc in next 2 sts, sc2tog—4 sc.
Row 18: Ch 1, turn, [sc2tog] twice—2 sc. Rows 19–22: Ch 1, turn, sc in each st across. Row 23: Ch 1, turn, sc2tog—1 sc.
Row 24: Ch 1, turn, sc in st.
Fasten off, leaving a long tail for sewing. -
 Step 6
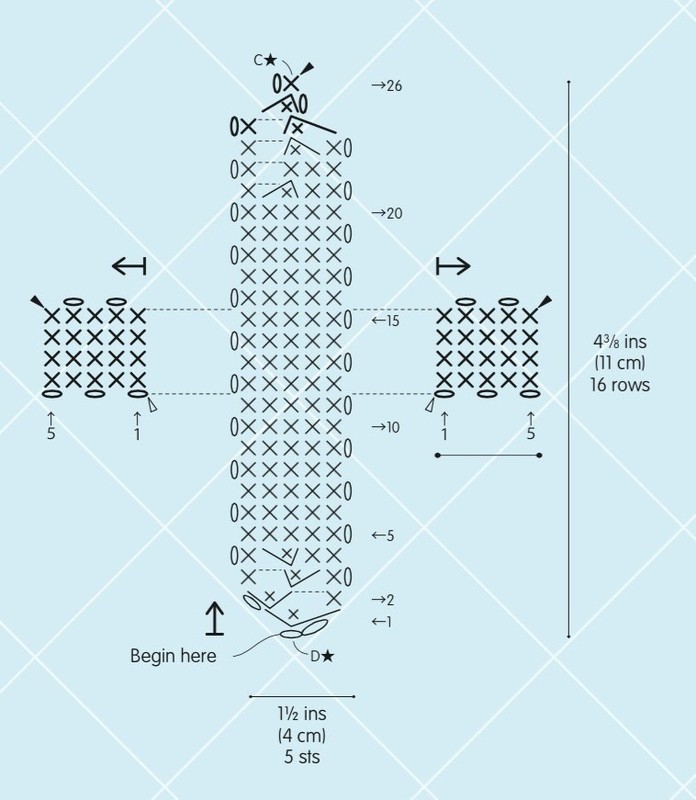
Underbody
With larger hook and white, ch 2.
Row 1: Sc in in 2nd ch from hook—2 sc.
Row 2: Ch 1, turn, sc inc in first st, sc in last st—3 sc.
Row 3: Ch 1, turn, sc in first st, sc inc in next st, sc in last st—4 sc.
Row 4: Ch 1, turn, sc in first st, sc inc in next st, sc in last 2 sts—5 sc.
Rows 5–20: Ch 1, sc in each st across.
Row 21: Ch 1, turn, sc in first 2 sts, sc2tog, sc in last st—4 sc.
Row 22: Ch 1, turn, sc in each st across.
Row 23: Ch 1, turn, sc in first st, sc2tog, sc in last st; change to black at end of row—3 sc. Fasten off white. Continue with black only.
Row 24: Ch 1, turn, sc in first st, sc2tog—2 sc.
Row 25: Ch 1, turn, sc2tog—1 sc. Row 26: Ch 1, turn, sc in st. Fasten off. -
Step 7
First Hind Leg
Note: First Hind Leg is worked across right side edge of Underbody. See Underbody chart for placement.
With right side facing, larger hook, and black, draw up a loop of yarn in end of Row 12 of Underbody.
Row 1 (right side): Ch 1, sc in edge of Row 12, sc in edge of Row 13, sc in edge of Row 14, sc in edge of Row 15—4 sc.
Rows 2–5: Ch 1, turn, sc in each st across.
Fasten off. -
Step 8
Second Hind Leg
Note: Second Hind Leg is worked across left side edge of Underbody. See
Underbody chart for placement.
With wrong side facing, larger hook, and black, draw up a loop of yarn in beginning of Row 12 of Underbody.
Row 1 (wrong side): Ch 1, sc in edge of Row 12, sc in edge of Row 13, sc in edge of Row 14, sc in edge of Row 15—4 sc.
Rows 2–5: Ch 1, turn, sc in each st across. Fasten off. -
 Step 9
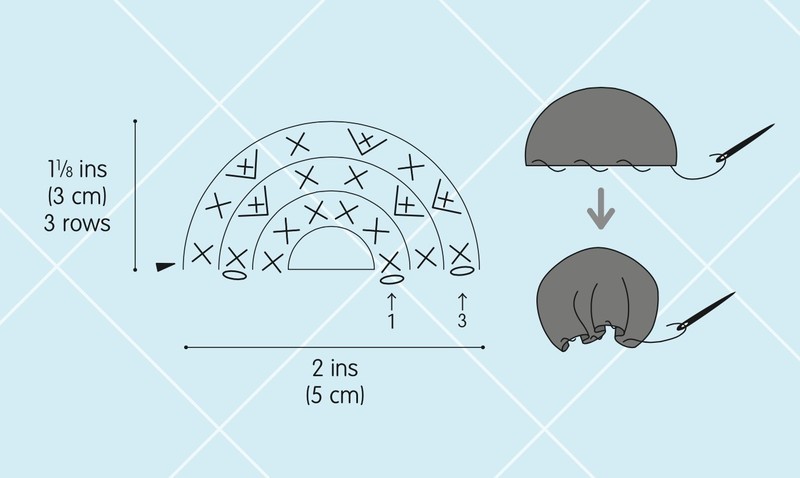
Ears
(make 2)
With black, using the crochet-in-the-round method, make center ring.
Row 1: Ch 1, work 6 sc in ring; do not join to work in rounds, work back and forth in rows—6 sc.
Row 2: Ch 1, turn, sc in first st, sc inc in next st, sc in next 2 sts, sc inc in next st, sc in last st—8 sc.
Row 3: Ch 1, turn, sc in first st, [sc inc in next st, sc in next st] 3 times, sc in last st—11 sc.
Fasten off, leaving a long tail for shaping Ear and sewing to Head. -
 Step 10
Front Legs
(make 2)
With black, using crochet-in-the-round method, make center ring.
Round 1: Ch 1, work 6 sc in ring; do not join with sl st ←15 →10
in beg ch-1, work in continuous rounds (spiral)—6 sc.
Place a marker in last st made to indicate end of round. Move marker up as each round is completed.
Round 2: Sc in next st (the first st of Round 1), sc inc in →10 ←5
next st, [sc in next st, sc inc in next st] twice—9 sc.
Rounds 3–7: Sc in each st around.
Round 8: [Sc in next st, sc2tog] 3 times—6 sc.
Rounds 9 and 10: Sc in each st around.Fasten off, leaving a long tail for sewing Front Leg to Body.
-
 Step 11
Muzzle
With smaller hook and black, ch 2.
Row 1: Sc inc in 2nd ch from hook—2 sc
Fasten off, leaving a long tail for sewing Muzzle to face and embroidering face details. -
 Step 12
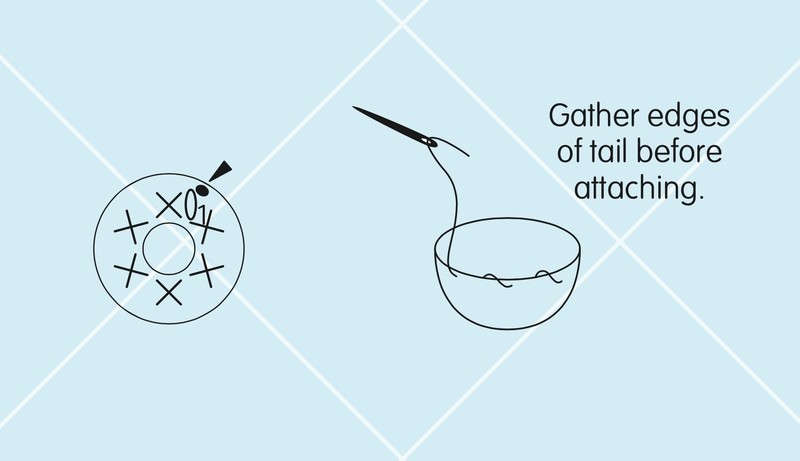
Tail
With larger hook and white, using crochet-in-the- round method, make center ring.
Round 1: Ch 1, work 6 sc in ring; join with sl st in beg ch-1—6 sc.
Fasten off, leaving a long tail to shape Tail and sew to Body. -
 Step 13
Sewing the Pieces Together
Attach buttons (with sewing thread and needle) or safety eyes to Side Body pieces as shown on chart. Match points A, B, C, and D (also labeled with a star) shown on charts of Side Body, Underbody, and Back of Head pieces and whipstitch pieces together with matching yarn, stuffing before completing the sewing. Stuff Front Legs, use long tail to close opening and sew to Side of Body. Use yarn tail to gather lower edge of Ears as shown in diagram on previous page and whipstitch Ears to top of head. Use yarn tail to gather edges of Tail and sew to back of Body. Whipstitch Muzzle to tip of nose. With a tail from Muzzle (or another short length of black yarn) and using photograph as a guide, embroider a straight stitch mouth beneath the Muzzle. Weave in ends.


 1
Home Accessories »
Diy Jewelry Box
1
Home Accessories »
Diy Jewelry Box


