


About
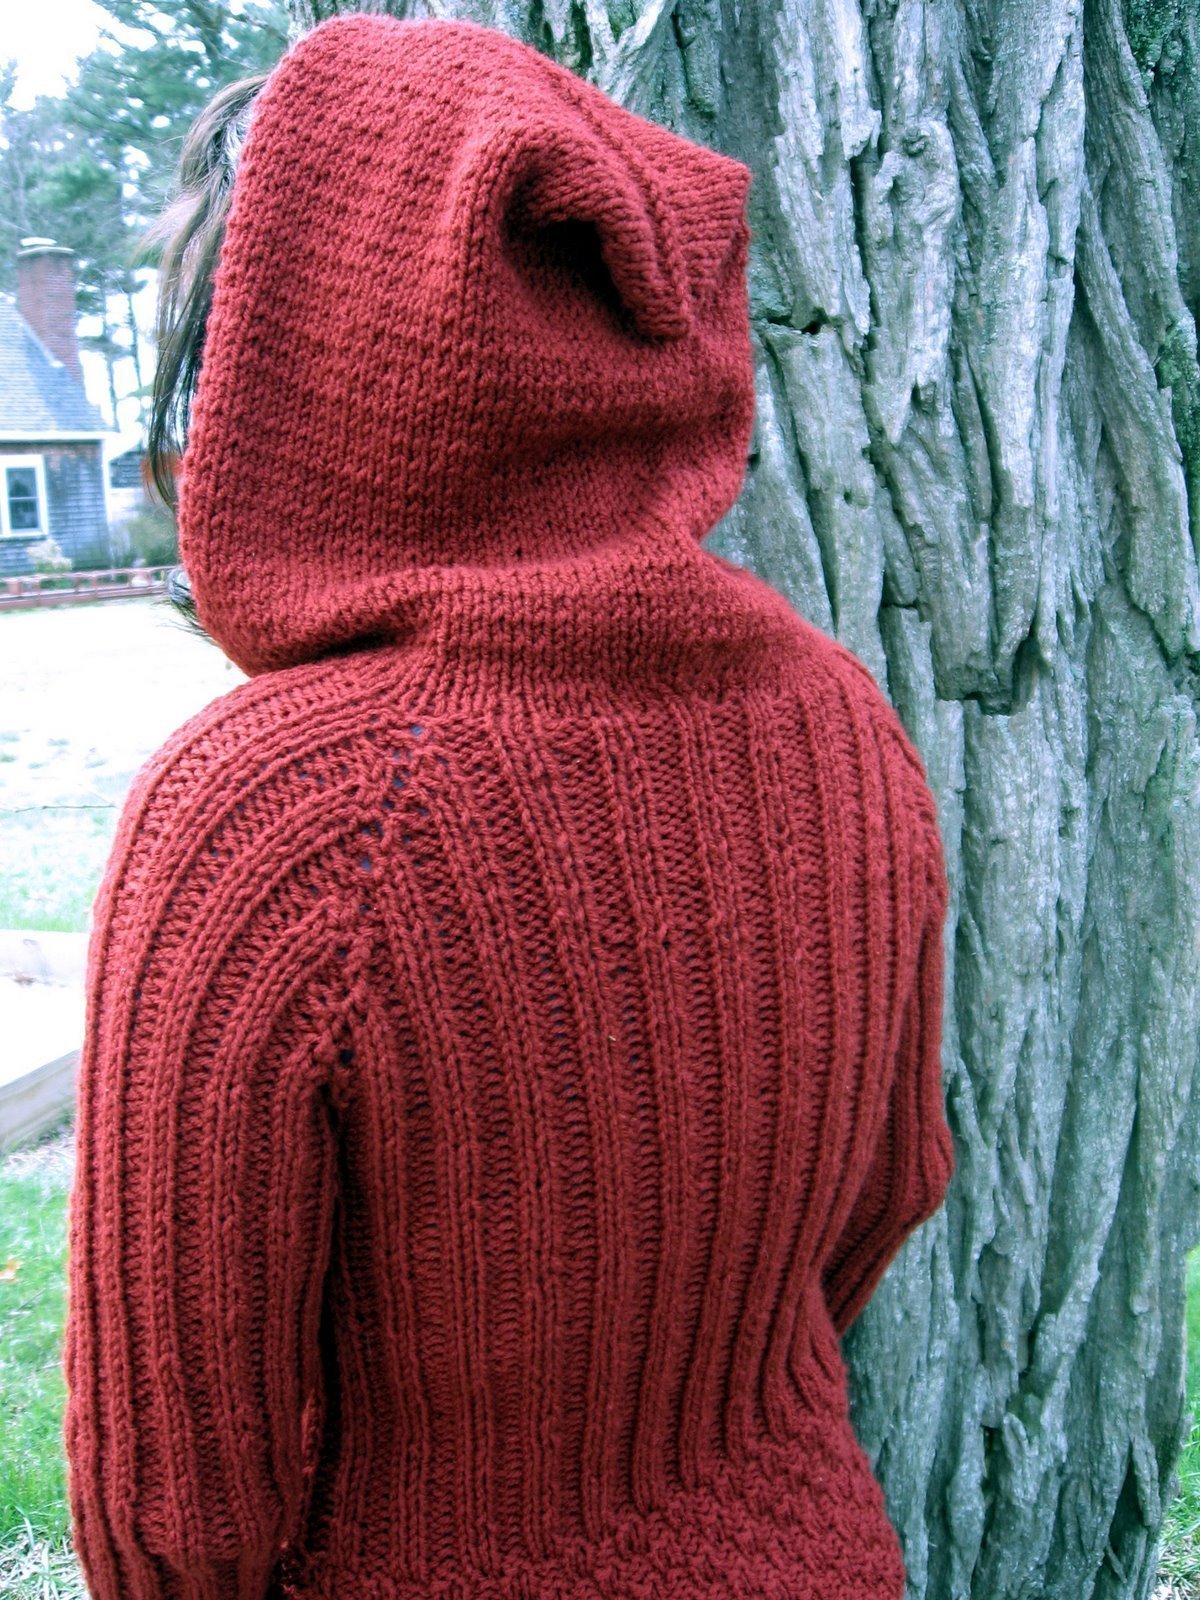
This hooded pullover, named for its fabled inspiration, is super comfortable, and perfect for a romantic wander down your favorite woodland paths.
The simple ribbing gives it a flattering fitted look with really no actual fitting at all! The romantic hood and buttons add whimsy as well as function!
LOST IN THE WOODS Hoodie Pattern
Written by Samantha Duff ©2009-2023 Kismet Knits. v.082620 Patterns for personal use only. Samantha@KismetKnits.com www.KismetKnits.com
-
 Jen S. favorited Lost In The Woods Hoodie
07 Jul 21:20
Jen S. favorited Lost In The Woods Hoodie
07 Jul 21:20
-
Liz N. favorited Lost In The Woods Hoodie
10 Apr 10:52
-
 Jayne W. added Lost In The Woods Hoodie to Hermione Granger
28 Mar 17:11
Jayne W. added Lost In The Woods Hoodie to Hermione Granger
28 Mar 17:11
-
Amanda C. favorited Lost In The Woods Hoodie
20 Jan 16:18
-
Michelle M. added Lost In The Woods Hoodie to crochet
30 Dec 13:49
-
Michelle M. favorited Lost In The Woods Hoodie
30 Dec 13:48
-
 RareJewel favorited Lost In The Woods Hoodie
11 Aug 05:41
RareJewel favorited Lost In The Woods Hoodie
11 Aug 05:41
-
 Elise T. added Lost In The Woods Hoodie to Knitting
17 Jul 01:26
Elise T. added Lost In The Woods Hoodie to Knitting
17 Jul 01:26
-
 Lara L. favorited Lost In The Woods Hoodie
28 Feb 13:43
Lara L. favorited Lost In The Woods Hoodie
28 Feb 13:43
-
 Imke S. favorited Lost In The Woods Hoodie
20 Jan 20:08
Imke S. favorited Lost In The Woods Hoodie
20 Jan 20:08
You Will Need
-
Step 1
Construction notes: Before beginning, select your size and use a highlighter or pen to indicate each corresponding number for your chosen size where listed in the pattern. Sweater is worked in the round from the top down, increasing in 2x2 rib with a negative ease due to the 2x2 rib stitch.
Finished Measurements (Approximate/if made to gauge)
A (hood length): 10.75 inches /27.30 cm
B (across neck):
7.5 (7.5, 7.5, 8, 8.25, 8.25, 8.5, 8.5) [8.75, 8.75, 9, 9, 9.5, 9.25, 9.25, 9.5] inches /
19 (19, 19, 20.5, 20.5, 21, 21.5, 21.5) [22, 22, 22.5, 23, 23, 23.5, 24, 24] cmC/D/E (around bust/waist/hem):
32 (34, 36, 38, 40, 42, 44, 46) [48, 50, 52, 54, 56, 58, 60, 62] inches /
81.25 (86.25, 91.5, 96.5, 101.5, 106.5, 111.75, 116.75) [122, 127, 132, 137.25, 142.25, 147.25, 152.5, 157.5]cmF (total body length):
24.5 (24.25, 24.75, 24.25, 25, 24.5, 25, 25.25) [25.75, 25.5, 26, 25.75, 26.25, 26.25, 26.75, 26.5] inches /
62 (61.5, 62.5, 61.5, 63.5, 62, 63.5, 64) [65, 64.5, 66, 65, 66.5, 67, 68, 67.5] cmG (around upper-arm): 10.5 (11.5, 11.5, 12.5, 13.5, 13.5, 14, 15) [ 15, 16, 16.5, 17.5, 18.5, 19.5, 20.5, 21] inches / 26.75(29.25, 29.25, 31.75, 34.25, 34.25, 35.5, 38) [38, 40.75, 42, 44.5, 47, 49.5, 52, 53.25] cm
H (around wrist): 6 (6.5, 6.5, 7, 7.5 7.5, 7.5, 8) [8, 8.5, 8.5, 8.5, 8.5, 8.5, 8.5, 9.5] inches /15.25 (16.5, 16.5, 17.75, 19, 19, 19, 20.25) [20.25, 21.5, 21.5, 21.5, 21.5, 21.5, 21.5, 24.25] cm
I (sleeve length): 17.5 inches/44.45 cm
Gauge: 18 sts x 24 rows = 4 inches (10 cm) in St st, blocked
-
Step 2
G E A R
Needles: US Size 10.5* [6.5mm] inches /40cm circular needles, & US Size 10.5* [6.5mm] 47 inch /120cm circular needles, & US Size 10.5* [6.5mm] double-pointed needles.
*or size needed to obtain gauge.Yarn: Aran, 10 ply, 8 wpi, 4, Medium
Yardage: Approximately: 1016 (1,075.75, 1,135.5, 1,195.25, 1,255, 1,317.75, 1,380.5, 1,443.25) [1,506, 1,568.75, 1,631.5, 1,694.24, 1,757, 1,819.75, 1,882.25, 1,945.25] yards/(930 (985, 1,040, 1,095, 1,150, 1,205, 1,260, 1,320) [1,375, 1,435, 1,490, 1,550, 1,605, 1,665, 1,720, 1,780] meters).
Notions: 4 stitch markers, small crochet hook, tapestry needle, sewing thread, 10 buttons (2 medium and 8 small), stitch holder or scrap yarn, optional drawstring.
-
Step 3
S T U F F YOU SHOULD K N O W
Abbreviations:
2x2 rib- k2, p2
BO- bind off
BOR- beginning of round
CO- cast on
Dec- decrease
Dpn- double-pointed needles
In- inches
Inc- increases
K- knit
KFBF- knit front, back and front again.
K yo tbl- knit yarn over through the back of the loop.
k2tog-k 2 sts together; single right-leaning dec
M- marker
m1R/L- make one right, left
P- purl
Pm- place marker
PU- pick up
Rnd- round
Sm- slip marker
St(s)- Stitch(es)
Tbl- through back of
loop
Yo- yarn over -
Step 4
DIRECTIONS
Hood: Using US 10.5 [6.5 mm] 16 in circ ndls, CO 78 (80, 84, 86, 88, 90, 94, 94) [96, 98, 102, 104, 106, 108, 110, 114] sts, do not join.Hood set-up row (RS): work Basketweave st for 12 sts, pm, k to 12 sts before end, pm, work Basketweave st 12 sts
Hood rep: FLAT
Row 1: work Basketweave st to m, sm, St st to m, sm, work Basketweave st to endWork Hood rep for 65 rows (all sizes). Removing markers on the last row.
-
Step 5
Yoke set up rnd (WS): work Basketweave st for 6 sts, pm, work 11 (11, 13, 13, 15, 15, 17, 17) [17, 19, 19, 19, 19, 21, 21, 23] front body sts in 2x2 rib, p1, pm, p1 work 8 (8, 6, 6, 4, 6, 4, 4) [4, 2, 4, 4, 4, 3, 2, 2] sleeve sts in 2x2 rib, p1, pm, p1, work 20 (22, 26, 28, 30, 28, 32, 32) [34, 36, 36, 38, 40, 40, 44, 44] back body sts in 2x2 rib, p1, pm, p1, work 8 (8, 6, 6, 4, 6, 4, 4) [4, 2, 4, 4, 4, 3, 2, 2] sleeve sts in 2x2 rib, p1, pm, p1, work 11 (11, 13, 13, 15, 15, 17, 17) [17, 19, 19, 19, 19, 21, 21, 23] front body sts, pm, work Basketweave st for 6 sts.
Yoke rep: FLAT
Work - (-, -, -, -, 1, -, 1) [3, 1, 3, 4, 6, 5, 7, 8] Double inc Rep, then work 9 (9, 9, 9, 9, 8, 9, 8) [6, 8, 6, 5, 3, 4, 2, 1] Single inc Rep
Double Inc Rep
Row 1 (RS): work Basketweave st to m, sm, [in set 2x2 rib, work to 2 sts before m, KFBF, k1, sm k1, KFBF] four times, work in set 2x2 rib to m, sm, work in Basketweave st to end. (16 sts inc) See note about adding sts in 2x2 ribRow 2 (WS): work Basketweave st to m, sm, [in set 2x2 rib, work to 1 st before m, p1, sm, p1] four times, work in set 2x2 rib to m, sm, work in Basketweave st to end.
Single inc Rep
Row 1 (RS): work Basketweave st to m, sm, [in 2x2 rib, work to 2 sts before m, m1R, k1, sm, k1, m1L] four times, work in 2x2 rib to m, sm, work in Basketweave st to end. (8 sts inc) See note about adding sts in 2x2 ribRow 2 (WS): work Basketweave st to m, sm, [in set 2x2 rib, work to 1 st before m, p1, sm, p1] four times, work in set 2x2 rib to m, sm, work in Basketweave st to end.
Join in the round: (all sizes) At the end of this WS row, using backwards loop cast on, co 1-4 sts (as needed to make front 2x2 rib line up), turn, s1, begin working
Yoke RND rep, making sure 2x2 rib lines up across the front without working Basketweave sts, and removing Basketweave sts m’s. When you come to the end of the first round, being careful not to twist the new sts, join in the round. Continue working in the round. Center front (new cast on sts) is now the BOR indicator.Yoke rep: RND
Work 12 (12, 15, 15, 15, 15, 18, 18) [18, 21, 21, 21, 21, 24, 24, 24] Single inc rnd’s
Single inc Rep
Row 1 (RS): [in 2x2 rib, work to 2 sts before m, m1R, k1, sm, k1, m1L] four times, work in 2x2 rib to center front. (8 sts inc)Row 2 (WS): [work in set 2x2 rib, work to 1 st before m, k1, sm, k1] four times, work in set 2x2 rib to center front.
Work until you have 76 (78, 84, 86, 94, 96, 102, 106) [110, 116, 120, 122, 126, 134, 138, 144] front* 48 (50, 50, 52, 54, 58, 58, 62) [66, 66, 72, 74, 78, 81, 84, 86] sleeve sts (per side), 60 (64, 70, 74, 80, 80, 86, 90) [96, 100, 104, 108, 114, 118, 126, 128] back sts (232 (242, 254, 264, 282, 292, 304, 320) [338, 348, 368, 378, 396, 414, 432, 444] sts total) *not including 2-4/adjusted front stitch cast on.
-
Step 6
Separate body: remove m, place sleeve sts onto stitch holders or scrap yarn, using backwards loop CO 4, pm, CO 4, work back body sts, remove m, place the next sleeve sts onto stitch holders or scrap yarn, CO 4, pm, CO 4 sts, work next front body sts, work 4 sts. *here you may have to tweak your cast on stitch numbers by 1-4 to align your 2x2 rib stitch.
BO all sts. -
Step 7
Body: work 73 (72, 69, 66, 70, 67, 64, 66) [69, 61, 64, 63, 66, 60, 63, 61] rnds in 2x2 rib to hem.
Hem: Switch to basketweave st pattern for 32 rnds. Bo all sts. Weave in the ends. -
Step 8
Sleeves: Set up rnd: using US 10.5 [6.5 mm] dpn’s, PU 4 sts from body, work 48 (50, 50, 52, 54, 58, 58, 62) [66, 66, 72, 74, 78, 81, 84, 86] live sleeve sts, PU 4 sts from body, pm. Work 36 (39, 30, 45, 39, 39, 45, 45) [36, [18, 18, 18, 15, 18, 9, 12] rnds in 2x2 rib pattern as set.
Sleeve dec:
Rnd 1-2: sm, work all sts.
Rnd 3: sm, ktog, work to 1 st before m, ssk. (2 sts dec) (note about keeping set pattern)Rep Sleeve dec 23 (22, 25, 20, 22, 22, 20, 20) [23, 29, 29, 29, 30, 29, 32, 31] times. 28 (30, 30, 30, 32, 33, 33, 34) [36, 36, 38, 39, 39, 40, 39, 42] sts rem.
Cuff: Switch to basket weave pattern for 8 rnds. Bo all sts loosely.
Rep with rem sleeve. -
Step 9
Collar: on the inside of the neck, pick up 54 (56, 60, 62, 64, 66, 70, 70) [72, 74, 78, 80, 82, 84, 86, 90] sts where the St st of the hood switched to the 2x2 rib of the yoke, skipping the Basketweave st sections on either side edge. Work in 2x2 rib for 33 rows. Bo all stitches and fold over towards the inside of the collar. Seam the bo sts to the picked up sts leaving the tube open to allow for a drawstring
-
Step 10
Seeming: using mattress stitch, seem the top of the hood together, from front of the hood to the point, tie off end and weave in. Using mattress stitch, seem front openings of collar, leaving 5 sts per side of opening to insert optional drawstring, or closing completely for a finished look, tie off end and weave in.
-
Step 11
Finishing: Weave in the remaining ends. Block to size measurements. Share your work! #LITWHoodie @KismetKnits
Comments


