About
The best cake topper in the Seven Kingdoms
Two years ago I asked my dad what I should make for my sister’s birthday cake and he suggested ‘something Game of Thrones-y’. At this point I had never watched the show or read the books so I took to Google. There were some bleeding tree cakes, a few dragons and then this chair made of swords. When I described it as such to my dad, he started a 20 minute rant explaining to me that that ‘chair made of swords’ was actually the Iron Throne of the Seven Kingdoms of Westeros, forged from 1000 swords surrendered to Aegon the Conquerer by the fiery breath of Balerion the Black Dread, fiercest dragon in history. I’m ashamed to say my response was a rather exaggerated eye roll. Shame. Shame. Shame. And so my edible iron throne was born. Don't worry, I'm fully caught up on all seven seasons now.
Tags
-
 JadeSucksAtLife favorited How To Make An Edible Iron Throne Cake Topper
24 Feb 22:32
JadeSucksAtLife favorited How To Make An Edible Iron Throne Cake Topper
24 Feb 22:32
-
 Wrap Champion published her project How To Make An Edible Iron Throne Cake Topper
25 Nov 09:00
Wrap Champion published her project How To Make An Edible Iron Throne Cake Topper
25 Nov 09:00
-
Step 1
With small pieces of fondant make 40-50 small sword shafts. These should be 1 ½ inches long and ¼ inch thick, pointed at the end. Transfer to a lined baking tray. Leave in a cool, dry place until hard.
Now for the sword handles shape 35 handles from grey fondant. Set aside on the lined tray until hard. Try google image searching swords for design inspiration.
-
 Step 2
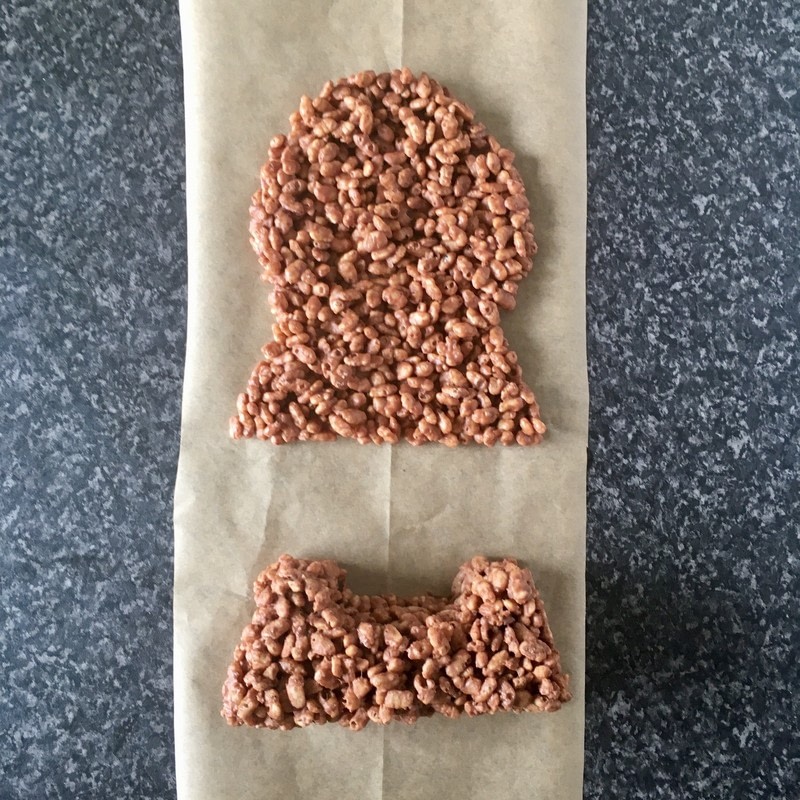
For the base melt 2/3 of the chocolate over a bain-marie and mix in the rice krispies until fully coated. Leave to cool for 5 mins.
While waiting cut a piece of parchment paper to fit a baking tray/board. On the non-shiny side mark out a guide in dark pencil in the shape of the throne. one for the back, one for the base.
Place the parchment paper on the tray pencil side down. Fill the pencilled guides with chocolate rice mix building the height until you have the correct shape for the throne. Its easiest to do this in stages, allowing one layer to harden in the fridge for a few minutes before adding more. Place in the fridge to harden for 15 mins.
-
 Step 3
Using a sharp knife carefully shave down any rough edges and even the sides.
Melt the remaining chocolate and use it to attach the two pieces like this. Chill in the fridge for 5 mins.
Spoon the remaining melted chocolate all over the throne, filling in all the little cracks to strengthen the structure.
-
 Step 4
In a clean bowl whisk the egg white until it is fluffy but not stiff and gradually add the icing sugar, whisking until smooth. Mix in black food colouring until you have a similar dark grey to the swords you made earlier and transfer to a piping bag with a small hole in the bottom or small round nozzle. This will be the glue that holds the throne together.
Roll the fondant to 2mm thickness and cut sword shapes roughly 5cm long, no handles just the shaft. Tailor the length to the section you are covering as you go.
Attach the shafts to the throne with the bagged icing to cover the chocolate base. Don’t worry too much about precision at this stage, you’re going to build on top with more details just make sure to attach them while they are still soft and pliable.
-
 Step 5
Back to the swords you left to dry earlier, if they aren’t hard yet and you need to speed up the process, pop them in a warm but switched off oven for 5 minutes.
When fully dry attach the swords with the bagged icing around the back panel of the throne like this. Leave to dry
-
 Step 6
When dry it’s time to add the decorative swords so grab your handles and fondant.
Roll out the fondant as before and cut more shafts (never getting tired of that), attach these to the throne pointing down and centre around the top, leaving space at the top to attach the handles.
Attach the handles being careful to line them up with the shafts so they look like a complete sword. Continue in layers moving down closer to centre until the throne back is covered
-
 Step 7
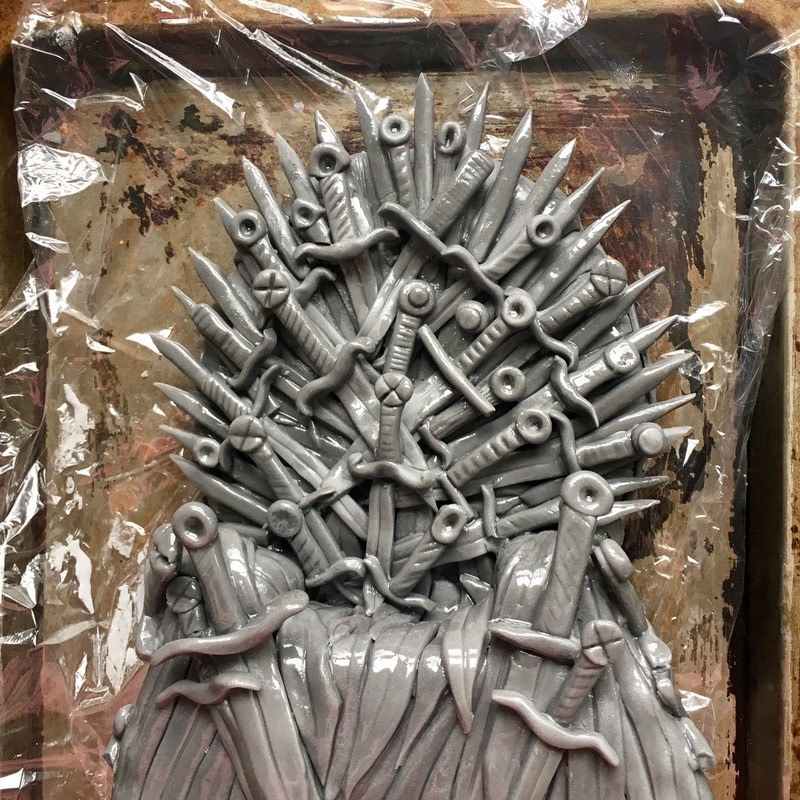
For the sides and seat front I attached two swords that criss-crossed to cover a larger area without looking too busy.
Finally attach two swords pointing down from each arm of the throne.
Leave to dry and you’re done!