


About
Videogame craft = win #3
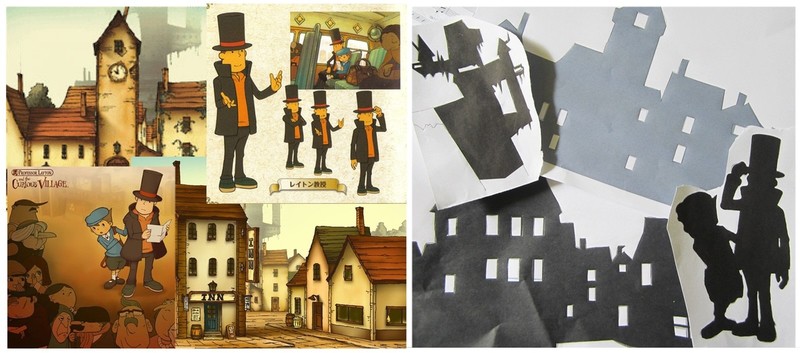
The Professor Layton games are some of my favourite so I’m going to show you how to recreate Limbos style of graphics within a Professor Layton papercut.
Papercutting is pretty much what the name suggests; paper cut into intricate designs. A lot of the time only 1 sheet of paper is used (so it looks like a stencil!).
Tags
Downloads
- PL_pattern.jpg 502 KB [ Download ]
-
 Vivien T. favorited How To: Limbo Inspired Papercutting Professor Layton And The Curious Village
13 Sep 22:25
Vivien T. favorited How To: Limbo Inspired Papercutting Professor Layton And The Curious Village
13 Sep 22:25
-
Alex B. favorited How To: Limbo Inspired Papercutting Professor Layton And The Curious Village
24 Dec 11:08
-
 Rainbow Wyvern favorited How To: Limbo Inspired Papercutting Professor Layton And The Curious Village
12 Feb 17:22
Rainbow Wyvern favorited How To: Limbo Inspired Papercutting Professor Layton And The Curious Village
12 Feb 17:22
-
 Pimke added How To: Limbo Inspired Papercutting Professor Layton And The Curious Village to Origami
02 Feb 11:53
Pimke added How To: Limbo Inspired Papercutting Professor Layton And The Curious Village to Origami
02 Feb 11:53
-
 Sue W. favorited How To: Limbo Inspired Papercutting Professor Layton And The Curious Village
09 Aug 17:35
Sue W. favorited How To: Limbo Inspired Papercutting Professor Layton And The Curious Village
09 Aug 17:35
-
Anette R. favorited How To: Limbo Inspired Papercutting Professor Layton And The Curious Village
03 Dec 00:00
-
 IntrepidMoose favorited How To: Limbo Inspired Papercutting Professor Layton And The Curious Village
10 Nov 22:35
IntrepidMoose favorited How To: Limbo Inspired Papercutting Professor Layton And The Curious Village
10 Nov 22:35
-
 OH! Its the Domo :3 favorited How To: Limbo Inspired Papercutting Professor Layton And The Curious Village
24 Aug 17:09
OH! Its the Domo :3 favorited How To: Limbo Inspired Papercutting Professor Layton And The Curious Village
24 Aug 17:09
-
 heather r. added How To: Limbo Inspired Papercutting Professor Layton And The Curious Village to To-make list
19 Aug 23:06
heather r. added How To: Limbo Inspired Papercutting Professor Layton And The Curious Village to To-make list
19 Aug 23:06
-
heather r. favorited How To: Limbo Inspired Papercutting Professor Layton And The Curious Village
19 Aug 23:06
-
 Step 1
Gather some Inspiration images so you have a good understanding on what you want your papercut to look like. I picked out different things from each picture and then put them all together to create my own unique image.
I put the images in Photoshop and turned them into ‘stencils’ so I could see what I would have to cut out, I made sure they were the right size then I printed them.If you would like to make my papercut download the template, just resize them to fit your paper.
-
 Step 2
If you’re a good drawer you can just draw your designs freehand onto the black card, if you’re like me and lack in drawing skills then you can trace your designs instead using Transfer Paper. Use a Stanley knife to cut around your image; I also cut out the windows so I could put yellow/white paper behind them.
-
 Step 3
Cut out the rest of your designs. Make sure everything in each design is connected, any loose pieces will fall out, for example: if writing words, be aware that letters like A, B,D,O etc. will lose their middle section. Also you want the top layer of your papercut to have a border around it, this is so it can hide the messy edges left by the other layers/double sided tape and give your papercut a nice framed finish.
-
 Step 4
Now you want to start layering your cutouts. Use a new piece of card for the background, put your first cutout on top of the background card, secure it with double sided tape and lay another sheet of tracing paper on top. Continue this: Cutout-secure-tracing paper-secure-cutout-secure etc… When you have come to your last cutout make sure you put double sided tape around the whole border so it stays flat.
-
 Step 5
You’re done! You can frame your papercut normally or put it in a lightbox frame (a shadow box with a light bulb in the back) if you can’t find one, try making one!
This is great if your papercut design has something in it you want to shine, like windows!
-
 Step 6
Using these instructions you can create a papercut of anything you like, use your imagination! Here is another one I made inspired by ‘The Legend of Zelda Twilight Princess’
If you would like the pattern for this one just pm me =]


 1
Books & Journals »
Locking Box And Journal
1
Books & Journals »
Locking Box And Journal
 2
Babies & Kids »
A Toy Kitchen For A Child
2
Babies & Kids »
A Toy Kitchen For A Child
 3
Origami Flowers »
Origami Orchid
3
Origami Flowers »
Origami Orchid
 4
Office »
Pretty Sketchbooks
4
Office »
Pretty Sketchbooks
 5
Charms & Keyrings »
Shugo Chara Inspired Pop It
5
Charms & Keyrings »
Shugo Chara Inspired Pop It
 5
Lamps & Shades »
A Table Lamp Made From Wallpaper Scraps
5
Lamps & Shades »
A Table Lamp Made From Wallpaper Scraps
