


About
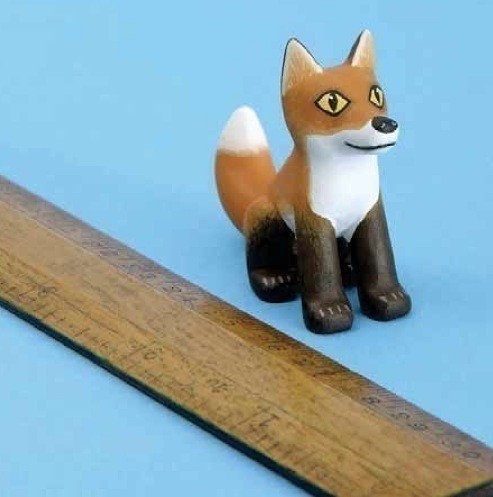
Carve a fox
If you’ve worked through the book in order, you should be gaining skill and confidence by now, ready to tackle some slightly more difficult figures. The fox has a few small, delicate features; these should be cut with the grain to make them as strong as possible. Therefore, make sure the grain is running vertically for this project. There’s a large chunk to remove at the outset, and you may want to use a saw to do this.
TIP
At the painting stage, the colors are mixed and stippled
to blend them together—at the top of the legs, for example. Practice this technique before attempting it on your carving; acrylics dry so fast that you won’t have much time to work
the paint.
-
 Winonaj Barden favorited Fox
13 Aug 11:12
Winonaj Barden favorited Fox
13 Aug 11:12
-
 The Dark Vixen added Fox to The Fox Den
05 Jul 20:50
The Dark Vixen added Fox to The Fox Den
05 Jul 20:50
-
 Allan C. favorited Fox
15 Jul 11:50
Allan C. favorited Fox
15 Jul 11:50
-
 LiQuiD.PaPeR.CuT favorited Fox
18 May 16:56
LiQuiD.PaPeR.CuT favorited Fox
18 May 16:56
-
 Len favorited Fox
01 Jun 20:14
Len favorited Fox
01 Jun 20:14
-
 Emma H. favorited Fox
27 May 13:18
Emma H. favorited Fox
27 May 13:18
-
 The True Fox favorited Fox
01 May 03:10
The True Fox favorited Fox
01 May 03:10
-
Echo R. added Fox to little things
15 Dec 08:04
-
 kimberly.hodges.5059 commented on Fox
16 Oct 12:28
kimberly.hodges.5059 commented on Fox
16 Oct 12:28
-
 Izzy and Emma's Channel xxx commented on Fox
13 Aug 12:15
Izzy and Emma's Channel xxx commented on Fox
13 Aug 12:15
-
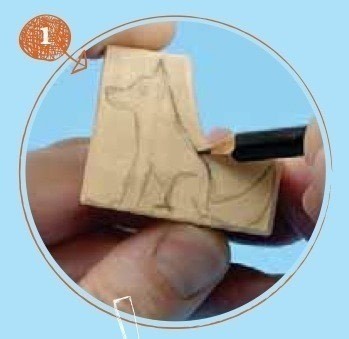
 Step 1
Draw the fox onto your sawn wood block. I’ve condensed the tail length slightly, but you can make it longer if you’d prefer.
-
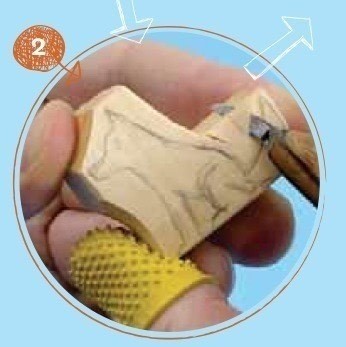
 Step 2
Roughly carve out the edges of the figure, using bold paring cuts, and cut a large notch between the tail and the body.
-
 Step 3
Taper the tail and muzzle. Cut away the edges, using paring cuts to start to round out the fox’s body.
-
 Step 4
Shape the fox’s tail, using scooping and notching cuts to define the area where the tail meets the body and to give the tail its distinctive shape.
-
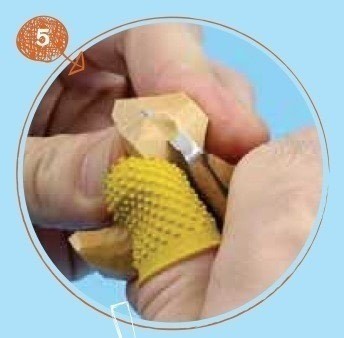
 Step 5
Rough out the head, paring 5 7 from the end of the muzzle to the tops of the ears. Looking
straight on, the face is square.
Cut off the angles so you finish up with more of an octagonal cone. Scoop out the front of the ears. -
 Step 6
Separate the ears. Make
notch cuts in the center of
the ear section to create a
gap between them. Be careful 6 8 not to go too deep or cut away
too much. -
 Step 7
At the front of the figure, make a large V cut with the
tip of the blade to define the space between the legs. Repeat this on both sides, and also on the underside of the fox, as you did in previous projects. Remember to draw on the footprints as a guide. -
 Step 8
Narrow the face and back. Make scooping cuts around the muzzle and long, smooth cuts from the tail end to
the tips of the ears, being careful not to remove the ears themselves. There’s also a lot of material to remove between the haunches and the head. -
 Step 9
Expand the gaps between the legs, digging with the tip of the knife. This is probably the most difficult part—make sure you don’t pry into the wood, or you might break the end of the blade. Working from the bottom, start with notch cuts, then expand the notch and start shaving out the gap.
-
 Step 10
Define the paws by cutting in from the front first and then slicing down to meet that initial cut. Maintain control so you don’t cut off the paw at the end of the cut. If you find it easier, for the front paws, you can first make a scooping cut down, then make some small notch cuts to define the angle of the paw.
-
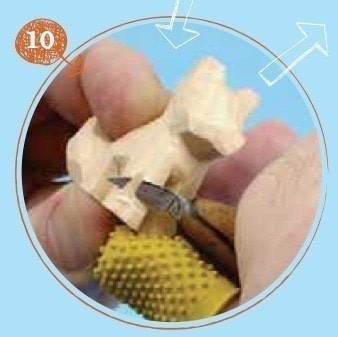
 Step 11
The ears are still square at this stage and need to be more pointed. Carefully make some small paring cuts until you’re happy with the shape. Look around the piece and see what else needs to be done. At the bottom of the tail, you can use notching cuts to clean up the edges; everywhere else, use simple paring cuts.
-
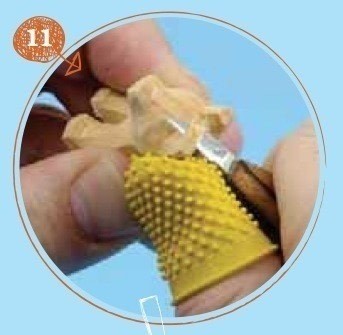
 Step 12
The muzzle is one of the fox’s most important identifying features, so make scooping cuts under the chin and as many small paring cuts as necessary to make your figure as foxy as it can be. Make sure all the transitions are smooth. Finish with fine sandpaper, but go easy, because you
can take off a lot of material quickly on such a small piece. Drill a hole for your toothpick, and you’re ready to paint.


Comments


 1
Home Accessories »
Diy Jewelry Box
1
Home Accessories »
Diy Jewelry Box
