


About
Cute and quick hair accessory that's really easy to make!
With this tutorial, you'll be able to whip up quick and really easy hair bows that you can make out of any color felt you want!
They can also be made in any size. Don't be limited by the listed sizes and feel free to experiment!
If you decide to use my tutorial, be kind and credit me. Thank you!
Tags
-
 Xfluffy_unitatoX favorited Felt Hair Bow, With Victor!
17 Nov 03:22
Xfluffy_unitatoX favorited Felt Hair Bow, With Victor!
17 Nov 03:22
-
 Ada A. favorited Felt Hair Bow, With Victor!
08 Nov 00:04
Ada A. favorited Felt Hair Bow, With Victor!
08 Nov 00:04
-
 Despina V. favorited Felt Hair Bow, With Victor!
27 Apr 16:52
Despina V. favorited Felt Hair Bow, With Victor!
27 Apr 16:52
-
 banu favorited Felt Hair Bow, With Victor!
01 Feb 12:39
banu favorited Felt Hair Bow, With Victor!
01 Feb 12:39
-
Kays K. favorited Felt Hair Bow, With Victor!
10 Jan 02:39
-
 iveto favorited Felt Hair Bow, With Victor!
23 Dec 19:33
iveto favorited Felt Hair Bow, With Victor!
23 Dec 19:33
-
Jen G. favorited Felt Hair Bow, With Victor!
07 Nov 19:52
-
 lilxpanda added Felt Hair Bow, With Victor! to To-make list
21 Sep 00:46
lilxpanda added Felt Hair Bow, With Victor! to To-make list
21 Sep 00:46
-
 LilKitten2000 favorited Felt Hair Bow, With Victor!
10 Dec 18:25
LilKitten2000 favorited Felt Hair Bow, With Victor!
10 Dec 18:25
-
LilKitten2000 commented on Felt Hair Bow, With Victor!
10 Dec 18:25
You Will Need
-
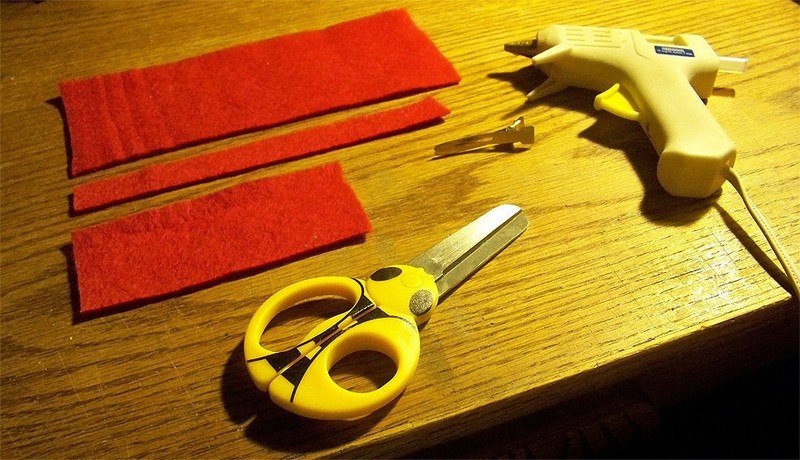
 Step 1
Gather your materials:
+ 3 rectangles of felt of any color. You need a Large (3" X 7.5"), Medium (1.75" X 4.5"), and Small (0.5" X 7")
+ Scissors
+ Glue Gun with Glue Stick
+ Alligator Hair Clip -
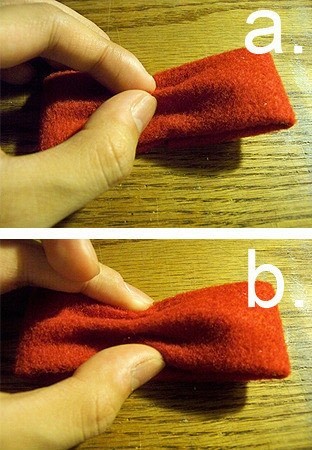
 Step 2
Take your medium (1.75" X 4.5") piece of felt.
Visually separate the piece of felt into thirds and fold one end down lengthwise.
Apply glue down the yellow dotted line as in figure (a.) and fold the remaining flap onto the glue (b.)
Turn the piece over and you should have what looks like figure (c.). This will become the center of the finished bow.
-
 Step 3
Take your large (3" X 7.5") piece of felt.
Visualize a line running down the center of the piece of felt lengthwise and fold both ends towards the center at that line.
Apply glue down the yellow dotted line as seen in figure (a.) making sure that glue stays only on the flap. Place the other flap over the glue and press firmly. Make sure the flaps overlap slightly (b.) and do not stick to the inside of the tube.
Turn the piece over and you should have what looks like figure (c.). This will become the main part of the bow.
-
 Step 4
Take the tube you just made out of the large (3" X 7.5") piece of felt.
Fold the tube lengthwise to mark the center (a.). Apply glue along each end (b.) and fold each end to the center (c.).
Make sure the ends are well glued down and are placed as close as possible to each other without them overlapping.
-
 Step 5
Turn the piece you just made around.
Now we're going to add a little dimension to the bow in just two steps.
First, pinch the middle of the bow lengthwise. It should make a little hill that will stand up like in figure (a.)
Second, pinch the outer edges of the bow along each side of the hill you just made like in figure (b.)
Adjust accordingly so that you have 3 ridges and try to make them soften out as they reach the ends of the bow. You can easily do this by sticking your finger into each loop of the bow.
-
 Step 6
Now take the strip you made out of the medium (1.75" X 4.5") piece of felt in step 2.
Tightly wrap the strip around the middle of the bow and hold with your fingers as in figure (a.). It should look like figure (b.) from the front of the bow.
Carefully spread each end of the strip apart and apply glue to secure it together like in figure (c.) and hold tight until it sets.
-
 Step 7
Once the hot glue has set, take your scissors and snip the ends off as close as you can to the bow, but not too close so that you don't cut any of the glue off.
It should look like figure (b.) when you've done this step.
-
 Step 8
Now take the small (0.5" X 7") piece of felt.
Fold it over itself at an angle so that it forms a V shape like in figure (a.) and add glue a half a centimeter from the fold line. This should ensure that you have a space left over like in figure (b.) for the alligator pin.
Cut the ends of the V shaped strip at an angle as I have done, or cut them any way you choose and at any length you choose. Finally, attach the v shaped strip onto the back of the bow with glue like in figure (c.).
-
 Step 9
Finally, slip in an alligator pin into the space saved in step 8.
There's no need to glue it in, since the alligator pin holds it securely in place. However, if you want to glue it in as a precaution, feel free!
-
 Step 10
Now you can wear your completed bow!
I hope you enjoyed this tutorial, and if you have any questions feel free to ask!
Don't forget to credit me if you decide to make one! ;)


Versions


Comments


 1
Home Accessories »
Diy Jewelry Box
1
Home Accessories »
Diy Jewelry Box
