Embroidered Patches
Extract from Doodle Stitching Embroidery Art • By Ray, Aimee • Published by C&T Publishing


About
Doodle Stitching Embroidery Art
Hand stitch some fun patches to honor your favorite things. Love cats or knitting? Make a patch, attach it to your favorite jacket and wear it with pride. You can create your own embroidered patches using any small motif or the Alphabet and Numbers patterns.
FINISHED SIZE: 4 ̋ (10.2cm) diameter
Stitches
Back stitch
French knot
Long and short stitch
Satin stitch
Stab stitch
Whip stitch
VARIATION
Turn your patch into an ornament or magnet by first cutting a piece of felt that is the same size and shape as the patch. Glue the felt to the back of the patch with fabric or craft glue, and attach a ribbon to the top for hanging or a magnet to the back.
Downloads
- 2021-02-03-162420-11415_155aT.eps 1.73 MB [ Download ]
- 2021-02-03-162637-11415_155bT.eps 1.71 MB [ Download ]
-
 Rebecca favorited Embroidered Patches
15 May 06:05
Rebecca favorited Embroidered Patches
15 May 06:05
-
 Scumbigula favorited Embroidered Patches
06 Feb 03:19
Scumbigula favorited Embroidered Patches
06 Feb 03:19
-
 Jun favorited Embroidered Patches
18 Aug 05:36
Jun favorited Embroidered Patches
18 Aug 05:36
-
 Ms Dorito added Embroidered Patches to sew craft
12 Jun 19:11
Ms Dorito added Embroidered Patches to sew craft
12 Jun 19:11
-
 mmotse03 favorited Embroidered Patches
23 Mar 05:10
mmotse03 favorited Embroidered Patches
23 Mar 05:10
-
 Heather R. favorited Embroidered Patches
15 Mar 14:30
Heather R. favorited Embroidered Patches
15 Mar 14:30
-
Wild A. favorited Embroidered Patches
12 Mar 23:22
-
 Teresa S. favorited Embroidered Patches
12 Mar 22:55
Teresa S. favorited Embroidered Patches
12 Mar 22:55
-
 Carla B. favorited Embroidered Patches
12 Mar 21:55
Carla B. favorited Embroidered Patches
12 Mar 21:55
-
 Kinhime Dragon added Embroidered Patches to things to make
11 Mar 14:12
Kinhime Dragon added Embroidered Patches to things to make
11 Mar 14:12
You Will Need
-
 Step 1
The easiest way to transfer patterns to felt is with the tissue paper method. Trace the patch pattern onto tissue paper, pin
the paper onto the felt, and secure the felt onto an embroidery hoop.TIP Turn any embroidery
motif into a patch by drawing
a border around the edge of the motif, 1⁄4 ̋ (6 mm) away from the original design. Add your own text using the Alphabet and Numbers patterns. -
 Step 2
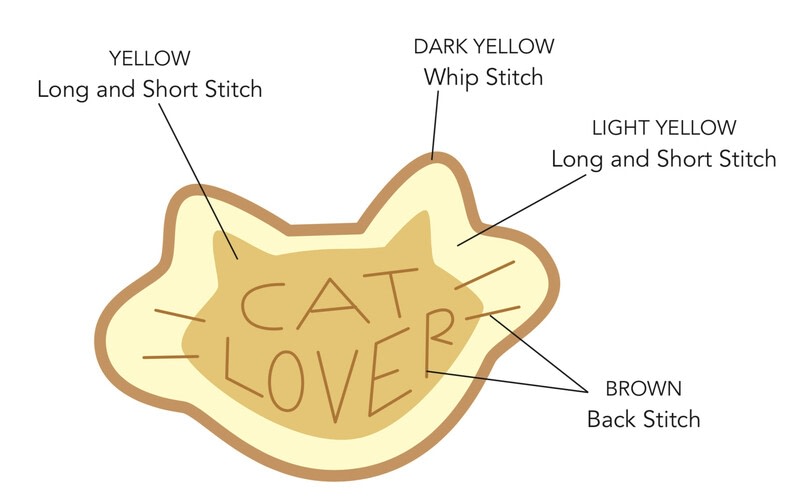
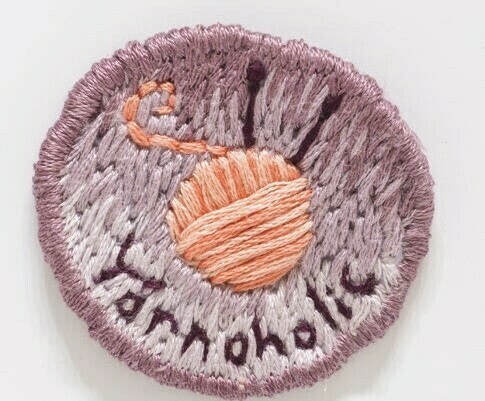
Embroider the design according to the stitch guides. For the Yarnaholic patch, use 3 threads of floss for the words, and knitting needles, and 6 threads for everything else; for the Cat Lover patch, use 3 threads of floss for the whiskers, and 6 threads for everything else. Begin by stitch- ing the words with back stitches. Fill in the spaces around the lettering with long and short stitches. Make sure your stitches bump right up against the edges of the letters. When you’re done, you can stitch over the lettering again if it is hard to read.
-
 Step 3
After embroidering, gently tear away the tissue paper and carefully cut out the patches very closely to the stitched edge. Be careful not to snip through your stitches. Now stitch around the edge of the patch using the whip stitch with 6 threads of floss. This will make a smooth, finished edge.
-
 Step 4
Attach your patches to fabric using tiny stab stitches around the edge, stitching just inside the border. You can also iron them on using fusible webbing. Cut a piece of webbing the same shape but slightly smaller than the patch. Position it on the fabric, and iron the patch to the fabric according to the instructions on the package, until the patch is firmly attached.