

About
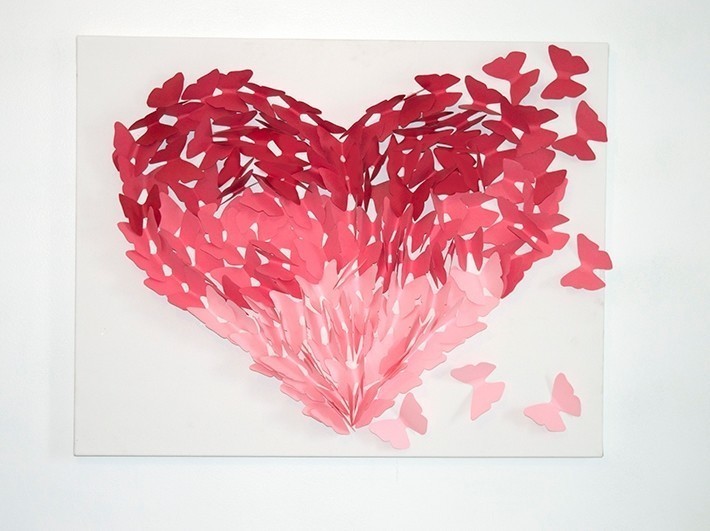
Create a stunning heart artwork made out of flying butterflies.
Tags
-
 Rebecca M. favorited Diy Butterfly Heart Artwork
14 Jun 13:45
Rebecca M. favorited Diy Butterfly Heart Artwork
14 Jun 13:45
-
 ShortHairedGirl favorited Diy Butterfly Heart Artwork
01 Jan 03:56
ShortHairedGirl favorited Diy Butterfly Heart Artwork
01 Jan 03:56
-
 Kim M. favorited Diy Butterfly Heart Artwork
28 Sep 04:27
Kim M. favorited Diy Butterfly Heart Artwork
28 Sep 04:27
-
 Lucy C. favorited Diy Butterfly Heart Artwork
23 Aug 21:11
Lucy C. favorited Diy Butterfly Heart Artwork
23 Aug 21:11
-
JJ W. favorited Diy Butterfly Heart Artwork
13 Aug 13:07
-
 Emily D. favorited Diy Butterfly Heart Artwork
08 Jul 01:10
Emily D. favorited Diy Butterfly Heart Artwork
08 Jul 01:10
-
 KBunker favorited Diy Butterfly Heart Artwork
27 May 20:21
KBunker favorited Diy Butterfly Heart Artwork
27 May 20:21
-
 Hannah D. favorited Diy Butterfly Heart Artwork
22 May 05:52
Hannah D. favorited Diy Butterfly Heart Artwork
22 May 05:52
-
 phoenix0365 added Diy Butterfly Heart Artwork to PAPER CRAFT
14 May 22:43
phoenix0365 added Diy Butterfly Heart Artwork to PAPER CRAFT
14 May 22:43
-
phoenix0365 favorited Diy Butterfly Heart Artwork
14 May 22:42
-
 Step 1
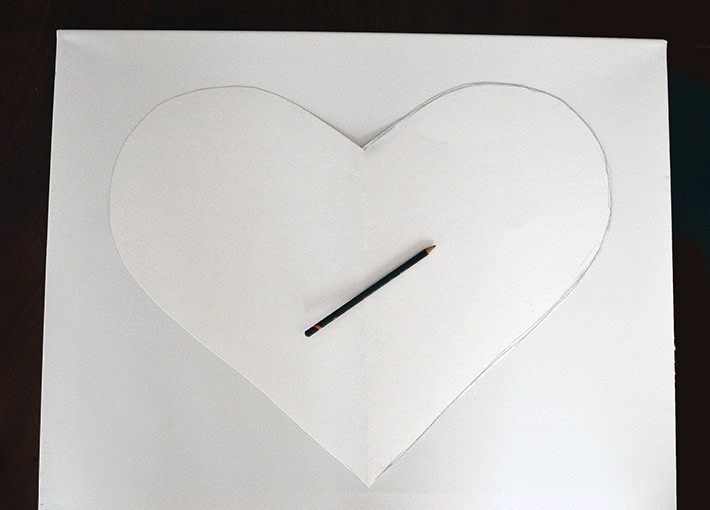
Take a large piece of paper and fold it in half, draw half a heart on the folded piece of paper and cut out the heart shape. Unfold the heart and place it in the middle of the canvas and lightly trace the outline of the heart using a pencil. If you prefer you can skip making a heart stencil and draw free-hand a heart using a pencil in the middle of the canvas.
-
 Step 2
Take a small piece of paper and fold it in half. Draw the outline of one butterfly wing, and cut the butterfly shape out. Unfold the piece of paper to reveal a full butterfly that you will use for your stencil for all the butterflies on the artwork. If you are having difficulty drawing a butterfly you can look online for a butterfly silhouette which you can print and trace. For best results keep the wing details relatively simple to keep the process of cutting the butterflies out relatively fast, and create the butterfly stencil on a thicker sheet of paper if possible as the stencil’s edges will get worn after using it over and over again. Once you have the butterfly stencil trace the butterfly as many times as possible on the sheets of paper and cut out all the butterflies. For my version this require 210 paper butterflies, but this number will depend on the size of your heart and how densely you glue your butterflies.
-
 Step 3
Begin gluing the butterflies to the canvas by placing glue in the middle of each butterfly and positioning the butterfly within the heart outline. You might find it easier to fill in the outline of the heart first. For me I worked on the top and bottom and placed a few butterflies in the middle area so that I would know when to transition colours.
-
 Step 4
Continue gluing butterflies until you fill in the entire heart. On one side of the heart I made the edge very crisp, while on the other I had butterflies flying in from the edge.
-
 Step 5
Once all the butterflies have been glued on remove any strings of glue and hang on the wall. Voila!


 1
Books & Journals »
Locking Box And Journal
1
Books & Journals »
Locking Box And Journal
 2
Babies & Kids »
A Toy Kitchen For A Child
2
Babies & Kids »
A Toy Kitchen For A Child
 3
Origami Flowers »
Origami Orchid
3
Origami Flowers »
Origami Orchid
 4
Office »
Pretty Sketchbooks
4
Office »
Pretty Sketchbooks
 5
Charms & Keyrings »
Shugo Chara Inspired Pop It
5
Charms & Keyrings »
Shugo Chara Inspired Pop It
