


About
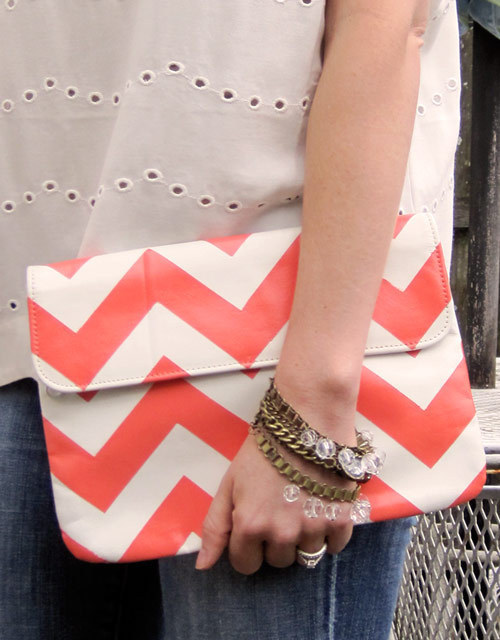
An easy way to spruce up an old thrift store clutch.
If you are a regular visitor to Goodwill (or just about any thrift store), you've no doubt seen a multitude of tired old clutches in need of a little sprucing up. This tutorial is a great way to repurpose an old bag into something you'll be happy to tote around.
Tags
-
 Lara L. favorited Chevron Stripe Painted Clutch
28 Feb 12:39
Lara L. favorited Chevron Stripe Painted Clutch
28 Feb 12:39
-
 arina m. favorited Chevron Stripe Painted Clutch
27 May 03:47
arina m. favorited Chevron Stripe Painted Clutch
27 May 03:47
-
Maxine M. added Chevron Stripe Painted Clutch to To-make list
19 Apr 04:39
-
 abolds1 commented on Chevron Stripe Painted Clutch
07 Dec 01:36
abolds1 commented on Chevron Stripe Painted Clutch
07 Dec 01:36
-
Nora E. added Chevron Stripe Painted Clutch to Projects to try
05 Apr 02:16
-
 Millie H. added Chevron Stripe Painted Clutch to Make
20 Mar 23:31
Millie H. added Chevron Stripe Painted Clutch to Make
20 Mar 23:31
-
Advitha K. favorited Chevron Stripe Painted Clutch
10 Mar 09:21
-
 cristinakilljoyway favorited Chevron Stripe Painted Clutch
03 Jan 17:29
cristinakilljoyway favorited Chevron Stripe Painted Clutch
03 Jan 17:29
-
yuliya k. favorited Chevron Stripe Painted Clutch
29 Nov 00:00
-
 Ana M. favorited Chevron Stripe Painted Clutch
02 Nov 03:33
Ana M. favorited Chevron Stripe Painted Clutch
02 Nov 03:33
You Will Need
-
 Step 1
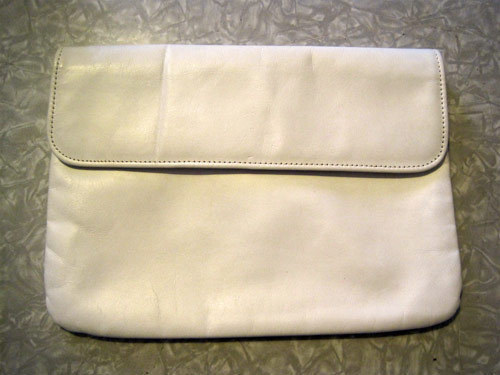
Obviously you will need a bag. A clutch is good because as I already mentioned, there seems to be an abundance of them at secondhand stores, and because it's less area to tape off (trust me, there will come a point, probably pretty early on, when you are tired of taping). My clutch is pleather. You could use real leather if you want, or canvas, or straw, or whatever you happen to find or have on hand.
-
 Step 2
You will need:
1. Nail polish remover and cotton balls (if you are using pleather, otherwise you won't need these).
2. A ruler, a pencil and some cardboard to make a template. I used a pizza box. Reduce, reuse, recycle! Or in this case just reuse.
2. Paint (acrylic works best, mine is outdoor acrylic because that is the only kind they had in coral). Two bottles was total overkill, one was way more than I needed. If you are using acrylic paint, get fabric medium as well.
3. A sponge brush (or any brush; I like the sponge ones best and already had one from another project).
4. Painter's tape. I got Frog Tape. You don't have to get Frog Tape, but DO NOT buy the cheap kind. You only paid a few dollars for the bag you're painting (hopefully), now is the time to splurge. Technically it's not really even splurging because you're only going to use about 1/20th of the roll so there will be lots left for future crafting endeavors.
5. Mod Podge (or any other kind of sealant).
-
 Step 3
First, clean your bag with cotton balls soaked in nail polish remover. Not only will this remove any dirt, it will take off some of the shiny finish so your paint sticks better. (Test a small, inconspicuous area first.)
-
 Step 4
Now it's time to tape! Well, now as in right after you make a template. This is where the ruler comes in. The chevrons can be any size you want, I made mine the same width as my tape (1") so the painted chevrons would be the same size as the ones that will be the original bag color.
Once you have your template cut out, line it up with the top or bottom edge of the bag to keep it level, then tape it down.
-
 Step 5
Now put tape on either side of the template, being careful to trim around the edges. Anywhere you don't put tape will get painted. Move your template up or down, aligning it with the tape you just put down, and continue until the entire bag is taped off. My edges don't line up exactly, but I did take care to line up the flap with the part underneath on the second try. I had the front taped off before I realized it wouldn't line up and had to start over (oh the benefits of following a tutorial rather than writing it). Tape off any zippers or hardware as well. Press down really hard to make sure all the tape is super secure. This is how you get nice, crisp edges.
-
 Step 6
Now you are ready to paint (aka the easy part). Mix your paint as directed on the fabric medium bottle. Using a cup works well for keeping the paint contained in a small area. (FYI the amount of paint I mixed up was about double what I needed to do three coats on this bag. Better to have a little too much than not enough since you are mixing the paint with the fabric medium and different batches might not be the exact same shade, but keep in mind you aren't painting a whole room here.)
It's best to work in light coats. In between coats, I put my cup and brush in a sealed plastic bag and left them in the fridge so I didn't have to wash my brush every time I painted. Three coats gave me perfect, even coverage. As tempting as it will be, DO NOT throw out the remaining paint yet. It's not like it's taking up that much fridge real estate.
Once the last coat is good and dry, remove the tape slowly and carefully. DO NOT remove the tape from any zippers or hardware. I was so anxious to see the results that I removed all the tape immediately, which meant I had to apply the Mod Podge very carefully to avoid my zippers during the next steps. At this point, you're really going to want all this DIY stuff off your kitchen table so being able to paint fast and clean up is key (unless you have some kind of office/craft room to work in at your leisure, in which case peel away). There may be a few spots where some of the paint peels off. This is no big deal, just go back in and touch up with the paint you saved.
-
 Step 7
Now you are ready for the Mod Podge (or other sealant of your choice). This will help even out the slight difference between painted and non-painted areas and add back a little of the shine that the nail polish remover took away (so professional!). I used the satin version and it still came out pretty shiny. Two coats should do it.
-
 Step 8
Let dry and enjoy!!


Comments


 1
Books & Journals »
Locking Box And Journal
1
Books & Journals »
Locking Box And Journal
 2
Babies & Kids »
A Toy Kitchen For A Child
2
Babies & Kids »
A Toy Kitchen For A Child
 3
Origami Flowers »
Origami Orchid
3
Origami Flowers »
Origami Orchid
 4
Office »
Pretty Sketchbooks
4
Office »
Pretty Sketchbooks
 5
Charms & Keyrings »
Shugo Chara Inspired Pop It
5
Charms & Keyrings »
Shugo Chara Inspired Pop It
