

About
Chalkboard Starter Pots Tutorial
In this tutorial, we'll be learning how to make our own reusable chalkboard seed starter pots. Use these pots to plant seeds, label with chalk to know which seedling is which. Once you plant your new sprout, rinse off the chalk and start again! Use them season after season. No waste.
-
 VeganSprinkles favorited Chalkboard Starter Pots
23 Mar 09:17
VeganSprinkles favorited Chalkboard Starter Pots
23 Mar 09:17
-
 Presley W. favorited Chalkboard Starter Pots
24 Sep 06:16
Presley W. favorited Chalkboard Starter Pots
24 Sep 06:16
-
 Elentine favorited Chalkboard Starter Pots
28 Feb 12:13
Elentine favorited Chalkboard Starter Pots
28 Feb 12:13
-
 Djamilah W. favorited Chalkboard Starter Pots
29 Jul 08:22
Djamilah W. favorited Chalkboard Starter Pots
29 Jul 08:22
-
 Raven Beauty favorited Chalkboard Starter Pots
23 Apr 06:23
Raven Beauty favorited Chalkboard Starter Pots
23 Apr 06:23
-
 Step 1
You'll need for this project:
-
 Step 2
Using a moist (but not wet) paper towel, wipe any dirt, pottery dust, or debris from the area you'll be painting. Set aside and let dry, which doesn't take long.
-
 Step 3
Holding the pot in your non-dominant hand as shown, rest the entire side of your hand on the working surface. This creates stability. Place your working hand in position to paint the rim, but extend your pinky and rest the entire side of that hand on the working surface as well.
Putting your brush loaded with paint to the rim, allow the bristles to widen out. Holding the brush in the same position, slowly rotate the pot away from you. Not moving the brush gives you more control to create an even line that is straight on both sides.
Gently lift off when you need more paint, and start again, slightly overlapping previous beginning and end points.
-
 Step 4
After first coat is completely dry, finish with a second coat of chalkboard paint. Make this layer a little thicker and try for as even a finish as possible. This layer will not sink into the terra cotta as much, so it will look a little more like its original placement than the previous.
Set aside to dry completely, approximately 45 minutes to an hour. (Note: if you're using this paint on a less-porous surface, it may take longer for each layer to dry.)
-
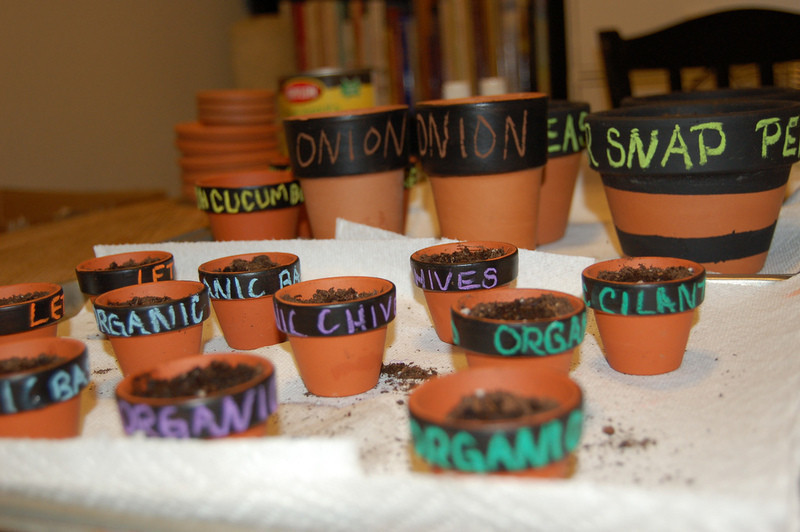
 Step 5
Here's all my pots, lined up and drying. When they're completely ready, fill each pot with soil, plant seeds, dust rim, then label edge with chalk. Water, and wait for your little babies to sprout!!


Versions

Comments


