About
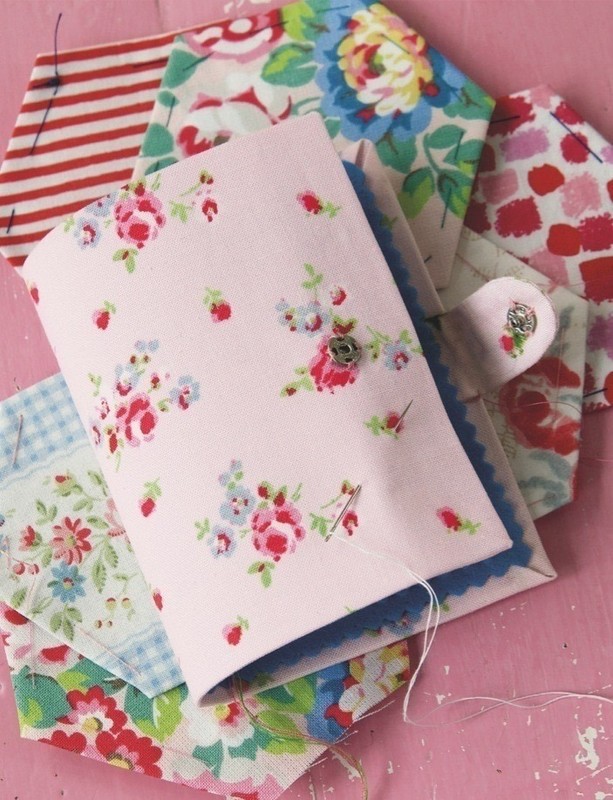
Sew yourself a wonderful Cath Kidston needlecase & pincushion.
If you've got the sewing bug, you'll need plenty of different needles for plain stitching, embroidery and quilting. Store them safely in the pages of this handy book, then make the adorable pincushion to match. Don't put your needles in the cushion however - they may disappear into the filling!
Top tip:
Alternative pincushion fillings over the year have included sawdust; clean sheep's fleece which contains natural lanolin; coffee grounds to prevent rust, and sand or emery powder which gives you a heavier cushion and keep the points sharp.
From the book Sew by Cath Kidston, read our review here.

Tags
© 2024 Cath Kidston / Quadrille · Reproduced with permission.
-
 Luna D. favorited Cath Kidston Needlecase & Pincushion
25 Apr 07:08
Luna D. favorited Cath Kidston Needlecase & Pincushion
25 Apr 07:08
-
 Rattiemama added Cath Kidston Needlecase & Pincushion to Embroidery and Sewing, Etc.
05 Oct 15:43
Rattiemama added Cath Kidston Needlecase & Pincushion to Embroidery and Sewing, Etc.
05 Oct 15:43
-
Rattiemama favorited Cath Kidston Needlecase & Pincushion
05 Oct 15:43
-
 Annelie S. favorited Cath Kidston Needlecase & Pincushion
10 Aug 09:43
Annelie S. favorited Cath Kidston Needlecase & Pincushion
10 Aug 09:43
-
 gail.obrien favorited Cath Kidston Needlecase & Pincushion
29 Mar 07:35
gail.obrien favorited Cath Kidston Needlecase & Pincushion
29 Mar 07:35
-
 Kim H. favorited Cath Kidston Needlecase & Pincushion
24 Dec 19:34
Kim H. favorited Cath Kidston Needlecase & Pincushion
24 Dec 19:34
-
 Ana favorited Cath Kidston Needlecase & Pincushion
15 Apr 17:30
Ana favorited Cath Kidston Needlecase & Pincushion
15 Apr 17:30
-
 susan.adkins.90 favorited Cath Kidston Needlecase & Pincushion
08 Apr 02:15
susan.adkins.90 favorited Cath Kidston Needlecase & Pincushion
08 Apr 02:15
-
Alecia B. favorited Cath Kidston Needlecase & Pincushion
01 Aug 16:52
-
 Vanessa B. added Cath Kidston Needlecase & Pincushion to Home DIY
23 Mar 16:43
Vanessa B. added Cath Kidston Needlecase & Pincushion to Home DIY
23 Mar 16:43
-
Step 1
Pincushion
1. To make the pincushion, trace round the heart template onto wrong side of the floral fabric. Cut out roughly, 1cm from the line. Cut another piece of fabric the same size and tack the two together with right sides facing.
-
Step 2
2. Machine stitch around the outline, leaving a 4cm gap in one straight side. Trim the allowance to 6mm, then clip and notch it. Press the allowance back on both sides of the gap and turn right side out.
-
Step 3
3. Stuff the pincushion with your chosen filling, packing it down firmly through the gap. Close the gap and turn right side out.
-
 Step 4
4. Tie the velvet ribbon into a small bow and trim the ends into fishtails. Sew the bow to the centre top of the finished heart pincushion.
-
Step 5
Needlecase
1. To make the needlecase, cut a rectangle of Bondaweb 1cm larger on each side than the card cover. Iron this to the floral fabric and cut out around the edge. Peel off the backing paper.
-
Step 6
2. Place the fabric on your ironing board with the Bondaweb facing upwards, then position the card centrally on top.
-
Step 7
3. Fold the corners of the fabric over to the card, gently pressing them down in turn with the tip of your iron. Now fold the sides over and iron each one so that the corners are neatly mitred.
-
Step 8
4. Turn the cover the other way up and, protecting the surface with a piece of spare fabric, iron it gently so the fabric fuses onto the card. Stitch the recessed half of the press stud halfway down the right side, 2cm in from the edges.
-
Step 9
5. Stitch the other half of the press stud to the round end of one tab, on the right side. Tack and machine stitch the two tabs together around the long and curved edges, leaving a 5mm seam allowance. Notch the allowance around the curve and turn right side out.
-
Step 10
6. Trace the cover lining onto the paper side of the Bondaweb. Cut out roughly, then iron it onto the felt. Cut along the pencil line with pinking shears.
-
 Step 11
Pin the other two pages centrally on top and machine stitch together down the centre. Peel off the backing paper from the first page, then press it onto the cover.