


About
Preserving Food ~ Canning Labels!
Last week I was so frustrated by my pantry collapse that I had decided I wasn't going to can anymore for the year. That lasted for about two days... or until I got two boxes of apples from the market. And then bruised peaches for free, and then corn. Sigh. It really is part of the pioneer in me to put up food when it is abundant and put by as much as possible. I just can't refuse amazingly good, organic food.
So this week was dedicated to peaches, and then corn, and now applesauce. But it was also dedicated to falling in love with my pantry again. To being in love with the process of putting food by and stepping back just enough so that I could see the beauty in my pantry that everyone else saw.
This led me to look for pretty labels for the tops of my jars:
Inspired by Bitter Betty and her wonderful canning labels (which are on all of my green beans) I set out to make my own. The process turned out to be MUCH easier than I thought it was. Although to figure that out, took about 3 hours, a Word savvy best friend, and a very patient husband. ;)
-
 kim l. favorited Canning Labels
19 Oct 13:39
kim l. favorited Canning Labels
19 Oct 13:39
-
 Lorraine E. added Canning Labels to Vintage stationary
20 Dec 23:09
Lorraine E. added Canning Labels to Vintage stationary
20 Dec 23:09
-
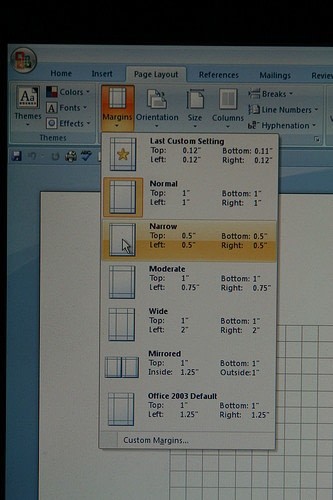
 Step 1
Go into Microsoft Word and open a new document. Then, set the margins to narrow (shown) and if you can, get the grid set up (it is always on mine, so I do not know how to do this.)
-
 Step 2
Go into the tab 'insert' and click on 'shapes'. Then click on 'oval' and create an oval on your paper.
-
 Step 3
Once you have done this, if you click on the oval it should bring up the properties under the 'picture tools' tab at the top of the page.
In the top right hand corner, there is a size box. Make both width and height 2.5 inches.
-
 Step 4
Then comes the fun part... filling the label. Go to 'drawing tools'. In the center top there is a button called "shape fill". The menu that comes down will have the option to fill this shape with a picture from your computer.
-
 Step 5
Select a square picture (or edit a current picture to be a square) for the best results.
-
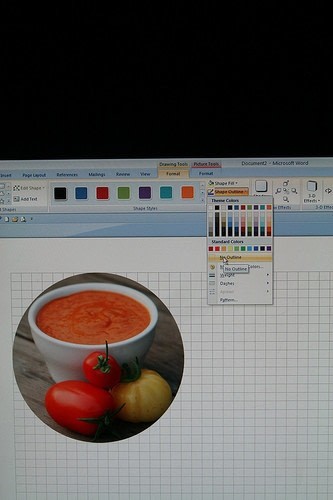
 Step 6
Set the shape outline to "no outline" so you have a little bit of room in where you can punch.
-
 Step 7
Once that is done, up in the top left hand corner is the "add text" button. This will bring the cursor to the top left of your shape on TOP of the picture.
-
 Step 8
Adjust the text to your liking.
(I really like Fonts for Peas free fun new fonts! kevinandamanda.com/fonts/fontsforpeas/ It is a GREAT site!)
If the font is not where you want it to be, adjust the top and bottom spacing. I always select the line spacing options and select "add space before paragraph" to set the text in the center of the label. You can also do custom spacing that works better for some other fonts.
-
 Step 9
Then it is just a matter of copy and paste until you have 12 on a page. Up until now, the grid was just for show, but at this stage in the game, the grid can be oh so helpful in making these all fit perfectly on the page.
-
 Step 10
Now save your labels. Make sure that you save them with "CanningLabel _" first so that you are able to find all of your labels at once. This is a tip that my friend Sarah taught me. It makes it so when you pull up one, you can just click on the office button and find them all.
-
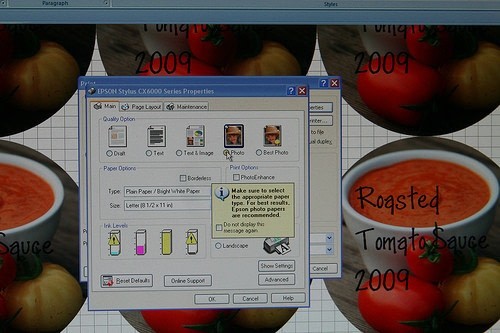
 Step 11
Before printing, make sure you have the label paper in the printer, and then set your printer to "photo". DO NOT QUICK PRINT! This will put lines through all your labels as the quality is very low.
-
 Step 12
Print as many as you need. :)
-
 Step 13
Use the scissors to cut off the bottom edge of the paper and then use your hole punch to cut the perfect labels from the page. I used my Micheal's 50% off cupon and this label punch cost me $6.49. It has already proven worth it.
-
 Step 14
Add to the top of your canning lids (the only part that you have to throw away) and enjoy the beauty of your pantry!


Comments

 1
Home Accessories »
Diy Jewelry Box
1
Home Accessories »
Diy Jewelry Box
