

Bear Pocket Backpack
Extract from The Build Bag Book: Backpacks • By Shore, Debbie • Published by Search Press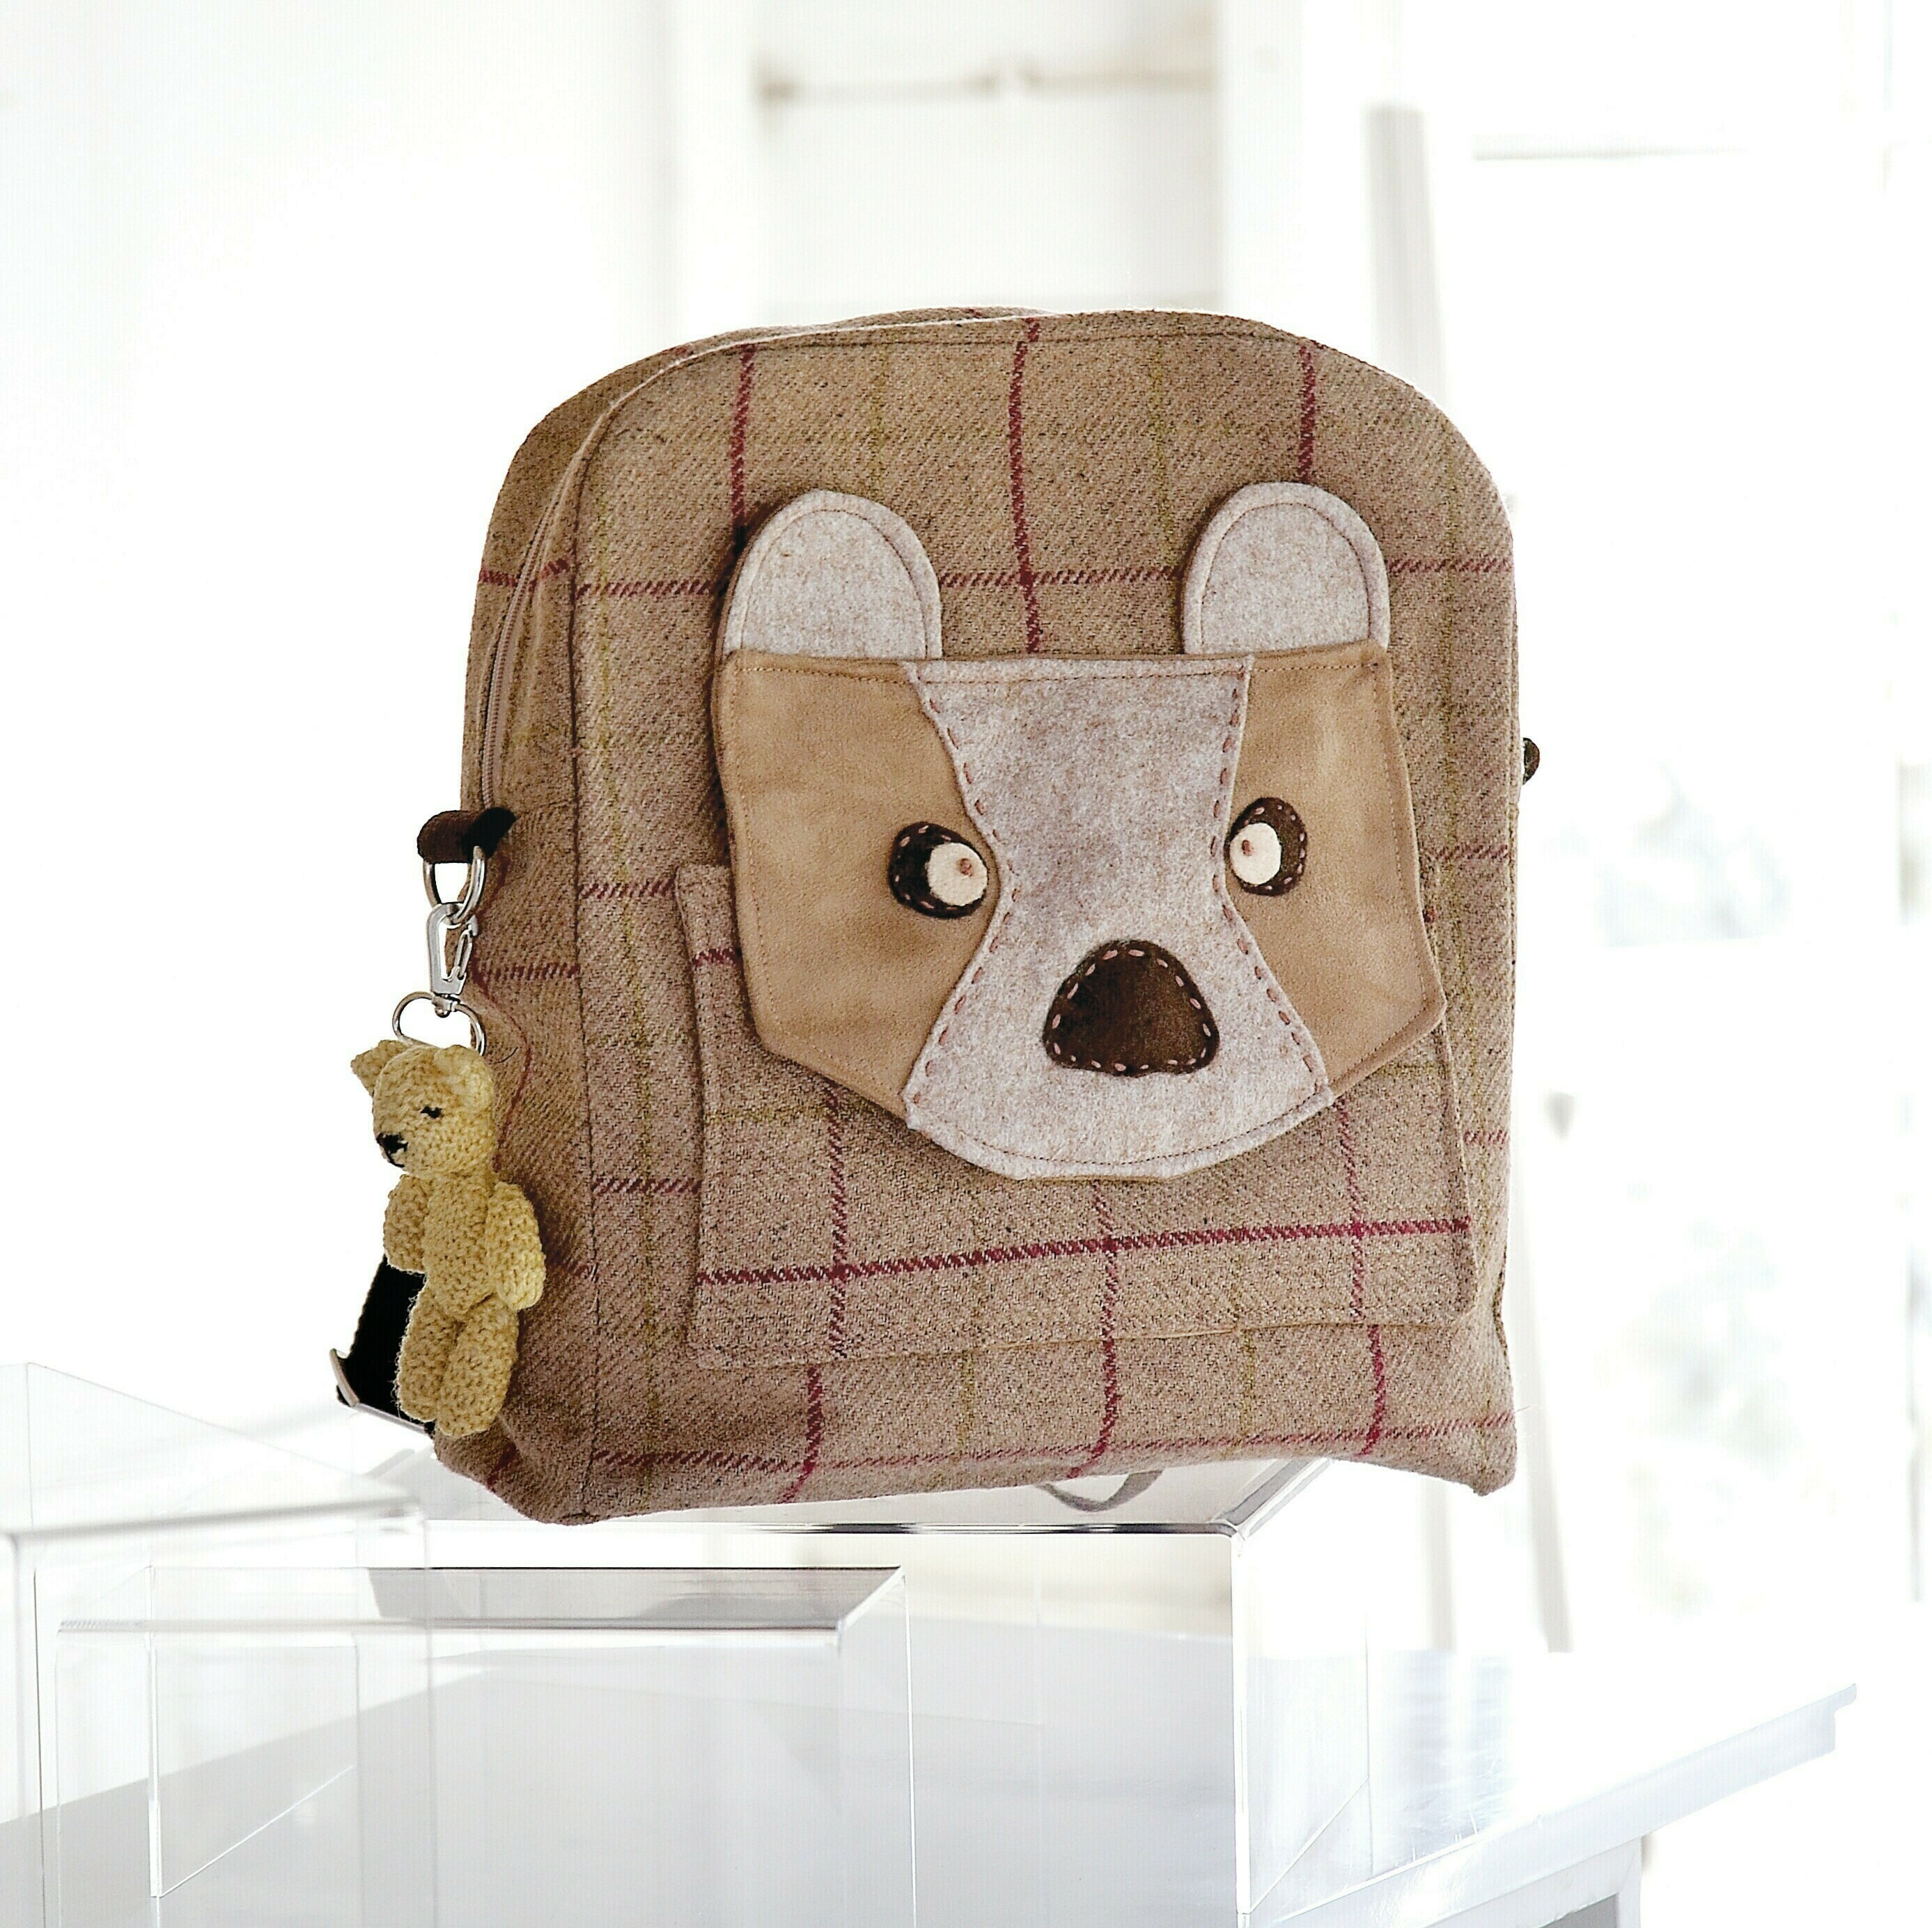

About
The Build Bag Book: Backpacks
Everyone will love this friendly brown bear!
Lift his chin to access the handy pocket. The D-rings on the side can be used to clip your favourite charm or another carry strap, if you wish to make one as an extra. I’ve used a heavyweight wool fabric for the outer bag and used interfacing, as the weave is quite open.
Finished size
29.5 x 34.5 x 9cm
(11½ x 13½ x 3½in)
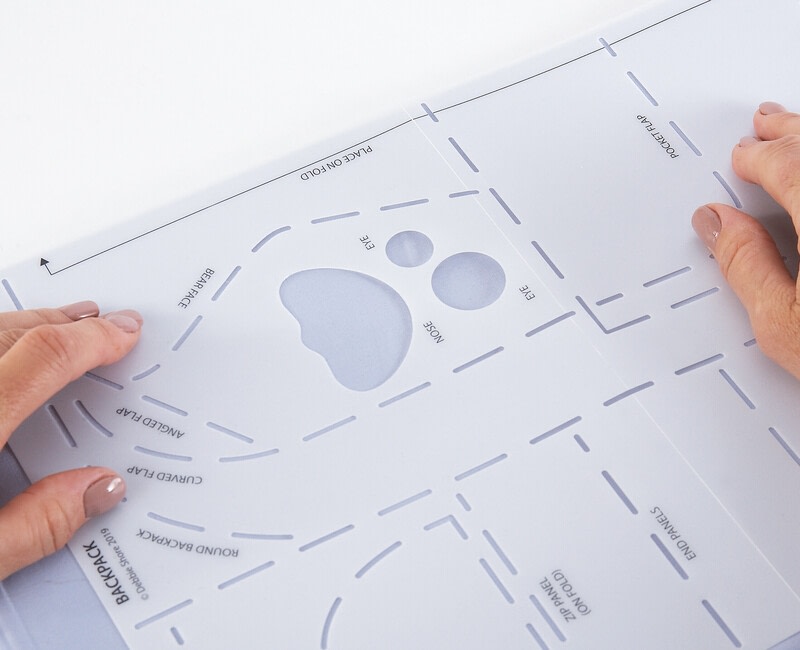
Using your template
Cut the following:
•
2 round backpack pieces from outer
fabric and interfacing, on the fold
•
2 round backpack pieces from lining,
on the fold
• 1 zip panel from outer fabric and
interfacing, on the fold
• 1 zip panel from lining, on the fold
•
1 base panel from outer fabric and interfacing, on the fold
• 1 base panel from lining, on the fold
• 2 end panels from outer fabric and
interfacing, not on the fold
• 2 end panels from lining, not on the fold
•
2 angled flaps from faux suede,
on the fold
• 1 pocket from outer fabric and
interfacing, on the fold
• 1 pocket from lining, on the fold
• 1 bear face from light brown felt, on the fold
• 2 ears from light brown felt
• 2 ears from faux suede
• 1 nose from dark brown felt
• 2 large eyes from dark brown felt
• 2 small eyes from cream felt
Tags
Downloads
- 2020-07-20-152630-Backpack+angled+pocket+and+zip+panel.ai 4.38 MB [ Download ]
- 2020-07-20-152638-Backpack+template+base.ai 4.36 MB [ Download ]
- 2020-07-20-152644-Backpack+template+end+and+face.ai 4.37 MB [ Download ]
- 2020-07-20-152713-Backpack+template+pocke+and+baset.ai 4.37 MB [ Download ]
- 2020-07-20-152721-Backpack+template+round+BP+and+ear.ai 4.37 MB [ Download ]
- 2020-07-20-152726-Backpack+template+round+BP.ai 4.37 MB [ Download ]
-
 Luna D. favorited Bear Pocket Backpack
25 Apr 06:52
Luna D. favorited Bear Pocket Backpack
25 Apr 06:52
-
 Crafterella featured Bear Pocket Backpack
23 Jul 23:00
Crafterella featured Bear Pocket Backpack
23 Jul 23:00
-
 Kinhime Dragon favorited Bear Pocket Backpack
22 Jul 19:33
Kinhime Dragon favorited Bear Pocket Backpack
22 Jul 19:33
-
C.J. M. added Bear Pocket Backpack to Sew
22 Jul 17:54
-
C.J. M. favorited Bear Pocket Backpack
22 Jul 17:54
-
 Search Press published her project Bear Pocket Backpack
22 Jul 09:00
Search Press published her project Bear Pocket Backpack
22 Jul 09:00
You Will Need
-
 Step 1
Then simply draw through the slots in your template to mark the outline of your bag pieces.
-
 Step 2
Cut out as many pieces as required, by following the drawn dashed lines.
-
 Step 3
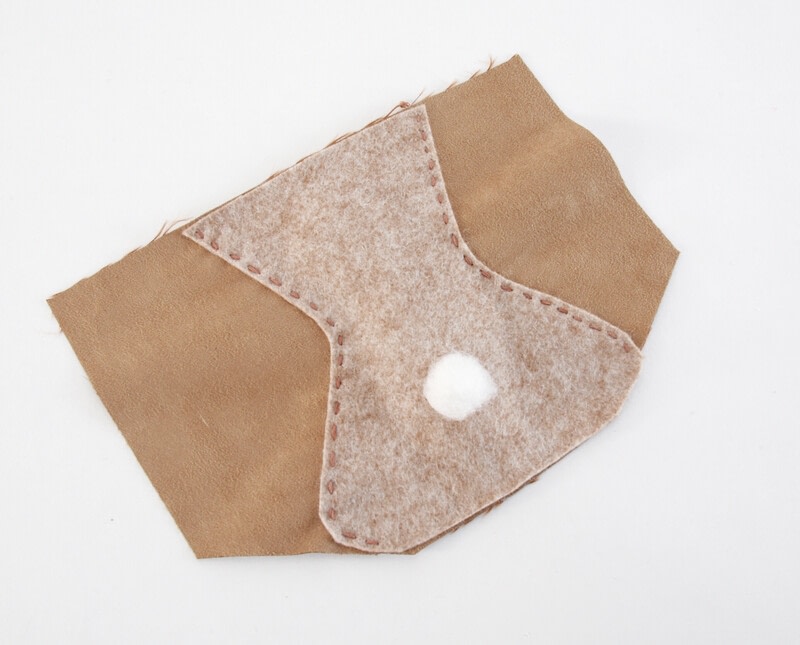
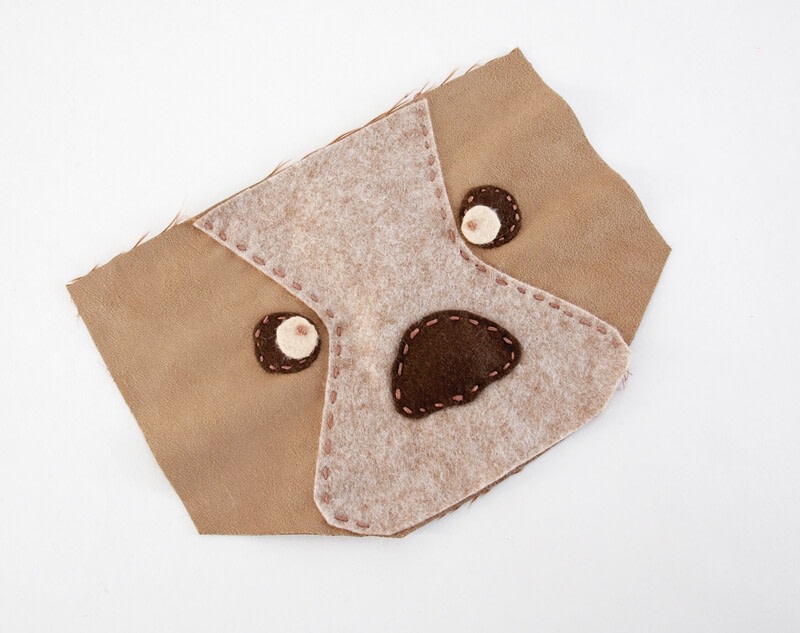
Place the bear face centrally over the right side of one of the angled flaps and secure with spray adhesive. Carefully lift one side of the face and stuff a little toy filler underneath. Hand-sew down each side of the face with running stitch in embroidery thread/floss. Roll a little ball of toy filler and place in the centre of the face, 5cm (2in) from the bottom.
-
 Step 4
Spray the back of the nose with adhesive and place over the top of the toy filler, then hand-sew in place. Sew the large eyes to either side of the face, as shown. Finally, place the small eyes on top and secure with a large French knot.
-
 Step 5
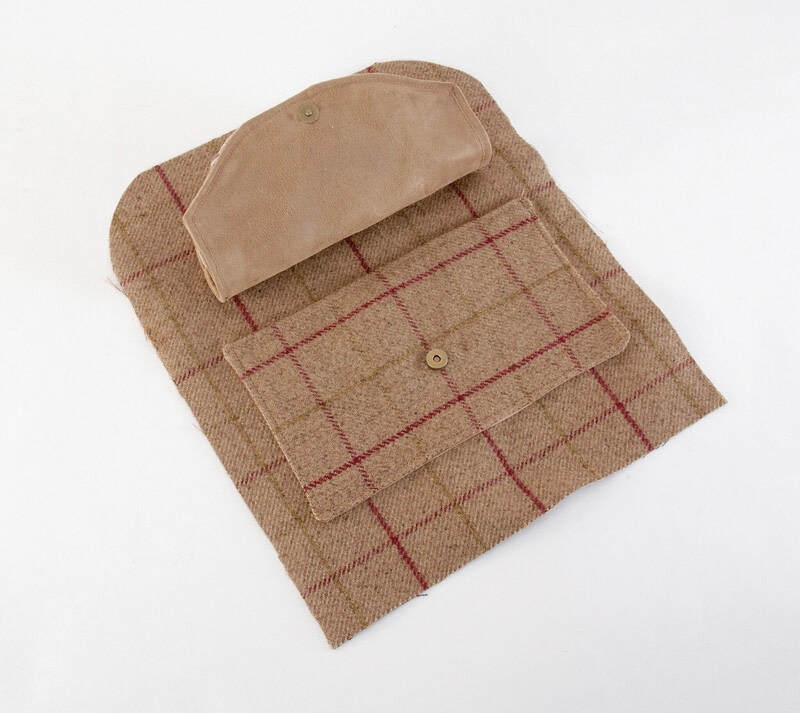
Apply the slimmer half of the magnetic snap to the right side of the other piece of flap fabric, centrally, 2.5cm (1in) from the bottom. Fit the other side of the magnetic snap to the outer pocket, centrally, 9cm (3½in) from the top.
-
 Step 6
Using the template
Refer to the pattern pieces needed for each bag. Where indicated in bold, place the template over the fold of your fabric.
-
 Step 7
Sew the ear pieces right sides together – each felt piece with a faux suede piece. Leave the straight side open, then trim around the curves with pinking shears.
-
 Step 8
Turn right side out and edge-stitch around the seam.
-
 Step 9
Sew the two angled flap pieces right sides together, leaving a turning gap of about 5cm (2in) in the top. Snip across the corners, then turn right side out. Edge-stitch around the side and bottom edges.
-
 Step 10
Fuse interfacing to the back of each outer fabric piece. Sew the two pocket pieces right sides together, leaving a turning gap of about 5cm (2in) in the top. Snip across the corners, then turn right side out. Edge-stitch across the top.
-
 Step 11
Fasten the angled flap to the pocket using the magnetic snap, then pin both centrally over the front of the bag, 6cm (2½in) from the bottom. Place the ears behind the flap at each top side and sew straight across the top of the flap, removing the pins as you sew. Lift the flap out of the way and sew around the side and bottom edge of the pocket.
-
 Step 12
The front of your bear bag is finished!
-
 Step 13
Make up an unlined zip panel (see page 16); cut two 7.5cm (3in) lengths of webbing and thread each through a D-ring – add one to each end of the zip panel before attaching the end panels.
-
 Step 14
Pin the centre of the zip panel to the centre top of the front of the bag, right sides together, then sew the whole panel to the front of the bag.
-
 Step 15
Cut two 7.5cm (3in) lengths of webbing, thread each through a rectangular ring then fold in half. Sew these, facing upwards, to the bottom of the back of the bag, 5cm (2in) from each side. Cut the remaining webbing in half. Thread one end of each strip around the centre bar of each slider and sew in place. Take the opposite ends of the webbing, thread through the rectangular rings, back through the slider, then sew to the top of the bag, 9cm (3½in) from each side.
-
 Step 16
Sew the bag back right sides together to the zip panel, marking and matching the centre points. Sew in the base, right sides facing, and your outer bag is complete.
-
 Step 17
Cut the lining zip panel in half lengthways, fold over one long side of each piece by 5mm (¼in) and press.
-
Step 18
Sew right sides together to the end panels, leaving a 1cm (½in) gap in the centre, as shown.
-
 Step 19
Make up the lining in the same way as the outer bag, sewing each side to the zip panel then adding the base. Turn right side out.
-
 Step 20
Push the outer bag inside the lining so that the wrong sides are facing. Line up the gap in the lining around the zip, then hand-sew with slipstitch.
-
 Step 21
Turn the bag right side out and add a charm to one of the D-rings if you wish!


 1
Origami Flowers »
Origami Orchid
1
Origami Flowers »
Origami Orchid
 2
Mint & Trinket Tins »
Miniverse Trinket Boxes
2
Mint & Trinket Tins »
Miniverse Trinket Boxes
