


About
living in the elfin forest
I had to make some small gifts for at first one friend and then the list become larger and larger.;-S
so i thought why not a tiny box present.
The outsides of all the boxes became differently but i had to much idea's for the inside.
That was given me the most problems and that's why the list of gifts for friends became only longer.LOL
Finely i got the idea that i loved the most.
i found a pop up card in the Hema (dutch shop , that i love for their bright colours and their desings)
I thought why not such pop up view inside. only not movable or infold and outfold.
It had to be a kind of very small shadow box.
so i started to design my own scene.
by working it out i have left some part away, which i didn't like and knew it would be too much for such a small scene.
But.... i didn't like my own back picture. so after an other long periode of thinking i knew i had a paper scene of a gift for making a fairytail showbox, (peepshow)
so... i only picked from that a very small piece which i used for my own scene.
Because i wanted to make more of them, i have used the computer , photoshop so i could make more of them.
But because i made some small changes and because it's all handcrafting they are not totally the same!!!
Notes:
You may use my desings , but please .....!!!!
only for personal uses , don't sell it. or when it's for a good purpose ask me!!!!
The time is without drying time and the time of my designing time. because you can use mine;-D
Of course you can make without a computer with only drawing an colouring with pencils and so on ... a scene like this as well.
you must make the same steps by making a backside
inbetween part
and the front layer.
You can use the copymachine for the drawing for copy the drawing three times.
And cut out the part in layers.
Hope this is helping for if you don't have photoshop programme and you decided to make your own scene;-D
I hope you love this and having fun with this project,
Feel free to ask my your questions and thank you very much for stopping by;-D
Have fun and be creative.
Downloads
- no_19._achtergrond_als_eerste_laag_ma_ken_copy.pdf 526 KB [ Download ]
- achtergrond_voor_mini_middenlaag_copy.pdf 209 KB [ Download ]
- achtergrond_voor_mini_copy_eerste_voormeisje.pdf 263 KB [ Download ]
-
 rene c. favorited A Tiny Pocket Woodland Shadow Box
07 Apr 22:07
rene c. favorited A Tiny Pocket Woodland Shadow Box
07 Apr 22:07
-
Kacie B. favorited A Tiny Pocket Woodland Shadow Box
11 Apr 18:47
-
 Gabriela M. added A Tiny Pocket Woodland Shadow Box to gifts
16 Jun 03:38
Gabriela M. added A Tiny Pocket Woodland Shadow Box to gifts
16 Jun 03:38
-
 Kinhime Dragon favorited A Tiny Pocket Woodland Shadow Box
20 Jan 21:22
Kinhime Dragon favorited A Tiny Pocket Woodland Shadow Box
20 Jan 21:22
-
 Whimsical Peacock favorited A Tiny Pocket Woodland Shadow Box
22 Jun 03:26
Whimsical Peacock favorited A Tiny Pocket Woodland Shadow Box
22 Jun 03:26
-
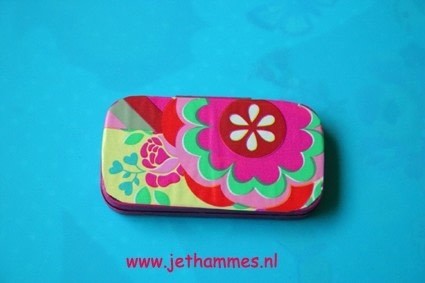
 Step 1
Search for a tin box like this, Hold the inside out the box.
so you have just a empty tinbox. -
 Step 2
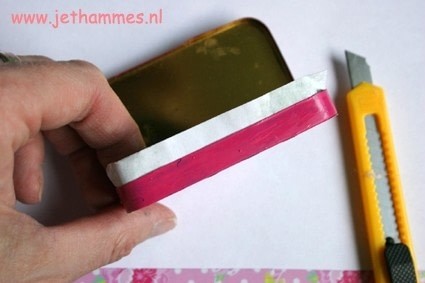
If you like to paint the sides of the tin, you must sand with a metal file the sides.
This step is importend because if you don't sand it and add the paint layer on it , it don't closed anymore.!;-D
this hasn't done completly blank just a bit. -
 Step 3
Pick a nice colour for the sides to paint ,paint the edges of the bottem and the top lid as well.
Perhaps you must add an other layer on the box so it's well covered with a nice smooth colour paint layer.;-D
Let it dry. -
 Step 4
Add the varnish or clear nailpolish on the paint, let it dry
-
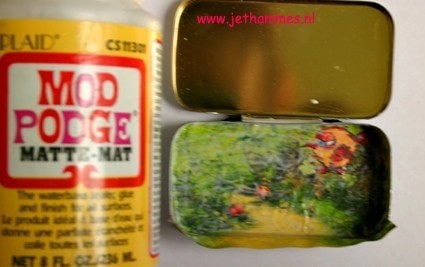
 Step 5
Pick your fave wrapping paper to glue some of it on the bottom lid of your tin with mod podge.
Let it dry and add on the paper and besides it an other layer of mod podge and let it dry. -
 Step 6
do the same with the upside or top lid.
If you want add a name choose a not tooo busy design of your wrapping.
If you like you can make this side prettier with adding some 3d paints or glitter glue.
for me this was enough. -
 Step 7
If you want to use mine designs you can leave the next step from here til step 18 without the computer programme explainations over.
But if you want to know what i did, please follow the steps;-D
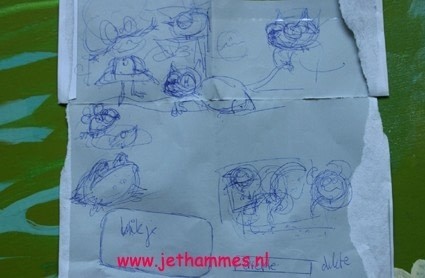
You can sketsch on everything i had this old envelope.
so sketsch your ideas on paper and choose the one you will use. -
 Step 8
Work t he sketsh out some more on real design paper with a pencil.
-
 Step 9
When you are satisfied with your sketsching work them out with inkt .
You can work with a fountain pen or marker.
let it dry.
and erase the left over lines away.
If you have a scanner and photoshop, scan the drawing and make a pds file of it. -
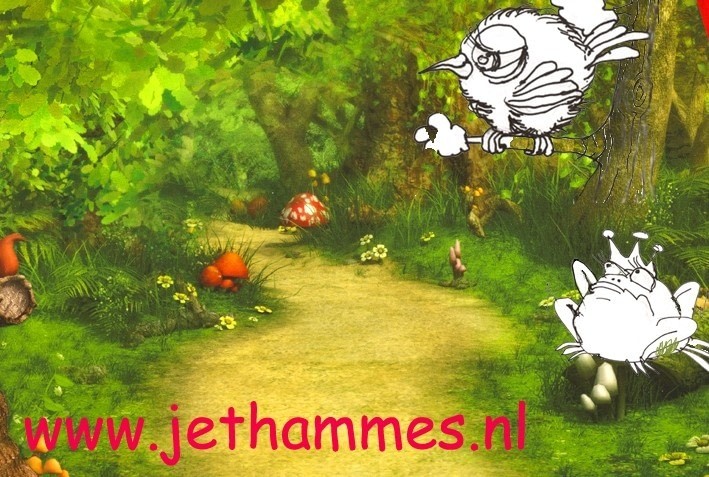
 Step 10
If you have a backside drawing or picture scan it and selecting the part you want to use and make it in a pds file as well.
Try to work allready in the measuring of your tin box.
I made the backside some longer because it was that way easier to glue the backside pict in the tinbox and cut off the drawing in more parts without losing too much of the real design. -
 Step 11
Use everytime a new layer when you will adding some new subject in the design of yours.!!!!
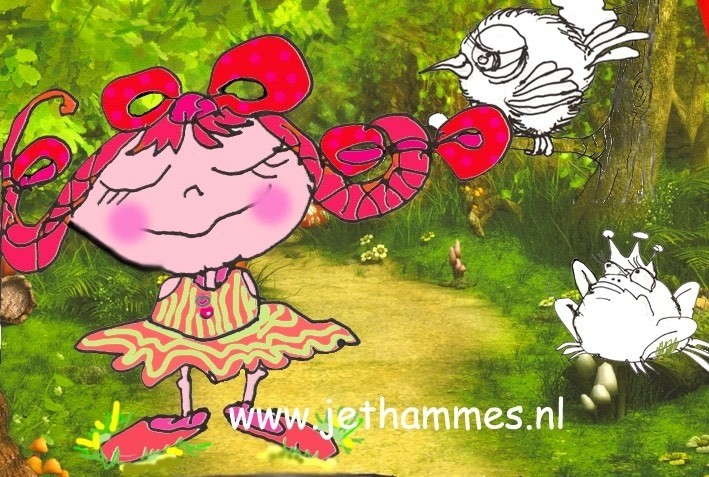
Add on a new layer the bird on the branch.
i have erased the lines in the barck of the tree of my own design and made it some blurred some of the lines a little bit so you could see the lines on the tree of the backpicture.
to make it more mine.
Sometimes you must add and erase some more lines feel free to do what you like.
just play and watch your result.;-D -
 Step 12
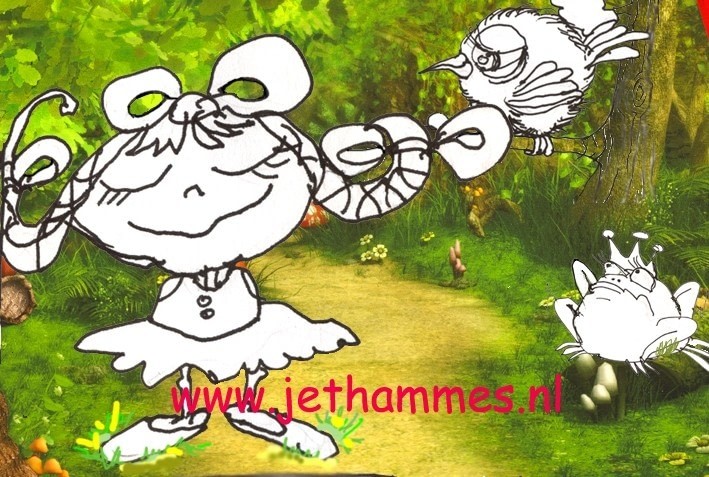
Place the kikker on the drawing in a new layer.
With photoshop you can make things bigger and smaller by using the transformation tools. and drag it to the best place . -
 Step 13
do the same with the girl. Add her on a new layer by dragging and transform the sizes of her.
-
 Step 14
Because the girl was on the front part of the scene i started to colouring the part on new layers by using the hue/saturation, all kind of brushes and sizes and blurred it a bit some;-D
If you add every part of the colouring parts on a new layer you still can change everything.
importend safe every time your file.
The computer programme can suddenly stops.!!! and then you have lost some parts-S
You will want your figure standing in the picture , and not if she is floading. so add some lines on the ground to give her more weight with shadow and grass. so she becomes a part of the whole picutre!!! -
 Step 15
Do the same with the frog , gave the underground some more shadow and accents and colouring the body on the same way.
And add some gras and moss on the trunk as well to over the body part of your froggy. -
 Step 16
The last part , the birdy.
Do the same with the colouring of the bird, and with giving the bird some weith and makes it a sitting on a branch bird by using shadow colours .
Perhaps you will notice that you must change some colours of the other figures as well.
Just watch it and feel free to change things.
When you do this on a severaly layer you always can erase them by throwing the layers in the trash.
Or adding some new layers ;-D
just be creative and play and have fun.;-D -
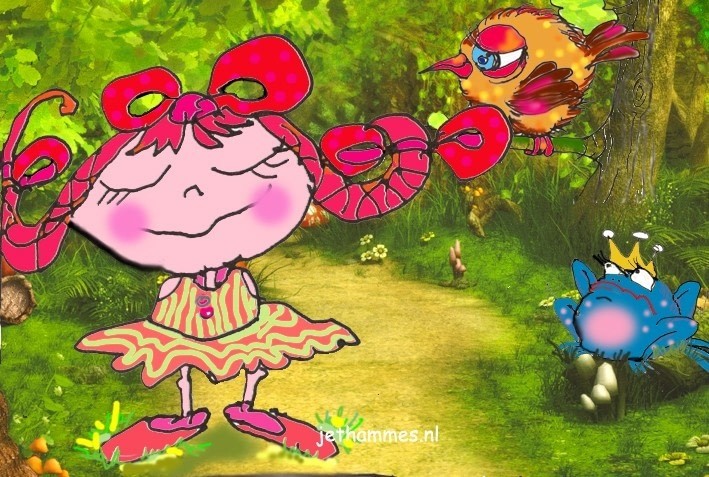
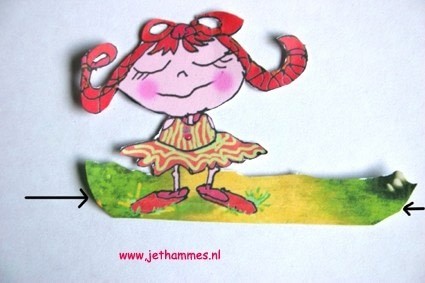
 Step 17
At the end you will becoming something like this.
It's a totally design wich must be made in seeraly piece . -
 Step 18
Now we must start with the background layer.
i wanted to have the bird on the background layer as well.
At first make an copy of your totally design,
Now
you can click the layers you don't want to use away When the eye on the layers isn't showing the layer isn't active on the screen.
You will perhaps removed the front shadow parts of the girl and the frog, just try this out.
In mine i wanted to left some of the grass i had add on the truck to give the picture some drama and depth.
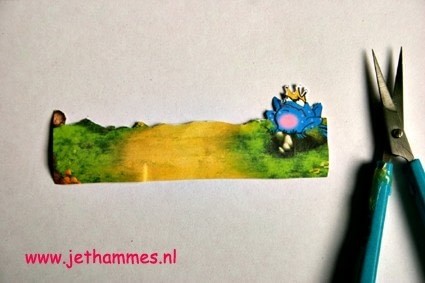
Print this picture out on paper and cut it out. -
 Step 19
Make by cutting the both sides of the picture some rounding edges.
Fold some lines
and gave some small cuts in the bottom line as well.
Watch the picture.;-D -
 Step 20
Glue the backside picture in the tinframe by using mod podge.
And when it's dried add an other thin layer.
I have found out you can use for this kind of paper scenes better the matt glue.
there will be some leftover parts of the picture outside on the edge of th bottemlid. -
 Step 21
When all the layers of mod podge and the paper is well dried.
Pick up your crafty knife to cut of the leftover of the paper on the edge. -
 Step 22
Make a new copy of your design with an other name.
Now you can start with making the seccond in between layer,
by disabling some of the layers of your desing.
You will i presume make this layer smaller by erasing most of the forest of your desing away.
When you are satified , print it out and cut it out.
For this small parts you can better use a small 3d scissor. -
 Step 23
Okay now you can decide which of this layer can be removed by cutting away and to modify it some more
Watch the picture. -
 Step 24
glue on the bottem side of the tin the folded layer of this froggy.
You will have something now like this.;-D -
 Step 25
Okay time for making the last layer , the top.
Make of your original design an other new copy.
Give it a differend name
And by disabling of layers and your eraser you will becoming the last layer of yours.
Print this out and cut it out. -
 Step 26
Modefy this layer but cutting it like my instructions and glue this part as well to t he bottem of the edge of the tinbox.
-
 Step 27
Glue behind the froggy and the middle of the grass some foam.
and behing the toplayer behind the head of the girl.
you must glue some small parts like a tower behind it.;-D
glue some of the hair of t he girl on the left and top on the sides of the frame as well. -
 Step 28
Let it dry,
You have now something like this.
Your fairytail scene is now done;-D -
 Step 29
Okay now it's time for making the note.
You don't have to do this, but because the tin boxes were gifts for friends, i liked this part.
Trash the inside of the lid on a pretty paper. -
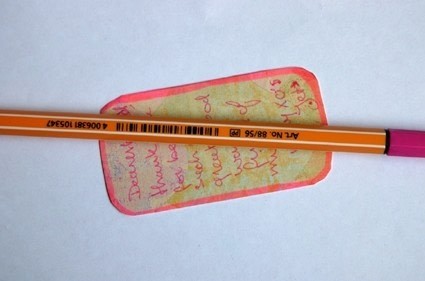
 Step 30
Cut out the shape of the note.
Draw on a piece of paper around the pretty paper note a line with a marker. -
 Step 31
Write a small note on this piece of paper.
For my sis i found a dutch poem (In holland it's custome that girls have a poeziealbum, it's a small book with blank pages. The grils must asked all their dearfriends and family members to write one side a poem and on the other side they must glue a special kitschy picture mostly with glitter on it.LOL
For my sis i found such a poem, but it wasn't good to translate for my other english friends.
So for the dutch members i wrote for her:
ik
en jij
de toffe meiden
de mooiste vriendschap
allertijden.(it's about friendship for ever);-D
-
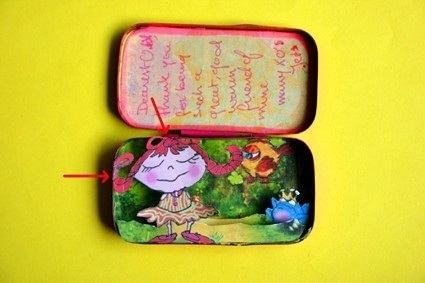
 Step 32
Glue the note in the inside of the top lid and.....
you're done;-D Yeaaah you made it.LOL
hey enjoy your new scene give it away or put it in your bag or pocket when you need some comforting or to cheerup or just dream away;-DI glued the head and the hair on two places on the top of the tin to made the top layer stronger;-D
watch the picture ;-DHope you liked this and it was helpful to make your own paper scenes.
If you have questions feel free to ask me.
Have much crafting fun , and be creative.
Thank you for stopping by;-D


You are so creative!!!
Met Kerst heb ik afgelopen jaar een gedicht moeten schrijven voor een vriendinnetje maar het gedicht was heel onsamenhangend want ik kwam maar niet op de juiste woorden.
Uiteindelijk ben ik opnieuw begonnen en kwam ik met 'Als de wereld wit wordt geef jij hem kleur' dat was mijn hele gedicht en alleen die twee zinnetjes waren genoeg, die zeiden uiteindelijk meer dan een gedicht van één A4tje lang.