About
Add panache to your tops or dresses with a zippered pocket!
A zippered pocket is surprisingly quick and easy to add. For this tutorial, two angled zippered pockets were added to a knit top.
-
 Kimya J. favorited Zippered Angled Pockets
07 Dec 01:50
Kimya J. favorited Zippered Angled Pockets
07 Dec 01:50
-
 A Happy Stitch (Melissa Q.) favorited Zippered Angled Pockets
07 Feb 00:39
A Happy Stitch (Melissa Q.) favorited Zippered Angled Pockets
07 Feb 00:39
-
 Crafterella featured Zippered Angled Pockets
25 Jan 23:00
Crafterella featured Zippered Angled Pockets
25 Jan 23:00
-
 Sanae I. published her project Zippered Angled Pockets
23 Jan 14:47
Sanae I. published her project Zippered Angled Pockets
23 Jan 14:47
You Will Need
-
 Step 1
Add pockets to the front bodice of your pattern. I basically eyeballed where I wanted the pocket to be, used a ruler to straighten things out, and then mirrored the pocket on the other side. I decided to make my pocket opening 1/2 inch x 3 1/2 inches to show a bit more of the zipper at the opening. I drew the rectangle on the pattern piece and cut out a slit in the middle of the rectangle.
Place tracing paper on top of pattern to create your pocket piece. I added a 1.5 inch seam allowance around pocket opening, then drew the curved portion freehand to make it look like a pocket. Note: my pockets look really small, but because it’s knit, it totally stretches and worked well.
-
 Step 2
Cut out pattern pieces from fabric and trace pocket positions onto RIGHT SIDE of front bodice. Remember, you’ll need FOUR pocket pieces total. Also cut out four strips of interfacing. Since my pocket opening is 1/2 inch by 3 1/2 inches, I added a 1-inch seam allowance all around for the interfacing, so I ended up with FOUR interfacing pieces that measured 2 1/2 inches by 5 1/2 inches.
Use pins to mark where the pocket opening tops and bottoms are. Now that I’m looking at it, you could also just trace the pocket positions on the wrong side and iron on the interfacing using the chalk marks instead of the pin positions.
-
 Step 3
Iron on the interfacing onto the wrong side of the fabric. This is to stabilize the knit for the zipper.
-
 Step 4
Now you’ll do pretty much the same thing for the pockets. On the wrong side of left and right pockets, indicate pocket position and iron on interfacing. Also, draw a 1/2 x 3 1/2 inch rectangle (or however large you decide to make your pocket opening) onto the interfacing for both left and right pockets.
-
 Step 5
Take out your (potentially unnecessary) pins from the right side, and mark the interfacing positions on the wrong side this time. I highlighted how the pins will show through in red on the right side. This will guide you for the pocket placement.
-
 Step 6
Using a Braille-like method and feeling for the pins, align the interfacing portion of the pockets with interfacing side facing up. I didn’t get it exactly, but was pretty darn close. Once you’ve gotten the pockets positioned well, remove the pins from the wrong side, and pin pockets to bodice. Sew along the rectangle you drew. I tried both a stretch stitch and a regular straight stitch and both worked fine.
-
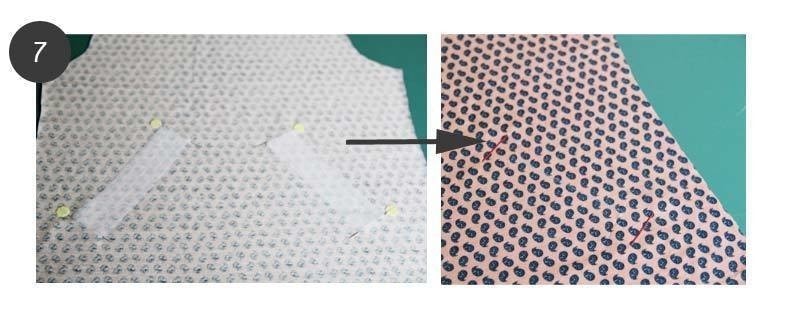
 Step 7
With a rotary cutter or scissors, cut a straight line through the middle of the pocket opening through all layers of fabric. Leave about 1/2 inch of space on both ends. Then using sharp scissors, cut diagonally into the corners as close to the seam as possible.
-
 Step 8
Pull the pocket through the opening and iron the opening flat. As you can see above, you should have a neatly finished pocket opening.
-
 Step 9
I used the Wonder Tape to hold the zipper in place, but it was quite wide and the tape made the pocket stick together in weird ways, so next time I might just try pinning. Sew close to the edge of the pocket opening. I used a zipper foot here, but because I made my opening quite big, it wasn’t strictly necessary.
-
 Step 10
Cut off excess parts of zipper. Not quite sure why I felt the need to write out the instructions in the image for this particular step. But you can see here how the Wonder Tape is peeking out around the zipper. There’s a thinner Japanese double-sided tape that works a little better, but I was all out.
-
 Step 11
Pin the pocket linings together and sew all around. Keep in mind that you’re sewing only the pocket pieces together and not onto the bodice. The pockets are already attached to the bodice at the zipper opening. I used my mock serger finish on my machine so it looks a little puckered.
-
 Step 12
And there you have it! The pocket bags do flop around a bit inside, so you could also sew the curved portion onto the bodice and that could look like a cool design element.