


About
Make Yarn Wrapped Pinecones
These cute, yarn wrapped pinecones are a great way to inject some colour into your décor using leftover yarn from your other craft projects. Best of all, no glue is required! A fun and easy project to share with the kiddos :)
Tags
-
 Kaiulani W. favorited Yarn Wrapped Pinecones
26 Nov 04:21
Kaiulani W. favorited Yarn Wrapped Pinecones
26 Nov 04:21
-
 shsh favorited Yarn Wrapped Pinecones
09 Apr 15:21
shsh favorited Yarn Wrapped Pinecones
09 Apr 15:21
-
 aprettyfix replied to a comment on her project Yarn Wrapped Pinecones
23 Dec 01:58
aprettyfix replied to a comment on her project Yarn Wrapped Pinecones
23 Dec 01:58
-
 Nancy! commented on Yarn Wrapped Pinecones
22 Dec 23:14
Nancy! commented on Yarn Wrapped Pinecones
22 Dec 23:14
-
 Alissa B. favorited Yarn Wrapped Pinecones
22 Dec 22:35
Alissa B. favorited Yarn Wrapped Pinecones
22 Dec 22:35
-
 Dawn B. favorited Yarn Wrapped Pinecones
22 Dec 18:33
Dawn B. favorited Yarn Wrapped Pinecones
22 Dec 18:33
-
 MischievousRaven added Yarn Wrapped Pinecones to bedroom ideas
21 Dec 10:31
MischievousRaven added Yarn Wrapped Pinecones to bedroom ideas
21 Dec 10:31
-
aprettyfix published her project Yarn Wrapped Pinecones
21 Dec 09:00
-
 Step 1
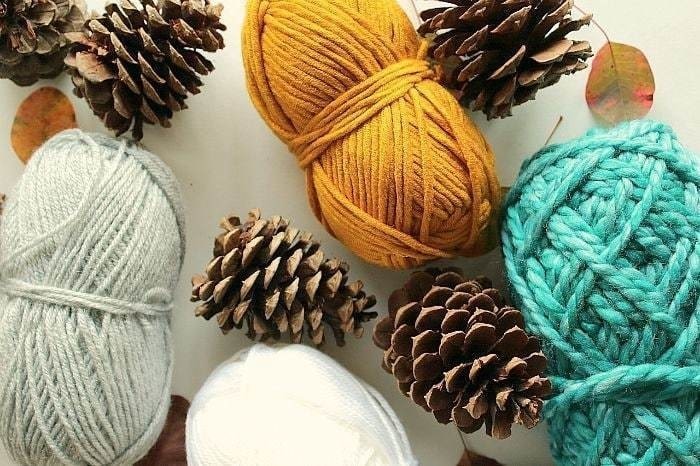
Gather your supplies. Only two are needed: pinecones and your choice of yarn. (no glue gun required!)
Select yarn sizes (i.e., thickness) in the range of 4-6 (if you are unfamiliar with this, just check the number on the label - each yarn has one).
For best results, be sure to select the most visually balanced pinecones.
-
 Step 2
Now begin wrapping each pinecone, beginning from the base and working your way up. No glue is required. Simply tuck in the yarn into the grooves, as required. Depending on the thickness of the yarn, you may need to go over each groove a few times before it is filled to your satisfaction. Each pinecone should take anywhere between 5-10 minutes to complete.
Once you reach the top, snip off the tail.
-
 Step 3
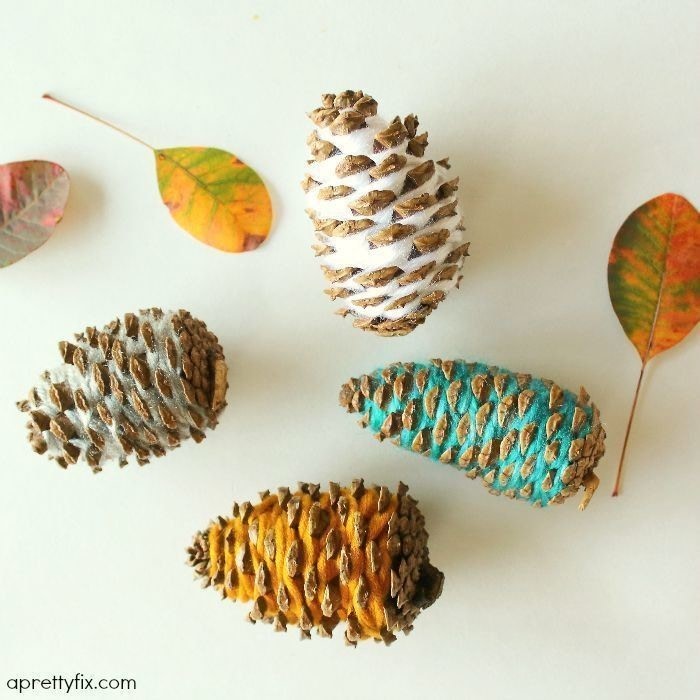
Your pinecones are now finished and ready to be displayed! Display in a bowl, individually as part of a vignette or anywhere where you need a dash of rusticity mixed with a splash of colour!

Comments


