


About
Learn how-to make decorative holes with Knit Purl in Portland, OR.
In addition to the functional holes covered in Part 1, which are often used for necklines and construction details, there are a number of decorative methods for creating holes in your knitting.
In lace work, perhaps the most common method for creating holes is a yarn over. A yarn over is both a type of hole and a type of increase, and is commonly found in lace patterns to either increase an area, or, when accompanied by a corresponding decrease, to create a hole that does not alter the width of the finished piece. Yarn overs often require some blocking at the end of the project (which we’ll cover in an upcoming Stitch Lab.)
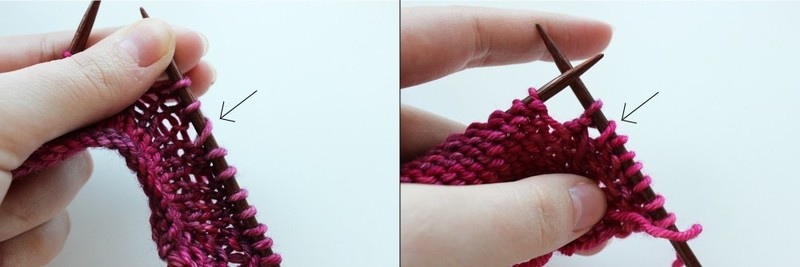
Depending on the surrounding stitches, you will approach a yarn over in a different way. To keep things as simple as possible, here are both the purl and knit yarn overs, laid side by side so that you can compare them on basic stockinette stitch.
-
 Karen D. favorited Yarn Over Decorative Holes
10 Jan 02:04
Karen D. favorited Yarn Over Decorative Holes
10 Jan 02:04
-
 Rachael H. added Yarn Over Decorative Holes to Sew/Knit/Crochet
09 Jan 15:48
Rachael H. added Yarn Over Decorative Holes to Sew/Knit/Crochet
09 Jan 15:48
-
 Michelet favorited Yarn Over Decorative Holes
12 Nov 18:44
Michelet favorited Yarn Over Decorative Holes
12 Nov 18:44
-
 Shop Showcase published her project Yarn Over Decorative Holes
06 Nov 15:38
Shop Showcase published her project Yarn Over Decorative Holes
06 Nov 15:38
You Will Need
-
 Step 1
You start by being on the correct side of the fabric, having worked up to the point where you will insert your yarn over.
-
 Step 2
For the knit yarn over, you will bring the yarn through the needles from the back to the front (as if you were getting ready to purl.) Then, move your right needle into the next stitch as if you were getting ready to knit it — wrap the yarn over the needle and around as if to knit, and slide the newly formed stitch and yarn over to the right needle.
For the purl yarn over, the yarn will start in the front — bring it all the way around the right needle to form a loop, then purl the next stitch.
-
 Step 3
It will be easy to identify your yarn over in the line of stitches. If you have ever increased on accident in a project, it’s possible this will look like a mistake to you — accidental yarn overs are a common mistake. This time, though, this hole is on purpose. Work back across your row, knitting or purling the yarn over as a new stitch when you come to it.
-
 Step 4
As you can see, both yarn overs form the same type of hole when done correctly. Always allow the stitch after the yarn over to dictate which approach you need.
Another method for creating holes in your knitting is called Dropped Stitch. While it might sound a lot like the mistake of having a running dropped stitch — the pesky traveling loop-and-ladder that results when you miss a stitch on your needle — these dropped stitches form vertical bars and do not unravel.
Since this stitch pattern creates an elongated stitch that lengthens an area of the fabric, it works best if the entire row is done the same way. If you have flanking stitches (such as a slipped stitch selvedge or garter-stitch border,) you might have to cease using them for the row that you are dropping. You begin a dropped stitch by working the first stitch of the row as normal, then wrapping your working yarn around the needle. We chose to wrap ours three times to create a long dropped stitch.
-
 Step 5
Then, you’ll continue to work this way across the row. It will look like you have increased a bunch of stitches.
-
 Step 6
After you have worked all the way across your dropped stitch row, you work back the other way. Allow the loose loops to drop as you come to them, and only work the original stitch. It will look like this. You should be able to see a discernible difference between the worked and looped sections — the looped stitches will not be connected to the fabric body in any way and will make a gap across your work.
-
 Step 7
As you work the row, you will see the longer stitches begin to form:
-
 Step 8
When you turn your work over, you will see the dropped stitch row, topped by a standard stockinette row. You can work as many dropped stitch rows as you like, but you’ll always need to anchor them with at least one row of regularly-worked stitches in between.
-
 Step 9
If you’ve got more questions about these types of intentional holes in knitted work, be sure to leave them in the comments, or come by our Stitch Lab at the store on April 16, where we’ll cover these types and probably a few more.


 1
Home Accessories »
Diy Jewelry Box
1
Home Accessories »
Diy Jewelry Box


