

Wigwam
Extract from Torie Jayne's Stylish Home Sewing • By Torie Jayne • Published by Ryland Peters & Small


About
Torie Jayne's Stylish Home Sewing
Create a little hideaway in your backyard, a shady spot for sunny days. Children will love holding tea parties with their friends and favorite toys in this pretty wigwam, and it also provides a great place for adults to read or take a quiet afternoon nap! Decorate it with crochet doily bunting, a comfy patchwork mat, and a selection of soft pillows and cushions.
Dimensions
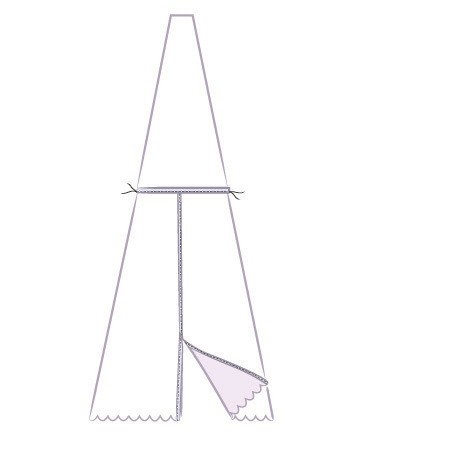
The finished wigwam is 62½ in (160cm) across and about 86in (218cm) high.
Downloads
- 107821_2F2015-03-05-174934-CB873_template_Wigwam_cutting+layout.eps 398 KB [ Download ]
- 107821_2F2015-03-05-174947-CB873_template_Wigwam_cutting_layout_excess_fabric_key.eps 411 KB [ Download ]
-
 andre g. commented on Wigwam
26 Aug 15:48
andre g. commented on Wigwam
26 Aug 15:48
-
 Key West Witch favorited Wigwam
28 Jun 15:28
Key West Witch favorited Wigwam
28 Jun 15:28
-
Key West Witch added Wigwam to Crafts General
20 Mar 21:40
-
Vi F. favorited Wigwam
21 Feb 23:14
-
Barbara M. added Wigwam to projects I likes...
14 Feb 22:15
-
Barbara M. favorited Wigwam
14 Feb 22:14
-
 Goddess Crochet added Wigwam to Summertime Hippie
23 Jan 16:06
Goddess Crochet added Wigwam to Summertime Hippie
23 Jan 16:06
-
kiki w. added Wigwam to Things I need to make for myself
29 Jan 02:08
-
 Harmonee.seal added Wigwam to Gardening Fun
28 Jan 17:24
Harmonee.seal added Wigwam to Gardening Fun
28 Jan 17:24
-
Harmonee.seal favorited Wigwam
28 Jan 17:24
You Will Need
-
 Step 1
Following the cutting layout, draw the shapes on the wrong side of the fabric, using a long straightedge and a water-soluble marker or a dressmaker’s pencil. Start with one door piece, which is 9¾ in
(24.5cm) wide on the selvage and 17¾ in (45cm) wide on the scalloped edge. Draw six triangles with their bases on the selvage and their pointed tops on the scalloped edge—the bases should be 16in (41cm) wide, and the triangles 16in (41cm) apart. These will be the top pieces. The fabric between the triangles will be the five bottom pieces and should each be 32in (82cm) wide on the scalloped edge. At the far end of the fabric, draw a second door, the mirror image of the first. Cut out all the pieces, then cut off the upper point on each of the six top pieces so that the upper edge of each is 2¼ in (6cm) wide. -
 Step 2
To stop the lengths of ribbon from fraying, paint the ends with fray-stop liquid and leave to dry. Using the bias tape (bias binding), bind the two edges that were at the ends of the fabric, which will be the inner edges of the two doors.
-
 Step 3
With right sides together and raw edges even, pin the upper edge of each door to the lower edge of the same top piece, with the bound edges of the doors overlapping each other by 3½ in (8cm). Stitch a 3/8in (1cm) seam, press open the seam to give a neat finish, then bind the seam allowances together.
-
 Step 4
Pin the lower edge of another top piece to the upper edge of a bottom piece, with right sides together and raw edges even. Stitch a 3/8in (1cm) seam, press open, and bind the seam allowances together. Repeat for the remaining top and bottom pieces. You should now have six full-length panels, including the one with the doors.
-
 Step 5
Pin a panel to the door panel along the long edges, with right sides together, raw edges even, and the bound seam allowances matching. Pin one of the long ribbons into the pinned seam, 22in
(56cm) up from the lower edge, with half the ribbon protruding on the inside and half on the outside. Stitch a 3/8in (1cm) seam.
Repeat to join a panel to the other long edge of the door panel, inserting the other long ribbon into this seam. -
 Step 6
Join the other long edge of one of these two panels to the long edge of another panel in the same way as in step 5, but omitting the ribbon. Repeat this all the way around, until all six panels are joined along the long edges. Press the seams open.
TIP FABRIC WITHOUT SCALLOPS
If your fabric doesn’t have a scalloped edge, you can still make the wigwam in the same way, because the lower edge will be a selvage instead and so will not need finishing. -
 Step 7
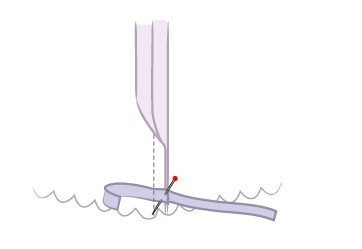
Fold one of the shorter ribbons in half crosswise and place the folded end at the bottom of one of the side seams, at right angles to it, encasing both seam allowances. Pin in place. Now pin three more ties over the seam in the same way, one 21in (54cm) away from the hem, one where the top piece of the panel meets the lower piece, and one 4in (10cm) from the top of the wigwam.
-
 Step 8
Repeat step 7 for the remaining five seams, and stitch each ribbon in place along the existing seam line. Bind the seam allowances together on each of the six side seams.
-
 Step 9
Now bind the top raw edge of the wigwam. Place a pole in the vise and drill a 1/4 in (5mm) hole 8in (20cm) from one end. Repeat for the other five poles. Thread strong string or jute through the holes and tie the poles together. Slot the tied-together ends of the poles through the opening at the top of the wigwam, splay the poles out, and pull the sides of the wigwam over the poles. On the inside, tie the ribbons around the poles to secure the fabric to the poles. Use the long ribbons at the front to tie the doors open.


Comments


