

Victory Rolls
Extract from Style Me Vintage • By Naomi Thompson, Belinda Hay, and Katie Reynolds • Published by Pavilion


About
Style Me Vintage
The iconic 1940s wartime hairstyle.
In the early 1940s, during World War II, women were rolling up their sleeves and getting involved in the war effort. Fashion was changing due to short- ages of fabric and the need to ration. Hairstyles also needed to be practical, as women were being employed to work in factories while their husbands went off to war.
Supposedly named after the manoeuvres of fighter planes, victory rolls were a great way to arrange hair, keeping it safely away from machinery and leaving room to put on a hat without quashing the style!
Modelled at one point by Veronica Lake in a short film encouraging ladies to style their hair in this way, it has become one of our favourite hairstyles to reproduce for a forties revival look.
The beauty of this style is that victory rolls can be created on hair that is bobbed, very long and every length in between.
Style Me Vintage Lookbook is published by Pavilion at £20. Available now at Anova Books.
-
 Harvey Knowles favorited Victory Rolls
18 Sep 06:40
Harvey Knowles favorited Victory Rolls
18 Sep 06:40
-
 Miley S. favorited Victory Rolls
10 Aug 10:37
Miley S. favorited Victory Rolls
10 Aug 10:37
-
 Caroline D. favorited Victory Rolls
15 Nov 10:45
Caroline D. favorited Victory Rolls
15 Nov 10:45
-
 Dorisita C. favorited Victory Rolls
01 Aug 17:42
Dorisita C. favorited Victory Rolls
01 Aug 17:42
-
 laura_southpaw added Victory Rolls to Keep Calm and Party
12 Apr 20:12
laura_southpaw added Victory Rolls to Keep Calm and Party
12 Apr 20:12
-
 Jacqulene C. favorited Victory Rolls
22 Nov 15:56
Jacqulene C. favorited Victory Rolls
22 Nov 15:56
-
 CountessAudronasha added Victory Rolls to Rockabilly
05 Nov 20:58
CountessAudronasha added Victory Rolls to Rockabilly
05 Nov 20:58
-
 Jeff S. favorited Victory Rolls
07 Sep 06:24
Jeff S. favorited Victory Rolls
07 Sep 06:24
-
 The Woman favorited Victory Rolls
17 Jun 02:00
The Woman favorited Victory Rolls
17 Jun 02:00
-
 Fiona C. favorited Victory Rolls
10 Jun 19:53
Fiona C. favorited Victory Rolls
10 Jun 19:53
-
Step 1
Prepare your hair, creating volume using heated rollers or blow drying with a round brush and securing sections with pin-curl clips. Once set, remove your rollers/clips and part your hair on the preferred side.
-
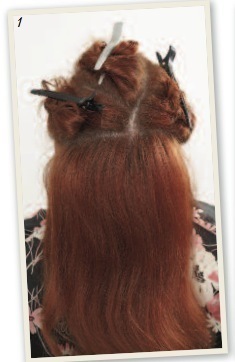
 Step 2
Section and secure your hair into four (Fig.1).
Section 1: your fringe. Take a triangle section from mid-way back on the top of your head to just above both
of your temples.
Section 2: left side. Section the whole front part of
your hair from the top of your head to the top of your ear.
ection 3: right side, as above.
*One of the sections will probably have more hair in it, because of your side parting.
Section 4: the back of your hair. -
 Step 3
Backcomb the first side section of your hair for volume and padding. Backcomb taking smaller vertical sections, about 1–2 cm through the larger section (Fig. 2).
-
 Step 4
Roll your hair loosely over your hand, rather like rolling a French pleat. You should be able to hold the finished roll securely with one finger so you can see the shape of your victory roll. When you are happy with how it looks, pin it into place and spray with hairspray (Fig. 3). Repeat steps 3 and 4 with the other side section.
-
 Step 5
Backcomb your fringe (Fig. 4). Smooth out the top layer of the backcombing ready to roll it into the rest of the victory rolls.
-
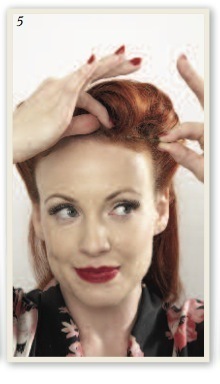
 Step 6
Roll your fringe loosely around your middle three fingers, away from your parting. Try to get the roll the same size as the largest of your two victory rolls. Pin this into place so that the second roll meets up with your fringe roll (Fig. 5). Now it looks like one roll.
-
 Step 7
Backcomb the back section of your hair for a little extra shape and volume. Smooth over the top layers with your boar bristle brush (Fig. 6).
-
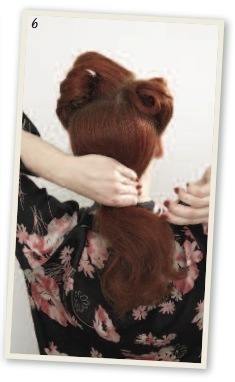
 Step 8
Using Kirby grips, start fixing a row of support grips along your nape (Fig. 7), about 2 cm above your hairline. Each grip should cross over for extra support.
-
Step 9
Once this has been securely clipped, section the ends of your hair into three parts: the centre and two sides.
-
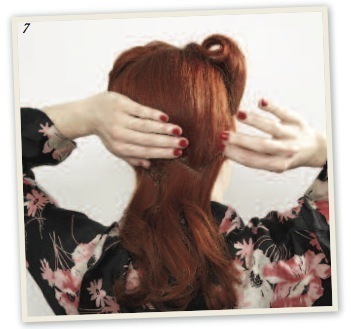
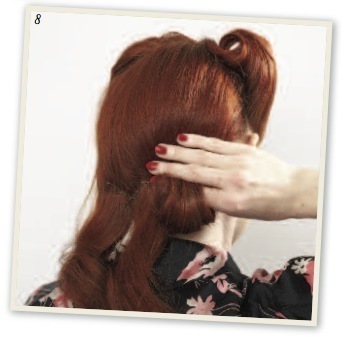
 Step 10
Backcomb each section very lightly if you need to, smoothing out the underneath layers, as this is the part you will see. Reverse roll each section over your hand and clip into place (Fig. 8).
Your rolls need to be roughly the same size so you can make each section blend together to make one large reverse roll along your back hairline. -
 Step 11
Spray hair well to smooth down any stray hairs and you have your finished look.
Try variations on this style.
Leave the back down and simply curl with tongs.


Comments


