

About
How to copy some fierce McQueen ankle boots
Summer’s here (well, we like to call it summer) and with the festival season upon us, we’ve as much of an excuse to rock out as we have to dress up, as the fashion world heralds, with look after look of “festival chic” dominating the press. I mean what else would you wear studded and/or psychedelically printed wellington boots to? That said, while it’s nice to see fashionistas giving it some welly in the pretty-but-practical department, not everything else I’ve seen recommended is quite so appropriate for braving the crowds and the elements. I’m sure your mum would have plenty to say about trawling through the mud and furious jostling audiences in sequins, heels and colourful floaty dresses, and she’d have a point! I nonetheless am taken with the black and be-studded “posh punk” look adorning many a style guide and starlet alike this season…
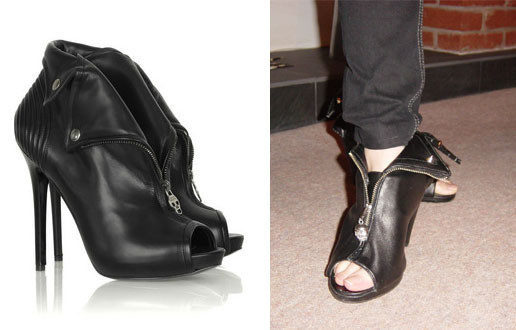
With this in mind, I was moved to find a similarly pretty-but-practical solution, to adapt for the Chic Cheat treatment… and failed miserably, after I fell in love with these tottering ankle boots by Alexander McQueen.
Tags
-
 Mk S. commented on Too Posh To Mosh
22 Oct 12:35
Mk S. commented on Too Posh To Mosh
22 Oct 12:35
-
 carlyjcais added Too Posh To Mosh to DIY the Look: Tilda Swinton
14 Feb 19:22
carlyjcais added Too Posh To Mosh to DIY the Look: Tilda Swinton
14 Feb 19:22
-
 Kendell V. favorited Too Posh To Mosh
26 Aug 03:11
Kendell V. favorited Too Posh To Mosh
26 Aug 03:11
-
 MickeyDi added Too Posh To Mosh to Maybe
27 Mar 18:27
MickeyDi added Too Posh To Mosh to Maybe
27 Mar 18:27
-
 Ky Yuuki favorited Too Posh To Mosh
04 Mar 21:09
Ky Yuuki favorited Too Posh To Mosh
04 Mar 21:09
-
 Oriana F. favorited Too Posh To Mosh
03 Feb 16:47
Oriana F. favorited Too Posh To Mosh
03 Feb 16:47
-
 Alex Poser added Too Posh To Mosh to A.o.C
11 Jan 18:48
Alex Poser added Too Posh To Mosh to A.o.C
11 Jan 18:48
-
 cristinakilljoyway favorited Too Posh To Mosh
03 Jan 13:19
cristinakilljoyway favorited Too Posh To Mosh
03 Jan 13:19
-
 Jenny J. favorited Too Posh To Mosh
17 Oct 17:12
Jenny J. favorited Too Posh To Mosh
17 Oct 17:12
-
 Rosalie E. favorited Too Posh To Mosh
11 Oct 06:25
Rosalie E. favorited Too Posh To Mosh
11 Oct 06:25
You Will Need
-
 Step 1
If you are using lace up sandals, the first thing you have to do is remove the laces.
Then you need a pattern from which you can cut out your leather, and you need to do this using your calico. Cut out a roughly rectangular piece that’s slightly longer than the length of the sandal from heel to the open toe. Draw a straight line with your gel pen down the centre of the top of the shoes and the centre of the back. Your next job will be to cover the entire area, on top of and between the straps in calico, up to the line on each side. Fold back any excess fabric at the edge and secure in place with pins. Careful not to prick yourself!
-
 Step 2
Make sure your fabric is pulled taut and that the area is covered all the way to the edge. Take your pen and draw around the edges. Mark where the bottom of the laces slit is on each side – this is where the bottom of your zip should go. Repeat this process with the other side and with the heel, which you will probably need to do it in two sections as it is curved. Your shoe should now be covered in calico with the edges clearly marked in black.
-
 Step 3
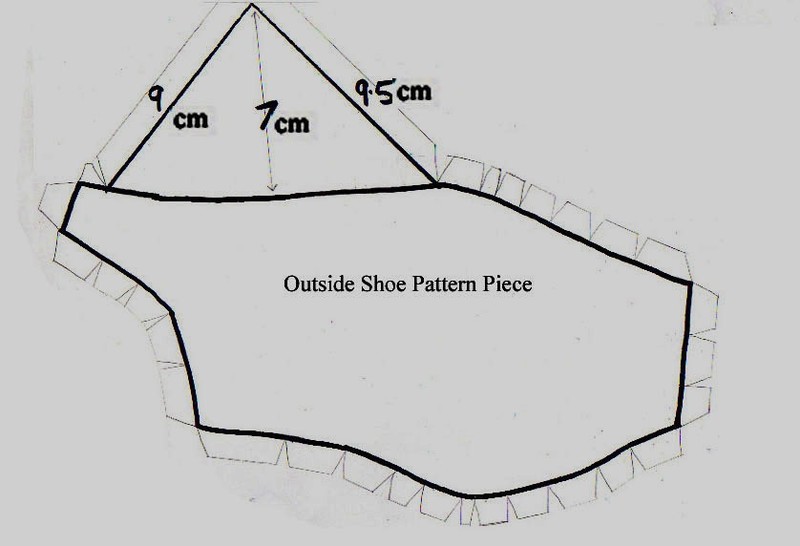
DO NOT remove your calico from the shoes yet as you still need to build an extension onto it for the collar, but for future reference, your pattern pieces should look something like this...
-
 Step 4
...and this.
Hint: If you have Photoshop on your computer and a printer, you could try printing this pattern off but you will have to adjust the sizing so that it’s the same length as your shoes (measure the distance on your shoes, from the centre of the back to the toe opening, and match it with the length of the pattern pieces by importing them into Photoshop and adjusting the scale. Use the rulers at the side of the image to get your measurements accurate). When you print, move the image to the centre of the page and DO NOT ask it to “scale to fit media” when printing as that will affect the size and therefore accuracy of the pattern.
-
 Step 5
You then need to start thinking about how you are going to put the “collar” design in. This is where you need to add on an extension. You need to add on a triangular piece of calico to both the outside and inside panel, the same size as the ones shown in the following diagram.
-
 Step 6
...
-
 Step 7
Fold your leather in half and secure your pattern pieces in place with some thin, small strips of masking tape and draw around the edge with your metallic gel pen. Then measure a centimetre from the edge all around the pattern piece with your ruler – this will be the seam allowance. Also don’t forget to mark out the bottom of your zip with a notch.
-
 Step 8
Do the same with the pattern pieces you made for your heel and for the following:
-
 Step 9
...
-
 Step 10
Cut slits along the seam allowance, which go right up to the edge of the pattern but not beyond, and V-like shapes at the corners (your seam allowance should look like those shown in my diagrams) This is so that they don’t overlap or extend over the edge when you fold the leather back on itself.
-
 Step 11
After you have cut your pieces out, fold the seam allowance back on itself on the wrong side of the leather and secure it with your glue stick or masking tape. Do not do this for the heel pieces, except along the bottom after you’ve sewn the two sides together.
-
 Step 12
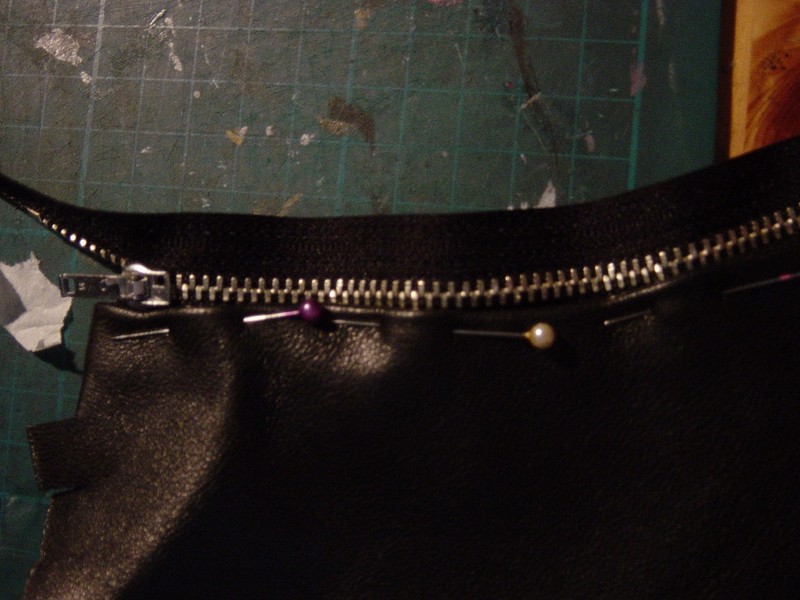
You are now ready to sew the zip in. Secure it with pins to the inside and outside panel for each shoe (zip should be on the wrong side of the fabric.) With the leather needle and zipper foot installed on your machine, sew the zip in. If it is longer than the side of the pattern piece, simply fold it diagonally back on itself and secure it with masking tape. DO NOT CUT IT.
-
 Step 13
Sew together the two sides of the heel. Notice how, on the McQueen original, there’s a great ridge effect to contrast with the flat “collar” panels. You can recreate this by cutting about 7 strips, each 20cm long and 1.5 cm wide. Fold the strips in half, fix them with glue and stick them, row by row, along the heel, starting 1cm from the edge and working your way inwards until the heel is covered in ridges, all except for the seam allowance.
-
 Step 14
Glue the heels to the shoe, then the sides, making sure all the edges meet in the same place. Use the glue generously and leave to dry for about ten minutes.
In the mean time, prepare the other triangular facets of the collars. First of all, having folded the seam allowance back on itself and glued it down (make sure it’s in a straight line and accurate) sew two lines along the edges of the triangles, one 1mm from the edge and one 1cm from the edge.
Place and affix your studs on the outside corners.
Glue your triangular collar pieces down edge-to-edge, making sure you don’t glue too close to the zip. It won’t fasten properly if glue or fabric get in the way of the teeth.
Finally, the finishing touch is to thread a small length of wire through the top of the zip, then through the skull and the round bead, and secure it by twisting it together and folding it back on itself with the pliers at the bottom of the zip.
Congratulations on having been put through your paces to strut your stuff in your fine new ankle boots, whether in the city, the bar or the whist, tranquil fields, of a sultry summer’s day, among many a daisy chain. How very now, brown cow!


 1
Home Accessories »
Diy Jewelry Box
1
Home Accessories »
Diy Jewelry Box


Incredible; thank you!