


About
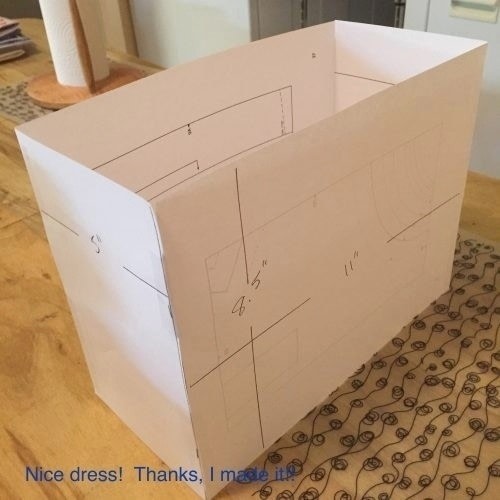
My sister wanted a bag that was 5″ deep, 11″ wide and 8.5″ tall.
No pattern? No problem! Then she let me run with the idea – and so was born the “TA-DA BAG“! The TA-DA BAG is a simple bag. Give it a try yourself! Use fabric from your stash and repurposed notions – zipper, handles, etc. from old ready-to-discard bags – get creative and you too will have a TA-DA BAG!
-
 Rae G. added The "TA-DA" Bag! to Bags
20 Jul 13:58
Rae G. added The "TA-DA" Bag! to Bags
20 Jul 13:58
-
 mary.stuerke.7 added The "TA-DA" Bag! to Accessories
24 Jan 20:06
mary.stuerke.7 added The "TA-DA" Bag! to Accessories
24 Jan 20:06
-
mary.stuerke.7 favorited The "TA-DA" Bag!
24 Jan 20:06
-
Bridget D. favorited The "TA-DA" Bag!
28 Aug 18:33
-
Tina H. favorited The "TA-DA" Bag!
04 Jan 11:28
-
 RareJewel favorited The "TA-DA" Bag!
13 Nov 09:50
RareJewel favorited The "TA-DA" Bag!
13 Nov 09:50
-
Traci S. added The "TA-DA" Bag! to Autumn Chill
10 Oct 17:22
-
Patricia A. favorited The "TA-DA" Bag!
28 Apr 21:30
-
 JadeSucksAtLife favorited The "TA-DA" Bag!
04 Mar 08:17
JadeSucksAtLife favorited The "TA-DA" Bag!
04 Mar 08:17
-
arlene c. favorited The "TA-DA" Bag!
16 Jan 17:32
You Will Need
-
 Step 1
I drew out my pattern pieces on paper and taped them together just to get an idea on the size - 5" x 8.5" x 11".
-
 Step 2
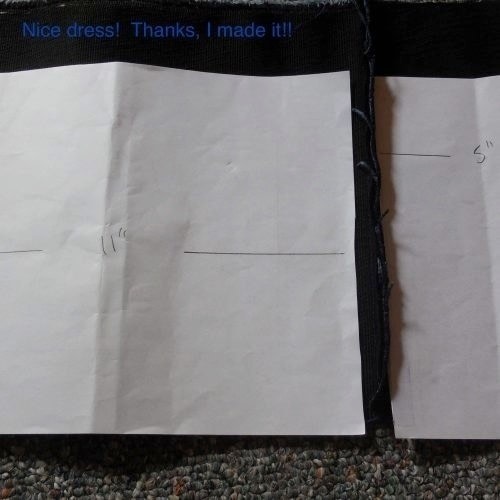
I drew out the bottom base piece – 11″ by 5″.
-
 Step 3
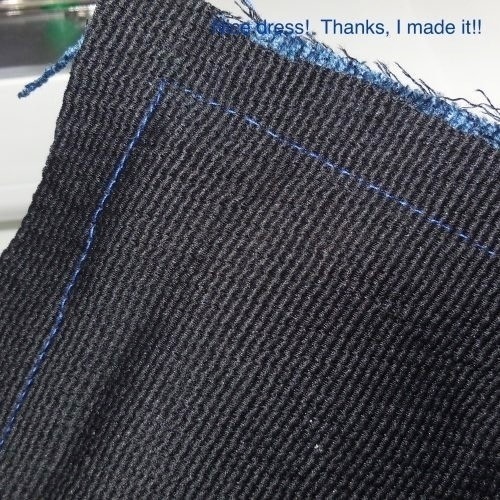
I took each paper piece and cut out my inner lining fabric and my outer bag fabric ADDING ON 5/8" all around each piece for seam allowances. Make sure you cut two extra bottom base pieces out of the inner lining fabric - put them aside for later use. I sewed the inner lining fabric "walls" together to look like my paper model, same with my outer bag fabric.
-
 Step 4
Both these fabrics were in my stash. The blue was used to cover three foot stools (upholstery fabric) and was heavy enough to be a medium weight bag fabric. The lining was a leftover 100% quilting cotton. Both fabrics are washable, if done in a gentle wash and hung to dry.
-
 Step 5
I carefully pinned the sewn together bag "walls" of my outer bag fabric to the bottom base piece of my outer bag fabric and sewed them together, turning at the corners neatly. You can carefully snip the corners on the bag walls if you are having trouble getting them flat enough to sew down and turn the corners. Just don't snip more than the 5/8" seam allowance.
The inner bag lining is done just slightly different. With the inner bag lining I pinned and sewed my "walls" to my bottom base piece, but I left an opening big enough in that seam to put my hand in later and pull my plastic handles through. You'll see! -
 Step 6
Grab your two extra bottom base pieces now. Luckily I found a piece of heavy plastic that used to be a binder page divider that was the right thickness and strength. It just needed to be cut to the right size. If you can't find plastic, cardboard will do. It's preferable to have something that won't bend though. I cut it to the right size (11″ x 5″) and covered it in the extra inner lining fabric - sewing it in. This will be placed in the bottom of the bag – loosely – to make the bag base more sturdy. It is removable. If it's plastic you can wash it, but if it's cardboard, you cannot.
-
 Step 7
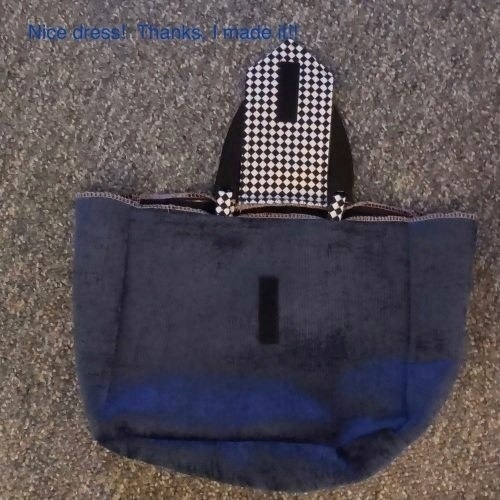
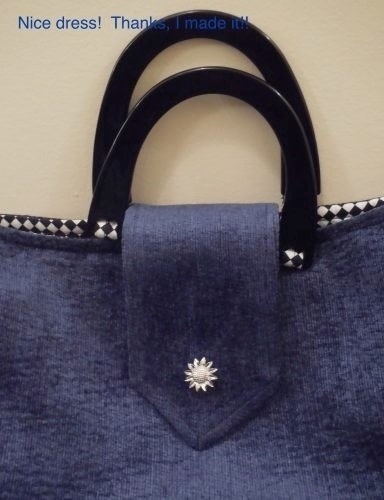
Before we attach our inner bag to our outer bag we have to attach our closing flap and the two plastic handles I have repurposed from an old ready-to-discard bag. I cut and sewed into a tube four fabric strips to attach the handles and a larger tube to act as a closing flap. After the closing flap was made, I sewed velcro on to the inside of it.
-
 Step 8
The plastic handle fabric strips, the closing flap and the second half of the velcro have been sewn on to my outer bag before the inner bag is attached.
-
 Step 9
I consider this to be the fun part. Sewing together the outer bag and the inner bag lining at the openings. My outer bag is placed inside my inner bag lining, with right sides together – so that I can turn the bag inside out afterwards. Then I sewed them together along the top edge at the opening - making sure your handles and the closing flap are on the inside, between both layers.
-
 Step 10
I put my hand inside the opening I left at the bottom of my inner bag lining (step 5) and pulled the handles and all the fabric out!
-
 Step 11
Just like a magic trick!
-
 Step 12
I hand sewed the opening closed (although you could use your machine) and pushed the lining inside the outer bag. I topstitched around the opening edge to keep the two layers tidy.
-
 Step 13
Now to give my sister an option, I have sewn a snap on each side at the side seams.
-
 Step 14
This way, when the snaps on the sides are closed the purse will have a smaller opening. When open, the purse will have a bigger opening and possibly more capacity.
-
 Step 15
Oh yes! There is the decorative shiny button that was repurposed from another bag for my sister’s TA-DA BAG! The closing flap is actually held by a velcro strip so the button is only for show.


Comments


