


About
Tired of misplacing your sewing tools??
This wise old owl sits next to your sewing machine and holds all your important tools for easy access...marking tool, seam gauge, a seam ripper (or two), tiny scissors to cut those loose threads and a fluff brush and tweezers to keep your machine clean and happy. You can even use him as a pin cushion! Find the pattern attached and follow the step by step tutorial below.
Tags
Downloads
- 104642_2F2014-10-05-170918-Owl+You+Need+Sewing+Buddy+Pattern+_26+Instructions.pdf 333 KB [ Download ]
-
 alp.zoey added The "Owl You Need" Sewing Buddy to Sewing plushies and more
18 Aug 03:58
alp.zoey added The "Owl You Need" Sewing Buddy to Sewing plushies and more
18 Aug 03:58
-
alp.zoey added The "Owl You Need" Sewing Buddy to Crafty/diy
12 Aug 12:41
-
 Marjolein452 added The "Owl You Need" Sewing Buddy to sewing
16 Nov 16:10
Marjolein452 added The "Owl You Need" Sewing Buddy to sewing
16 Nov 16:10
-
 forbunnie favorited The "Owl You Need" Sewing Buddy
06 Mar 00:24
forbunnie favorited The "Owl You Need" Sewing Buddy
06 Mar 00:24
-
 Caron K. added The "Owl You Need" Sewing Buddy to Pin Cushions
23 Dec 07:26
Caron K. added The "Owl You Need" Sewing Buddy to Pin Cushions
23 Dec 07:26
-
Caron K. favorited The "Owl You Need" Sewing Buddy
23 Dec 07:25
-
Pristine O. favorited The "Owl You Need" Sewing Buddy
16 Dec 00:59
-
rose c. favorited The "Owl You Need" Sewing Buddy
10 Oct 13:00
-
 Emily I. favorited The "Owl You Need" Sewing Buddy
06 Jul 07:26
Emily I. favorited The "Owl You Need" Sewing Buddy
06 Jul 07:26
-
 LolMadeYouLook favorited The "Owl You Need" Sewing Buddy
25 May 00:55
LolMadeYouLook favorited The "Owl You Need" Sewing Buddy
25 May 00:55
-
 Step 1
What you will need:
Pattern - attached
Fabric - This is a perfect project to use up all those fabric scraps
Thread
Pins & Needle
Scissors
Fusible Fleece
Polyfill
Rice- about a cup
Two Buttons
Your sewing machine
Any embellishments you desire..how about a bow or a button heart? -
Step 2
Cut out your pattern pieces. If you would like your owl one solid color you will only need page 1 for your front & back piece. If you would like your owl to have a contrasting belly cut out the pattern pieces on page 2 for the front of your owl. For this tutorial I will be showing your how to make the owl with a contrasting belly.
-
 Step 3
Cut out your fabric and fleece pieces according to directions on pattern pieces. You will want to cut your fleece pieces about 1/4 inch smaller than your fabric pieces. Iron your fleece to corresponding pieces.
-
 Step 4
If your making the owl one solid color you can skip this step. For the contrasting owl's belly pin your two pieces together, belly to head, right sides together. Stitch 1/4 inch seam. Trim seam and iron flat.
-
 Step 5
Take your pocket piece and fold top edge down 1/4 inch, iron, fold over again 1/4 inch and iron. Topstitch in place.
-
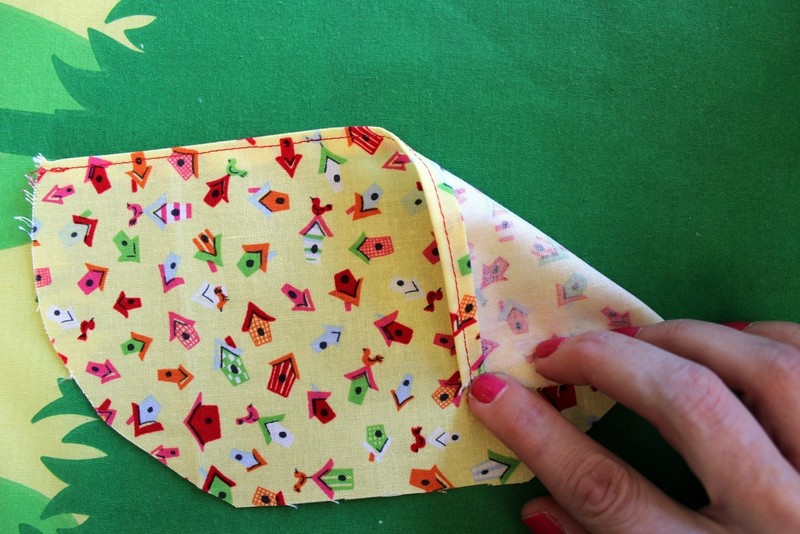
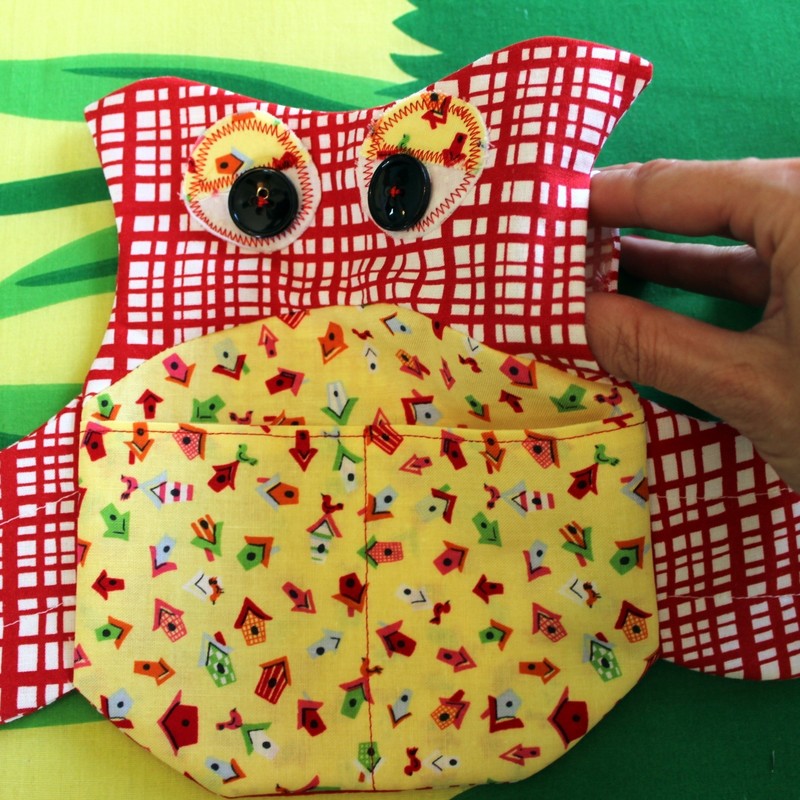
 Step 6
Place wrong side of pocket piece on right side of owl front body lining up edges and pin in place. Find center and topstitch from top of pocket to bottom.
-
 Step 7
Take your two eyeball pieces and place on owl front where you'd like them. Now take your eyelid piece and cut in half. Place on top of eyeballs and pin in place. Zig zag stitch (or any decorative stitch of your choosing) around eyeball and across bottom of eyelid. Zig zagging in a circle can be tricky. I found using Steam a Seam or fusible web to hold your eyeballs & eyelids in place instead of using pins helps a lot. It doesn't have to be perfect. That's what makes your owl unique.
Sew your buttons in place on top of eyes. -
 Step 8
Take two of your wing pieces and pin right sides together. Stitch 1/4 inch around edge of wing and make sure to leave end open so you can turn inside out. Trim seam 1/4 inch. Iron and turn inside out. I used a point turner to form fingers. Be careful that you don't poke through your seam. Iron flat once wings are formed. Topstitch wing to create a 3 feather look. Repeat for second wing.
-
 Step 9
Go ahead and assemble your beak & feet the same way you did your wings..place wrong sides together, stitch around pieces 1/4 inch leaving ends open for feet and a small opening at side for beak. Trim seam and iron. Turn inside out, iron and slipstitch opening of beak closed.
-
 Step 10
Place wings on top of front owl body in correct spots lining up edges. Place owl back piece on top with right sides facing. (make sure your wings are arranged correctly so you don't catch bottom of your wings when you stitch around edges) Stitch around owl 1/4 inch leaving about a 2.5 inch opening at side. Trim seam and iron. Flip right side out, iron.
**Note: You may also chose to attach your feet here too as well. I actually tacked mine on to the front, which I go through in Step 13 but I later found that actually sewing them on here like you do the wings works just as well if not better.
-
 Step 11
Fill bottom of owl with about a cup or so of rice to give it some weight so it will sit upright and not want to fall over. Stuff the rest of your owl with polyfill. Stuff him good too!
-
 Step 12
Slipstitch opening closed. Your almost there!
-
 Step 13
Now stick that nose on his face. You can either sew in place or take the easy route like me...a little tacky glue works perfect!
Now do the exact same thing with his feet if you didn't already attach them in Step 10. -
 Step 14
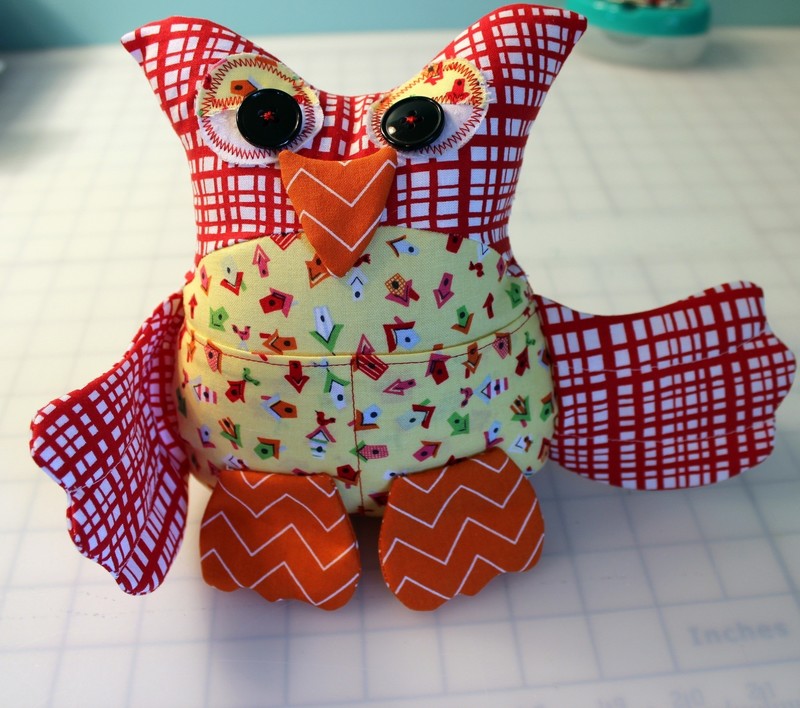
Embellish these little dudes how you want. Add a bow for a girl or a bow tie for a boy. You can leave his wings floppy or you can hand sew or glue them in place...I like them sewn in place, looks like he/she's hugging all my sewing gadgets that way :)
You are all finished! Now you got a little buddy to keep track of all your tiny sewing notions.


Comments

