


About
Now you can wear your pick and use it :P
I know there are a few versions around here with clasps, but I didn't like the look and went for something way more primitive.
The best thing is, you can take off the pick without taking off the necklace, and you don't have to fiddle around with fasteners and clips!
I had a bunch of plastic glow-in-the-dark stars around, and some of theme were big enough to cut picks from. I've been making picks out of them since forever, but until recently I kept losing them everywhere.
Tags
-
 Hemophobic Vampire favorited The Easiest Fully Functional, Adjustable, Glow In The Dark Pick Necklace!
10 Aug 04:58
Hemophobic Vampire favorited The Easiest Fully Functional, Adjustable, Glow In The Dark Pick Necklace!
10 Aug 04:58
-
 KozmicBlues added The Easiest Fully Functional, Adjustable, Glow In The Dark Pick Necklace! to Anti-aburriment
08 Feb 19:44
KozmicBlues added The Easiest Fully Functional, Adjustable, Glow In The Dark Pick Necklace! to Anti-aburriment
08 Feb 19:44
- Abnormal Abby added The Easiest Fully Functional, Adjustable, Glow In The Dark Pick Necklace! to Jewellry 11 Jun 01:41
-
 Lioba M. added The Easiest Fully Functional, Adjustable, Glow In The Dark Pick Necklace! to DIY Wear
24 Mar 20:42
Lioba M. added The Easiest Fully Functional, Adjustable, Glow In The Dark Pick Necklace! to DIY Wear
24 Mar 20:42
-
 cristinakilljoyway favorited The Easiest Fully Functional, Adjustable, Glow In The Dark Pick Necklace!
04 Jan 19:41
cristinakilljoyway favorited The Easiest Fully Functional, Adjustable, Glow In The Dark Pick Necklace!
04 Jan 19:41
-
 Zach Parsons favorited The Easiest Fully Functional, Adjustable, Glow In The Dark Pick Necklace!
30 Dec 10:34
Zach Parsons favorited The Easiest Fully Functional, Adjustable, Glow In The Dark Pick Necklace!
30 Dec 10:34
-
 Hermione Granger commented on The Easiest Fully Functional, Adjustable, Glow In The Dark Pick Necklace!
24 Oct 17:44
Hermione Granger commented on The Easiest Fully Functional, Adjustable, Glow In The Dark Pick Necklace!
24 Oct 17:44
-
 Physco K. favorited The Easiest Fully Functional, Adjustable, Glow In The Dark Pick Necklace!
19 Oct 15:24
Physco K. favorited The Easiest Fully Functional, Adjustable, Glow In The Dark Pick Necklace!
19 Oct 15:24
-
 Missy favorited The Easiest Fully Functional, Adjustable, Glow In The Dark Pick Necklace!
27 Jun 21:16
Missy favorited The Easiest Fully Functional, Adjustable, Glow In The Dark Pick Necklace!
27 Jun 21:16
-
 n k. entered her project The Easiest Fully Functional, Adjustable, Glow In The Dark Pick Necklace! to Pick Punch
09 Dec 18:06
n k. entered her project The Easiest Fully Functional, Adjustable, Glow In The Dark Pick Necklace! to Pick Punch
09 Dec 18:06
-
Step 1
(skip this step if you're using a store-bought pick)
Using the pick as a template, draw your pick shape on the plastic.
cut around it with sturdy scissors and smooth the edges with a knife and some sandpaper. Or use a pick punch (now you know why I need one lol). I don't think this step needs a picture. -
 Step 2
Draw on the pick where you want the hole to be. The length should be twice the width, and you shouldn't draw too close to the edges or you'll risk breaking it when you carve it later.
-
 Step 3
Now heat a needle/nail/piece of wire while holding it with pliers, or stick it in a wine cork before you heat it . Then use it to poke a hole in the pick - move it around a little so the hole gets big enough to start carving with the knife!
Using the x-acto knife, carefully carve the hole to the shape you've drawn. Again, try to get the edges as smooth as possible.
Congratulations, you've finished the pick part ^^ -
Step 4
Now prepare the necklace cord:
If you want to make a loose necklace, just cut a piece of leather or waxed cotton string long enough so it fits over your head (add 1" for the knot) and make a knot. I used polyester corset laces, but I wouldn't really recommend it because it's not safe (it's too strong and you could get hurt if it gets tangled somewhere).
If you want a short necklace that fits tightly around your neck, you'll have to make the adjustable one. (see next step!) For a medium length necklace you can either use a closure, or make it adjustable too. -
Step 5
Make an adjustable cord: (I learned this from a guy who was selling handmade jewelry at a market)
lay the string flat in a "U" shape. DON'T thread your pick on the string yet, I told you it'll be removable ;) -
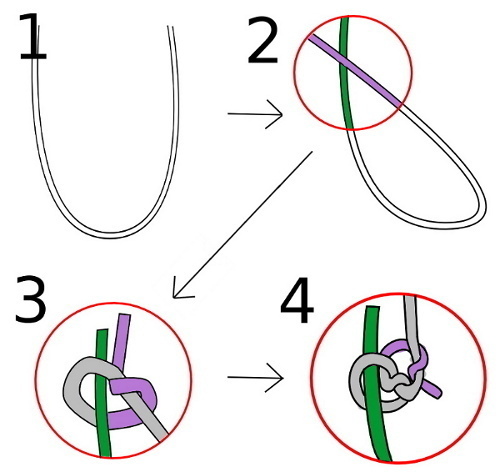
 Step 6
fold one of the ends over the other, and tie a knot. Then tie another knot on top of it, in the opposite direction. (This is important! if you tie both knots in the same direction, the resulting knot will stick out at a 90° angle and won't really work well)
-
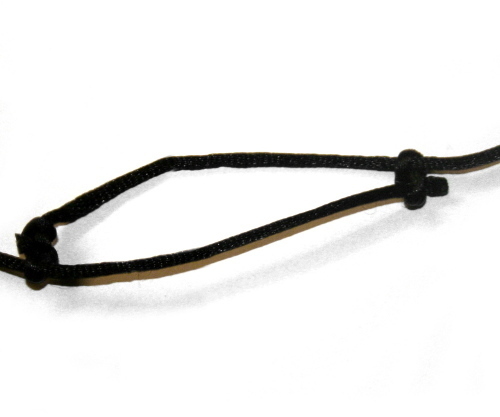
 Step 7
Do the same with the other end. It should look like the picture on the left now. You have to pull the knots really tight, or they won't stay in place! To adjust the necklace, just slide the knots around. You can secure the knots with a drop of superglue, and then shorten the ends if they stick out too much.
-
 Step 8
Now attach the pick by making a loop from the necklace and threading it through the hole, then pulling the pick through the loop (I've made photos of the steps in case someone doesn't know the trick yet ^^)
-
 Step 9
to remove the pick (this can be done while wearing it!) you just have to apply the steps from [8] in the opposite order.


Comments

