


About
A decorative holder for spare toilet paper rolls or paper towels
Last week my husband went out of town for several days, and I got a wild hair to make a toilet paper holder while he was gone. Don’t ask me why. I don’t know if it was a serious lack of anything better to do with my time (could that possible be it?), or maybe my inability to focus on projects I SHOULD be doing, when there are projects I COULD be doing… or it possibly could have been the anxiety i feel when I’m digging through stacks of toilet paper under the sink in any of the 3 bathrooms we have in this house. Ugh. Yeah, it was probably one of those things…
Anyways, this toilet paper holder can also be used to hold paper towels if you’d like to make something fun that matches your home decor.
-
Step 1
My plan started out at Home Depot which, while functional, did not produce something as pretty as I’d hoped for. Nor was it easy finding what I wanted.
First I purchased a dowel to use as the actual holder. The dowel I purchased was 1″ in diameter (perfect size) and 3 feet in length (also perfect size).
-
Step 2
I then purchase a 1×6 piece of wood, and utilized some 1″ wood trim I’d had left over from a recent project.
**see below for how to make this without 1×6 and trim**
-
Step 3
First, cut a square off the 1×6. My husband says that a 1×6 is actually 5.5″ wide, so in that case, make it a 5.5″x5.5″ square.
-
Step 4
Using a Miter Saw, cut trim that will fit around all the edges (this is just for looks). Using a nailgun, attach the trim pieces along all 4 sides.
-
Step 5
Cut the dowel to a 12″ length (I cut mine into 3rds so I could make 3 of them).
Paint dowel and trimmed square.
-
Step 6
Using coordinating scrapbooking paper and mod-podge, cover the top of the base and the entire dowel with paper. Consider spraying with Rustoleum Gloss Coat when it’s dry, to stop any tackiness the mod-podge might have. Using a 2″ (or longer) screw, and the coordinating drill bit, drill a hole into the center of your base and into the center of the dowel bottom. Run screw up through the base from underneath and into the dowel. Tighten down. I predrilled a little too much on mine, and it was still turning and not quite getting tight. If you have this probablem, a dab of wood glue onto the threads of the screw and onto the bottom of the dowel will help.
-
Step 7
Apply no-slip sticky furniture pads to the bottom of the base to keep it from getting dinged up, or dinging anything else up.
-
Step 8
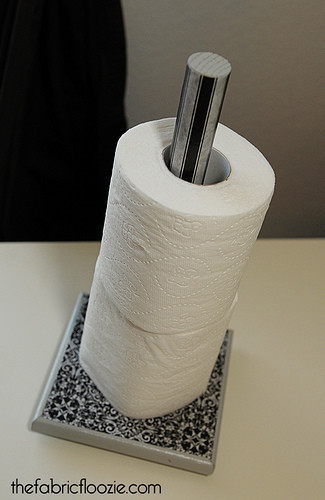
All done! Just slip on some TP or Paper Towels and enjoy the decorative holder you just made for under $5.
 1
Books & Journals »
Locking Box And Journal
1
Books & Journals »
Locking Box And Journal
 2
Babies & Kids »
A Toy Kitchen For A Child
2
Babies & Kids »
A Toy Kitchen For A Child
 3
Origami Flowers »
Origami Orchid
3
Origami Flowers »
Origami Orchid
 4
Office »
Pretty Sketchbooks
4
Office »
Pretty Sketchbooks
 5
Charms & Keyrings »
Shugo Chara Inspired Pop It
5
Charms & Keyrings »
Shugo Chara Inspired Pop It

