


About
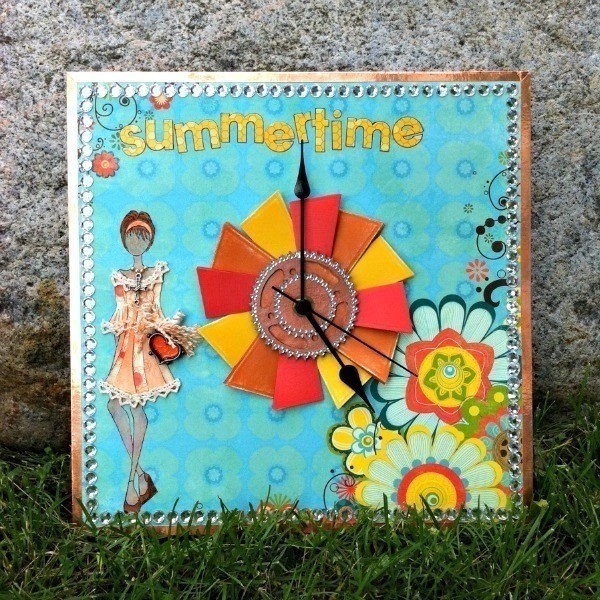
Let’s officially declare it 5 O’Clock somewhere with a Media Mixagé Summertime Clock.
I created this tutorial for my Guest Design at Spellbinders Paper Arts.
http://bit.ly/summertimeclock
-
 TheSewingMaven favorited Summertime Clock
04 May 00:34
TheSewingMaven favorited Summertime Clock
04 May 00:34
-
 Zulfa R. added Summertime Clock to Papercrafts
08 Jul 01:59
Zulfa R. added Summertime Clock to Papercrafts
08 Jul 01:59
-
Zulfa R. favorited Summertime Clock
08 Jul 01:58
-
 Karen D. favorited Summertime Clock
07 Jul 13:40
Karen D. favorited Summertime Clock
07 Jul 13:40
-
 OH! Its the Domo :3 favorited Summertime Clock
21 Jun 03:53
OH! Its the Domo :3 favorited Summertime Clock
21 Jun 03:53
-
 Danielle H. favorited Summertime Clock
21 Jun 01:28
Danielle H. favorited Summertime Clock
21 Jun 01:28
-
 cardparties favorited her project Summertime Clock
19 Jun 22:32
cardparties favorited her project Summertime Clock
19 Jun 22:32
-
 Valerie R. favorited Summertime Clock
19 Jun 18:26
Valerie R. favorited Summertime Clock
19 Jun 18:26
-
 Step 1
Clock Preparation
Adhere your choice of Bo Bunny Press - Hello Sunshine Papers with Mod Podge. Let dry and sand off excess with Bazzill Basics Paper® - Two Scoops Sander. Tip - use a brayer to smooth out any wrinkles or areas with excess or Modge. Paint back and sides of clock with Deep Ocean Blue Paint (Plaid). Line edges of clock with Cooper Memory Foil Tape (Ranger). I like to bevel the edges with a straight edge and a craft knife. Gently smooth the tape with something smooth and flexible. I like to use the bottom of the paint container.
-
 Step 2
Clock Center
Die cut 12 MD1-004 Media Mixagé Triangles Size 3 (1¾ x 2½”) in assorted colors of cardstock to create rays. Score in half with Scor-Pal® - Scor Buddy and distress as desired. Adhere to clock. Tip - use a gridded mat and align the triangular rays upside down and tape together, then adhere to the clock.
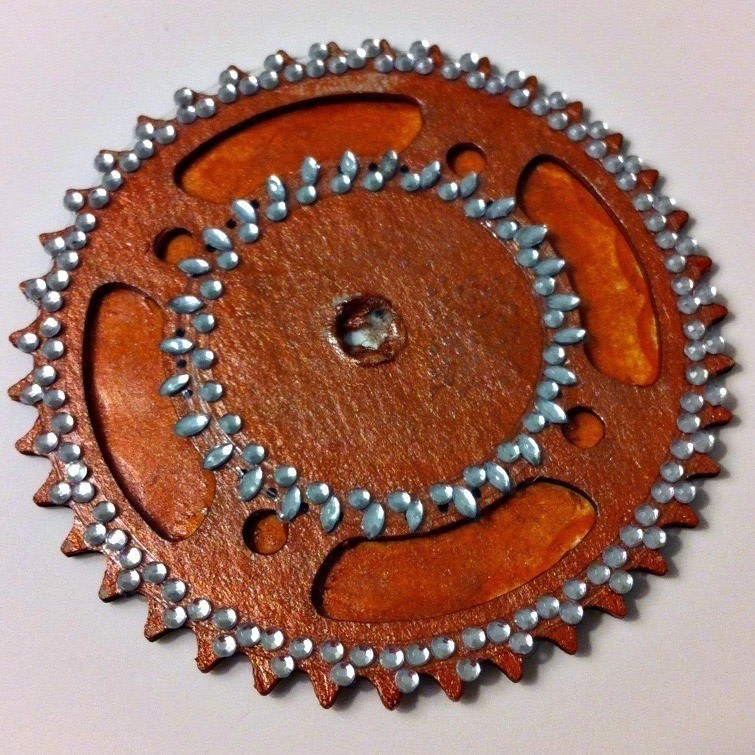
Die cut a Standard Circle to fit behind the Want2Scrap© Sprightly Sprockets Nestaboard™. Distress your paper as desired and mount on back of sprocket. Your Sprocket will need a hole in the center to accommodate the clock hardware. I made a hole with a hammer and a nail - but I would bet that a hole punch might be easier! Sand your hole, if needed, then paint Sprocket with Terra Cotta Dimensional Pearl Paint. Get into the nooks and crannies! Embellish with Nestabling™ to really bling it up!
Assemble clock according to directions.
-
 Step 3
Mixed Media Doll and Media Mixagé “Purse”
Stamp Doll on tissue paper with Tsukineko® - Memento Rich Cocoa. Note, this will bleed through, so protect your work surface. Color image with Copic Markers. I used E93, E08, E35, E39 for her skin and R02, R000, R22 on her clothing. Fussy cut image. I used a Sp.05 Multiliner Marker from Copic to “hide” any cutting errors. Stamp an additional image on your choice of Bo Bunny Press - Hello Sunshine Papers and fussy cut pieces for paper piecing the doll’s dress and her headband. I like to shade these pieces with a coordinating Copic marker - I used R000, R02 and R22.
-
 Step 4
Adhere image to clock with Mod Podge and let dry. Layer Bo Bunny Press - Hello Sunshine Papers that you fussy cut as desired and embellish your Mixed Media Doll with Want2Scrap© Charm and La Creme Pearls as accents and trim her dress with May Arts - Crochet Trim using Scor-Pal® Scor-Tape.
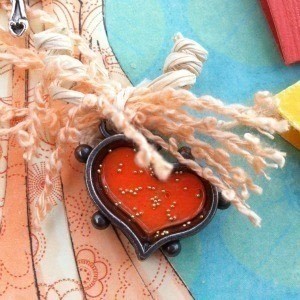
For the doll’s purse, die cut your choice of Bo Bunny Press - Hello Sunshine Papers with Size 1 (¾ x ⅝”) MD1-005 Hearts One Media Mixagé Die . Apply a bit of Glossy Accents in the bottom of the MB1-005 Hearts One Media Mixagé Bezel and add paper. Cover with Glossy Accents and sprinkle 14K Gold Micro Beads (Judikins) and let dry. I left a little space and repeated this step, to give the micro beads a floating appearance. Coil some Paper Wrapped Wire (Michael’s) and attach wire and fibers by tying to the bezel with Crochet Thread (Michael’s). -
 Step 5
Finishing Touches
Add title and outline with a Sp.05 Multiliner Marker from Copic.
Apply a line of Scor-Pal® Scor-Tape and add Want2Scrap© Bulk Bling. Start at the edges and work your way to the middle, so you can arrange to have all of the rhinestones fit without any noticeable gaps.
Hang your clock, pour something tall and cold, and let’s all get ready to have the best summer ever!


 1
Home Accessories »
Diy Jewelry Box
1
Home Accessories »
Diy Jewelry Box
