


About
Junk Beautiful
Got Stuff?
Stuff Coat Hanger
It’s time to talk about fun stuff! I had a “pot of gold” encounter when I came across a trailer full of composite letters. I eagerly began pulling them out to see if I could come up with a word appropriate for an entryway coat hanger. I think STUFF says it all!
Express Yourself
Having fun is what the art of inventing with junk is all about. There are no borders when working with castoffs, creating endless opportunities for innovative self-expression. Allow yourself to set your inner kid free to be purely playful—projects born of a sense of humor will be your favorites for years to come. This coat hanger has become one of my favorite happy-go-lucky projects of all time.
I have been a collector of letters for as long as I can remember, so you can picture what my reaction was when I discovered a trailer full at a cost between $2 and $5 each. I was giddy as a schoolgirl before her first high school dance! In hindsight, I should have bought all the composite letters, but I’m still delighted with what I did acquire. The task of building the coat rack was straightforward, quick, and easy.
Bear in mind that projects don’t have to be difficult or take hours of your valuable time to be terrific. Sometimes the pure joy of discovering the unanticipated while on a shopping excursion and a few hours of deliberation on possibilities will save you time on the actual labor. Playful and painless is the best of both worlds.
make it/how to
Stuff Coat Hanger
We all have stuff, right? Like many of you, I have too much of it, making organization a nightmare. Salvaging these letters put a serious smile on my face. This whimsical project will make getting your ducks in a row entertaining. You might even get kids to hang things up. Stranger things have happened!
The big and bold letters are affixed to a piece of reclaimed lumber large enough to provide stability without upstaging them. I added in a super-cool metal table to help corral pocket and purse droppings.
Vintage hooks are readily available and inexpensive. They add a touch of authenticity to the reclaimed coat hanger.
What can I say? Most people who love vintage are all in. Retro key holders are the bomb!
A vintage Stetson and leather jacket ride side by side on the stuff coat rack. The jacket pockets are another storage opportunity.
Old boxes and drawers are another basic in a junker’s realm. This numbered goodie is just right for sunglasses and loose change.
Building with composite wood, especially old pieces, can be tricky because it is not as sturdy as real wood. For best results, purchase only pieces that have been protected from damp conditions.
Safety First
Be sure to wear gloves throughout this project, particularly when working with bleach, stain, and Minwax Polycrylic, as well as old wood
-
 Harmonee S. favorited Stuff Coat Hanger
15 Jul 22:40
Harmonee S. favorited Stuff Coat Hanger
15 Jul 22:40
-
 Bianca favorited Stuff Coat Hanger
27 Mar 03:07
Bianca favorited Stuff Coat Hanger
27 Mar 03:07
-
 Leonor R. favorited Stuff Coat Hanger
08 Oct 15:12
Leonor R. favorited Stuff Coat Hanger
08 Oct 15:12
-
 Kristi J. added Stuff Coat Hanger to DIY Home Decor
28 Mar 19:06
Kristi J. added Stuff Coat Hanger to DIY Home Decor
28 Mar 19:06
-
Kaya R. favorited Stuff Coat Hanger
26 Feb 01:43
-
 Crafterella featured Stuff Coat Hanger
24 Feb 23:00
Crafterella featured Stuff Coat Hanger
24 Feb 23:00
-
 Kimya J. favorited Stuff Coat Hanger
20 Feb 00:50
Kimya J. favorited Stuff Coat Hanger
20 Feb 00:50
-
 JadeSucksAtLife favorited Stuff Coat Hanger
19 Feb 11:04
JadeSucksAtLife favorited Stuff Coat Hanger
19 Feb 11:04
-
 GMC Group published her project Stuff Coat Hanger
19 Feb 09:00
GMC Group published her project Stuff Coat Hanger
19 Feb 09:00
-
 Step 1
Clean the composite letters with bleach diluted with water, then use a shop rag to wash the letters with warm water. Let dry in the sun.
-
Step 2
Sand the letters with fine- to medium-grit sandpaper. This is easiest with a power sander, but you also can do it by hand with sandpaper or a sanding block.
-
 Step 3
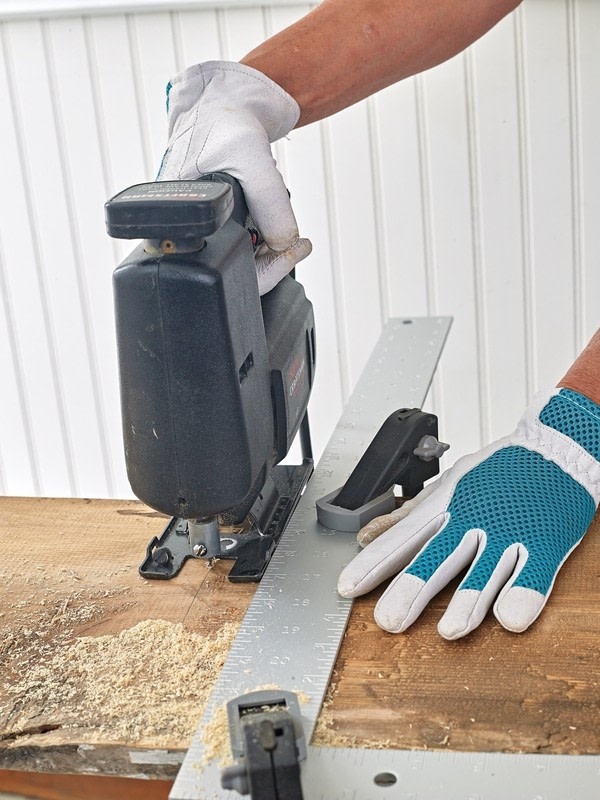
Secure the board to a table with clamps. Measure the wall where your sign will hang, and measure and cut the board to length using a carpenter square and jigsaw. A
-
 Step 4
Using a shop rag and warm water, clean the board and allow it to dry, then sand using fine- to medium-grit paper. You only need to sand one side and the edges. Apply 1 coat of Minwax Polycrylic to the sanded side and edges of the board with a shop rag.
-
Step 5
Measure and mark the back of the board for ½-in. wood screws to use for hanging the coat hanger. Predrill holes where marked, then screw in wood screws, leaving space to attach hanging wire. Measure and cut the wire; then wrap it around the screws. Tighten the screws to secure the wire.
-
 Step 6
Stain all sides of the letters with gel stain, varying the colors across the word. Let the stain dry, then apply Minwax Polycrylic to all sides of the letters. Use a clean shop rag for the stain and a paintbrush for the Minwax Polycrylic.
-
Step 7
Measure and mark for letter placement on the board.
-
Step 8
One at a time, glue the letters to the board; clamp until the glue has dried.
-
 Step 9
Before removing the clamps, screw the letters one at a time to the board from the back. I used several 1½-in. wood screws to secure each letter.
-
 Step 10
Measure, mark, and drill holes on the letters for vintage hooks. Then screw the hooks into the letters and hang the sign.


 1
Home Accessories »
Diy Jewelry Box
1
Home Accessories »
Diy Jewelry Box
