Steampunk Floor Lamp
Extract from DIY Industrial Pipe Furniture and Decor • By James Angus • Published by Ulysses Press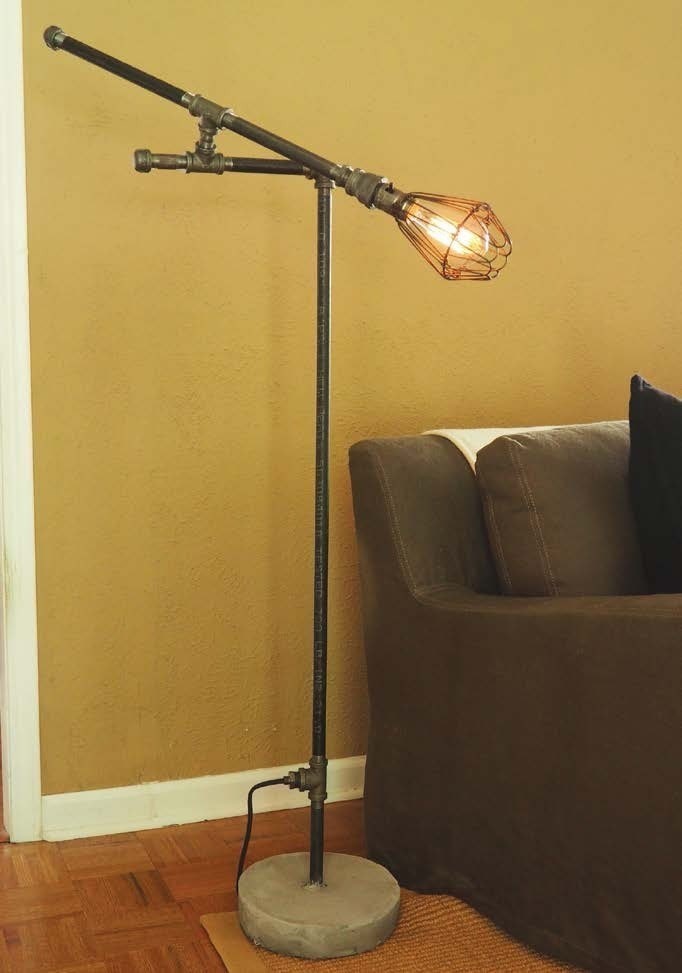

About
DIY Industrial Pipe Furniture and Decor
I’ve always loved the look of reclaimed industrial lamps. Too bad they’re so expensive.
When I discovered the “convert a bottle into a lamp” kit at the hardware store the hamster on a wheel in my brain started running full speed. With a socket and a cord, now anything could become a lamp. Seriously, anything. Not just glass bottles, like the kit is intended for, but even a pile of pipes.
-
 alp.zoey added Steampunk Floor Lamp to Lighting
18 Aug 03:15
alp.zoey added Steampunk Floor Lamp to Lighting
18 Aug 03:15
-
alp.zoey added Steampunk Floor Lamp to Crafty/diy
18 Aug 02:40
-
 K2 favorited Steampunk Floor Lamp
28 Dec 22:13
K2 favorited Steampunk Floor Lamp
28 Dec 22:13
-
 Jennifer P. favorited Steampunk Floor Lamp
13 Feb 13:51
Jennifer P. favorited Steampunk Floor Lamp
13 Feb 13:51
-
 Catherine D. added Steampunk Floor Lamp to Edward Scissorhand
14 Aug 17:59
Catherine D. added Steampunk Floor Lamp to Edward Scissorhand
14 Aug 17:59
-
 Crafterella featured Steampunk Floor Lamp
24 Jan 23:00
Crafterella featured Steampunk Floor Lamp
24 Jan 23:00
-
 Emma H. favorited Steampunk Floor Lamp
21 Jan 12:26
Emma H. favorited Steampunk Floor Lamp
21 Jan 12:26
-
 DeadGirl favorited Steampunk Floor Lamp
18 Jan 00:43
DeadGirl favorited Steampunk Floor Lamp
18 Jan 00:43
-
 Ulysses Press published her project Steampunk Floor Lamp
11 Jan 09:00
Ulysses Press published her project Steampunk Floor Lamp
11 Jan 09:00
You Will Need
-
 Step 1
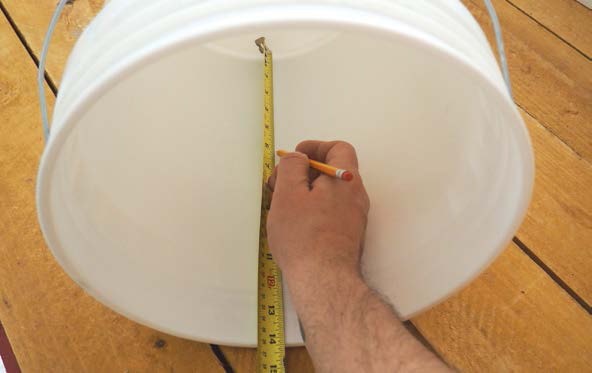
Mark the inside of the pickle bucket with a pencil at 4 inches from the bottom.
-
 Step 2
Run a few lines of painter’s tape above the 4-inch marks. This will be your guide for the height of the cement.
-
 Step 3
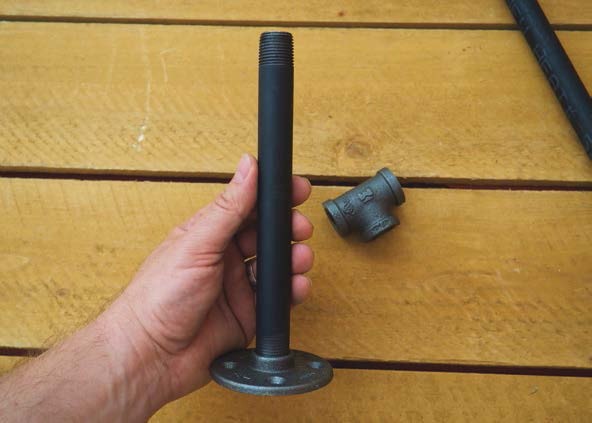
Screw the 8-inch-long pipe into the flange.
-
 Step 4
Connect the reducing T fitting to the top of the 8-inch-long pipe. The side opening is where the power cord will exit the finished lamp.
-
 Step 5
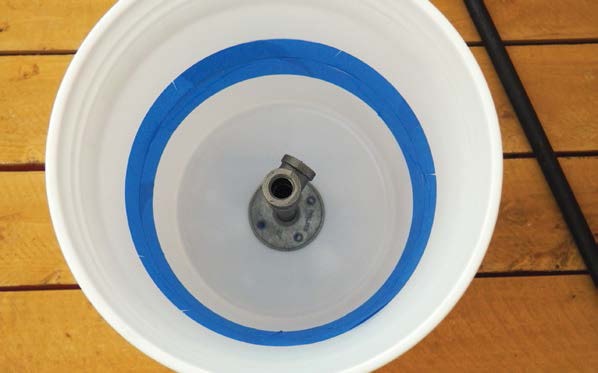
Attach a wad of painter’s tape to the bottom of the flange. It doesn’t need to be a lot, just enough to keep it in place.
-
 Step 6
Stick the flange to the center of the bucket.
-
 Step 7
Spray the inside of the bucket with a light coating of cooking spray. This brilliant tip will help remove the hardened cement once it dries. It will also help remove any excess cement you may spread onto the pipe.
-
 Step 8
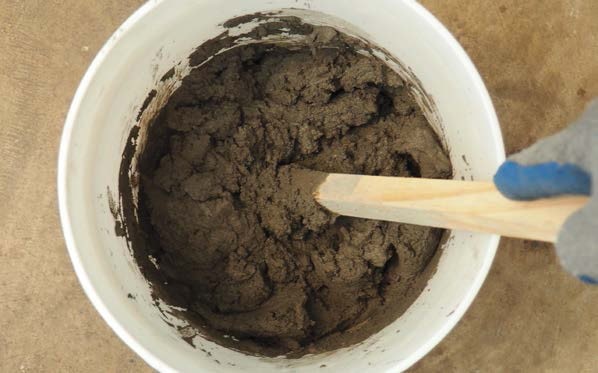
In the second bucket, mix the quick-dry cement according to the package directions. Usually, a 10-pound bag of cement requires about 2 cups of water, but you may have
to add a little bit more if your mixture is too stiff. Always add the dry cement mix to the water, and not the other way around or it will be lumpy. Use a thick stick to stir with, and wear gloves to protect your hands. You’ll know the cement is ready when it’s the consistency of oatmeal. -
 Step 9
Transfer the mixed cement to the first bucket with the putty knife a few scoops at a time. Smooth it around the pipe and try to get it as level as you can using the blue tape as a guide.
-
 Step 10
Lay out the pieces in the lamp kit. A typical lamp kit for converting a bottle into a lamp will contain: a lamp cord, a socket with an on/off switch, a socket shell, a check ring, a threaded rod, and a few ribbed rubber spacers.
-
 Step 11
Insert a tight fitting rubber spacer into the threaded end of the bushing coupling.
-
 Step 12
Push the threaded rod into the white ribbed bushing as snugly as you can with your hands. This will hold your lamp socket securely inside the coupling.
-
 Step 13
Screw the reducing coupling straight down onto the bushing coupling and the threaded lamp rod.
-
 Step 14
Screw the bottom of the socket cap from the lamp kit onto the threaded rod inside the reducing coupling. Twist it as far down as it will go.
-
 Step 15
Push the cut end of the lamp cord into the threaded lamp rod through the bottom of the socket assembly.
-
 Step 16
Slide the socket cover forward to expose the screws on either side. Attach the cord wires to the screws with a screwdriver and slide the cover back down.
-
 Step 17
Gently push the socket pieces together and pull the excess cord through the back of the assembly. Give the outside of the lamp assembly a good spritz of the flat metallic soft iron spray paint to match the other fittings.
-
 Step 18
With a pair of scissors, cut the male end off the lamp cord. It’s OK. It’s not plugged in.
-
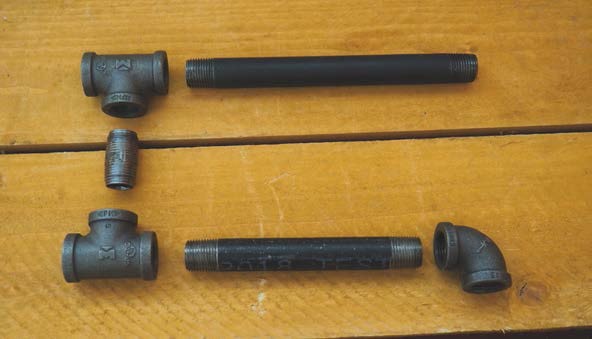
 Step 19
Lay out the 8-inch-long pipe, two T fit- tings, the close nipple, the 6-inch-long pipe, and an elbow fitting.
-
 Step 20
Thread the lamp cord through the pipe pieces. It’s probably easier to thread and attach each fitting one at a time, but I wanted to show the order for assembly.
-
 Step 21
Tighten the pipes and fittings together and pull all of the excess lamp cord through.
-
 Step 22
Add the 10-inch-long pipe with a cap to the open end of the T fitting on the top lamp arm, and add the 21⁄2-inch-long pipe with a cap to the open end of the T fitting on the bottom lamp arm.
-
 Step 23
Once the cement for the lamp base is completely dry, probably about 24 hours, gently lift the base from the bucket. The cooking spray should have done the trick.
If it does stick, don’t panic. Simply use a box cutter to cut the bucket off the concrete base. You can use a heavy grit sandpaper to smooth out any rough spots. -
 Step 24
Attach the 3-foot pipe into the top of the reducing T fitting in the top of the lamp base.
-
 Step 25
Push the lamp cord through the top of the 3-foot pipe in the base.
-
 Step 26
Use a pair of needle-nose pliers to gen- tly pull the lamp cord through the side hole of the T fitting. Be careful not to puncture the cord with the pliers.
-
 Step 27
A compression adapter is the perfect fitting to extract your lamp cord. They are easiest to find in brass, so just give it a shot of flat metallic soft iron spray paint so it will match all of the other pipe fittings.
-
 Step 28
For the power cord, use a pair of scissors to cut off the female end of the fabric-covered extension cord. For safety reasons, make sure it’s not plugged in.
-
 Step 29
Thread the newly painted compression adapter over the cut end of the fabric- covered extension cord small end first.
-
 Step 30
Use a pair of scissors to cut back some of the fabric covering from the cut end of
the extension cord, then split the inner cord in half about 3 inches. Strip back the white plastic to expose the copper wires under- neath on both sides. -
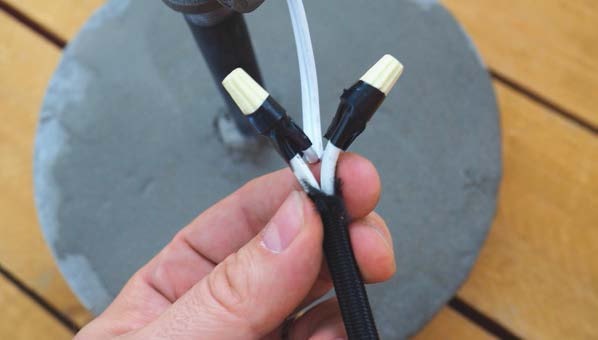
 Step 31
Connect the power cord wires to the lamp wires by twisting the copper ends together. It doesn’t matter which side is connected to which, just be sure to keep the two wires separated and not touching.
-
 Step 32
Connect the power cord wires to the lamp wires by twisting the copper ends together. It doesn’t matter which side is connected to which, just be sure to keep the two wires separated and not touching.
-
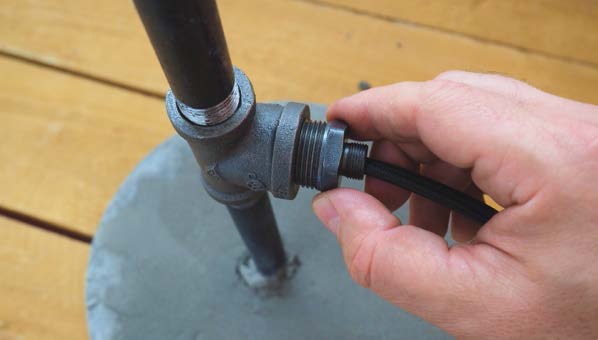
 Step 33
Push the connected wires into the
T fitting. Slide the compression adapter up the fabric cord and screw it into the open hole of the T fitting. -
 Step 34
Attach the elbow on the top part of the lamp to the 3-foot pipe as tightly as you can.
-
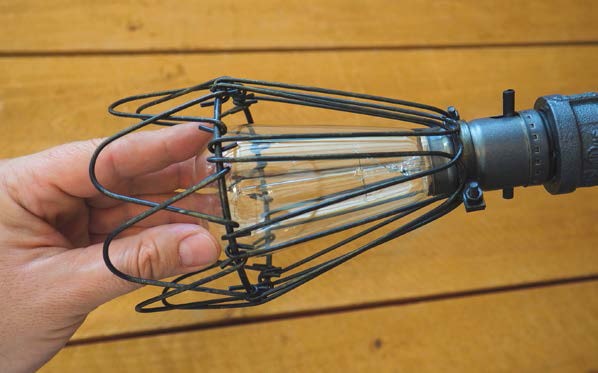
 Step 35
Use a screwdriver to attach the lamp cage to the lamp socket.
-
 Step 36
Insert an Edison-style lightbulb into the socket and close the cage.
-
 Step 37
Plug it in, and switch the light on.
Pat yourself on the back because you just built an awesome steampunk floor lamp.
That wasn’t so hard, now was it? I told you that I’d walk you through it.