


About
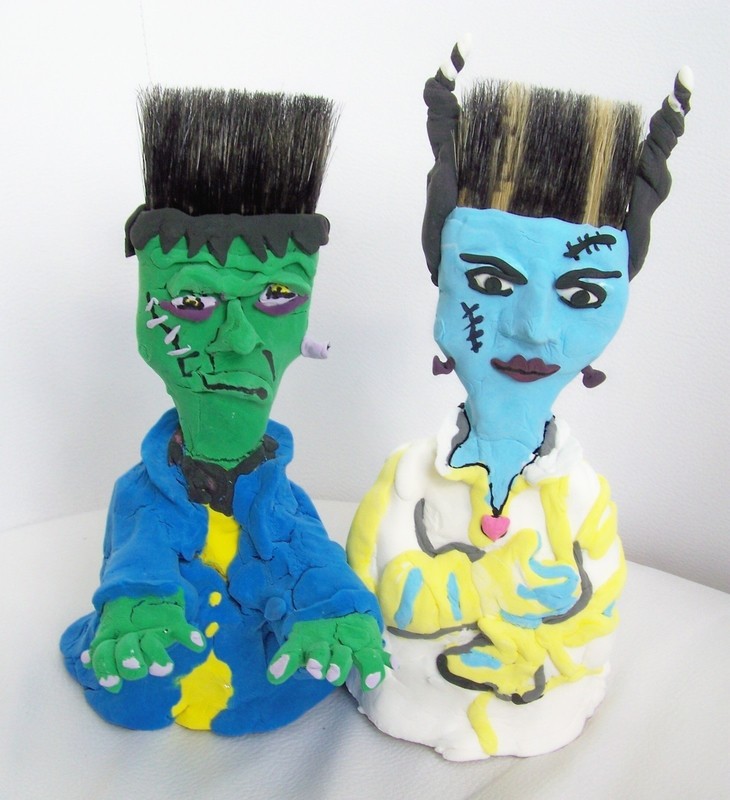
This pair of figures will get you into the Halloween spirit!
As we get closer to Halloween, I thought I’d create a pair of spooky characters that are fun to make and display on this fun holiday.
Materials:
2” paint brush from Home Depot’s painting department or other hardware store
Aluminum foil (for the turkey’s head and body)
Permanent markers (optional)
Double sided foam tape
Model Magic variety of colors
Embellishments of your choice
Tags
-
 rockinrubysalonandmassage favorited Spooky Brush Head Figures
01 Feb 19:49
rockinrubysalonandmassage favorited Spooky Brush Head Figures
01 Feb 19:49
-
 go-go-chi favorited Spooky Brush Head Figures
27 Nov 10:56
go-go-chi favorited Spooky Brush Head Figures
27 Nov 10:56
-
 Tabitha.VampireLover added Spooky Brush Head Figures to Halloween crafts
23 Sep 21:14
Tabitha.VampireLover added Spooky Brush Head Figures to Halloween crafts
23 Sep 21:14
-
 RaspberrySourZ added Spooky Brush Head Figures to work ideas
19 Sep 11:22
RaspberrySourZ added Spooky Brush Head Figures to work ideas
19 Sep 11:22
- Gothic C. favorited Spooky Brush Head Figures 29 Mar 21:41
You Will Need
-
 Step 1
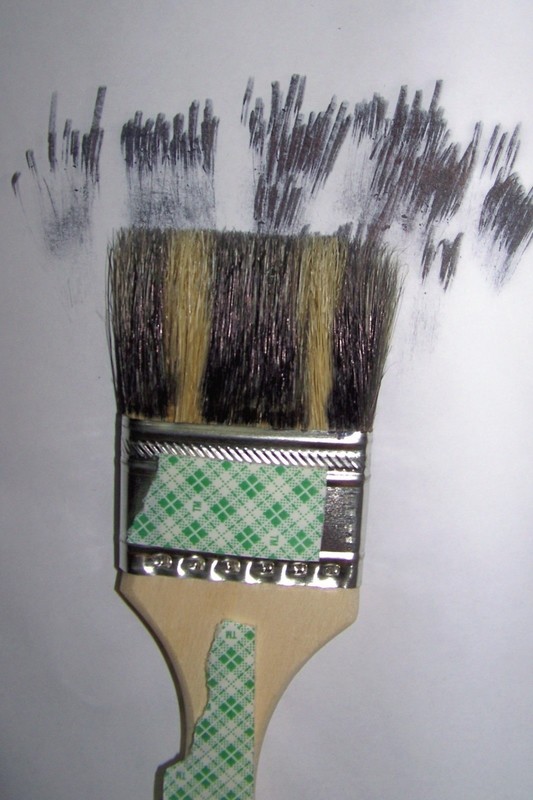
1) Tear off small pieces of double sided foam tape and press the pieces onto the metal bristle holder and handle of the paint brush covering both sides. The foam tape will help hold the foil armature to the brush for the figure’s torso.
-
 Step 2
2) Since the bristles on the paint brush I used were light in color. I used a black permanent marker to “color” the outside layer of the bristles black while leaving a couple of open, uncolored streaks.
-
 Step 3
3) Create the figure’s face by applying Model Magic pieces over the foam tape covering the metal section and lower, neck of the paint brush just below the metal. The bristles act as the hair for your figure. I ended up adding some extra clay to give the bride a bit of a hair extension next to the existing bristles. Add on facial features, the nose, eyes, ears, scars to both sides of the brush, using additional pieces of Model Magic. Set this aside briefly while you prepare the foil armature.
-
 Step 4
4) Tear off a medium sized sheet of aluminum foil and crumble it as you stick it onto the lower half of the paint brush handle just below the neck of the brush. Crumble more foil over the first layer and mold it into a torso shape, making sure it supports the whole handle. The bottom, foil base of the figure should be wide and flat in order to hold the (paint brush) figure straight up.
-
 Step 5
5) Once the base is set, roll up two small pieces of foil for the arms and attach them to the figure sides using more foam tape. Have fun with the arms and pose them any way you like. Sculpt the figure’s shirt and add additional details over the foil with more Model Magic. The clay should stick to the foil easily. Add embellishments, such as beads, buttons or wires as desired and you’re done. I created a Frankenstein to go along with his bride. Have fun creating some spooky characters of your own.


Comments


