


About
Easy mittens using chunky wool; 7mm needles; and plain, purl & ribbed stitches.
Simple knitting pattern for mittens. Allows you to make fancy looking wool mittens with minimal confusion over tricky patterns. Pictures below show you exactly what to do and you can get at least 4 pairs out of a ball of chunky knit wool. Sizes below based on using wool and needles of 7mm.
Skills you will need:
-casting on -plain knit -plain and purl -ribbed (knit/purl alternative stitches) -casting off
If you don't know how to increase or decrease don't worry I will explain simply below.
Haven't got these skills? Check my other projects, I'm making a plain knit version so all you need is cast on, cast off and plain knit!
Tags
-
 srslyjc favorited So Simple Knitted Mittens
19 Jul 20:09
srslyjc favorited So Simple Knitted Mittens
19 Jul 20:09
-
 Georgia favorited So Simple Knitted Mittens
26 Mar 18:35
Georgia favorited So Simple Knitted Mittens
26 Mar 18:35
-
 carman.hopper.1 favorited So Simple Knitted Mittens
22 Mar 14:08
carman.hopper.1 favorited So Simple Knitted Mittens
22 Mar 14:08
-
 Ariel N. favorited So Simple Knitted Mittens
26 Jan 16:51
Ariel N. favorited So Simple Knitted Mittens
26 Jan 16:51
-
 Hannah E. favorited So Simple Knitted Mittens
30 Nov 00:22
Hannah E. favorited So Simple Knitted Mittens
30 Nov 00:22
-
 thatdorkychick favorited So Simple Knitted Mittens
22 Oct 22:35
thatdorkychick favorited So Simple Knitted Mittens
22 Oct 22:35
-
 Orla H. favorited So Simple Knitted Mittens
06 Oct 11:50
Orla H. favorited So Simple Knitted Mittens
06 Oct 11:50
-
 Olivia H. added So Simple Knitted Mittens to Knitting
11 Sep 21:16
Olivia H. added So Simple Knitted Mittens to Knitting
11 Sep 21:16
-
Olivia H. added So Simple Knitted Mittens to Clothes and Accessories
11 Sep 21:16
You Will Need
-
 Step 1
Cast on your wool. Follow this size guide:
Extra-Small mittens: 20 stitches
Small-Medium mittens: 22 stitches
Medium-Large mittens: 24 stitches
Extra-Large mittens: 26 stitchesIf you don't know which size is correct guess and keep going to step 2 at which point you can line up the initial row with your wrist to judge whether it will be big enough. It has to reach around without stretching.
-
 Step 2
Plain knit one row after having cast on.
-
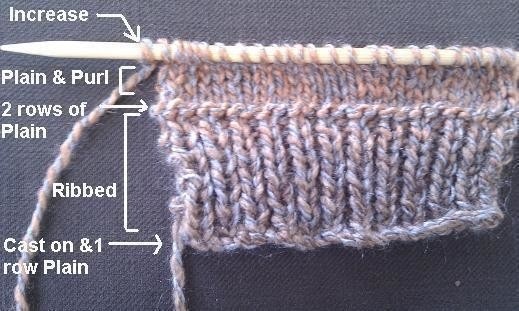
 Step 3
Now knit 8 rows of ribbed knit.
After these 8 knit then 2 rows plain knit to give the divider as seen in the picture.
(This is knitting one stitch plain knit, the next stitch purl, alternating as you go, and bringing the wool from behind or the front as needed. The wool will be behind your right needle for the knit stitch, and brought in front before you do your purl stitch and so on).
-
 Step 4
Now knit 4 more rows:
1 row purl, 1 row plain
1 row purl, 1 row plain.This will give the effect of below. You will be using this '1 row purl, 1 row plain' effect to make the rest of the glove purl to the end now.
-
 Step 5
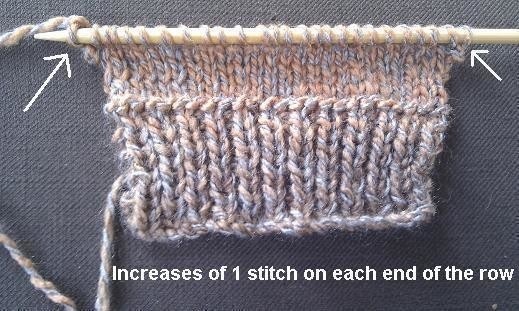
Now to increase. At the start of the next row put your right needle into the first stitch as if going to plain knit it, and then instead cast on one stitch as you would if normally casting on. You can see in the picture ('Increase') that this extra stitch will sit above the rest of the stitches.
Now purl the rest of this row as normal, starting with the new stitch you just added.
-
 Step 6
Once completing this row, do the same again, increasing by adding one stitch to the other end. Then plain knit the rest of this row. After this it will look like the picture, where there is an additional stitch on either end (see arrows)
-
 Step 7
Now repeat the same for the next two rows:
Increase one stitch, purl the row.
Increase one stitch, plain knit the row.You will now have increased a total of four stitches, two on each side, as can be seen in the picture.
Do not increase any more, simply proceed to knit:
1 row purl, 1 row plain knit
-
 Step 8
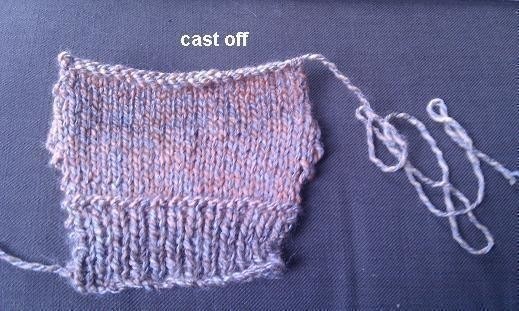
Now you will start to decrease. Take the next row and put your first needle through the first two stitches, purling these two together (as this is a purl row - you can check which row as you will be purling if the back of the glove faces forward). Then purl the rest of the row.
Now on the Plain knit row, plain knit the first two stitches together and plain knit the rest of the row. You will now have decreased two stitches, one on either side.
Repeat this exactly:
Purl 2 stitches together, purl the row.
Plain knit 2 stitches together, plain knit the row.Now it will look like the picture where there is an obvious increase and decrease on both sides.
-
 Step 9
Now:
Purl 1 row, plain knit 1 row.
Purl 1 row, plain knit 1 row.Now it is time to cast off. Cast off as normally, but leave a length of wool attached to the end of the mitten about 30 cm in length.
-
 Step 10
Now the mitten is made but you need to fold it in half longways and start to weave up the seam with the piece of wool left over at the end. See the picture, you can use a needle if you want or just push the wool through the gaps yourself.
Do this for about 4cm up then tie the wool in a few knots on the underside, securing it and snipping the extra wool away. -
 Step 11
Make sure this is the correct place for the thumb by trying on.
Now start weaving up the other end, working towards the middle. keep trying on as you go so that you leave enough room for the thumb, but not so much that the rest of your hand is exposed. Tie knots on the underside to secure again and snip off the excess wool.
-
 Step 12
Now the mitten is finished!
-
 Step 13
Your glove will look like this on. Now repeat the whole process for the second glove.
-
 Step 14
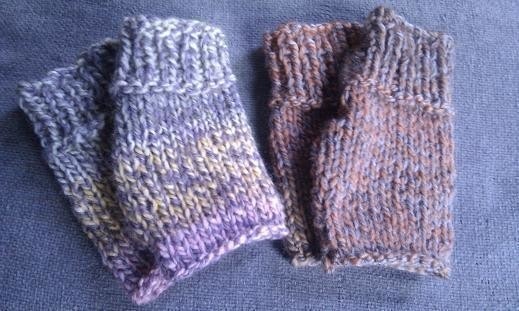
You'll soon be a pro at making many mittens for yourself and gifts. These are just some of the ones I have been making for friends and family this christmas!


 1
Books & Journals »
Locking Box And Journal
1
Books & Journals »
Locking Box And Journal
 2
Babies & Kids »
A Toy Kitchen For A Child
2
Babies & Kids »
A Toy Kitchen For A Child
 3
Origami Flowers »
Origami Orchid
3
Origami Flowers »
Origami Orchid
 4
Office »
Pretty Sketchbooks
4
Office »
Pretty Sketchbooks
 5
Charms & Keyrings »
Shugo Chara Inspired Pop It
5
Charms & Keyrings »
Shugo Chara Inspired Pop It
