

Snap Frame Purse
Extract from Learn to Sew with Lauren • By Lauren Guthrie • Published by Mitchell Beazley

About
Cash in Hand
I love making these little purses – especially for
presents, as it is so easy to personalize them with a
special fabric, with different pocket combinations,
such as an extra pocket for cards, or by adding
initials. Each purse is fully lined, and you can
gather the fabric or make a little box pleat, which
looks elegant in the leather variation on page 00.
These purses are also a great way to use up scraps
of fabric left over from bigger projects – you could
have one to match every outfit!
Finished Size
14 X 10cm (00 X 00in) snap frame
Lauren’s
Tip
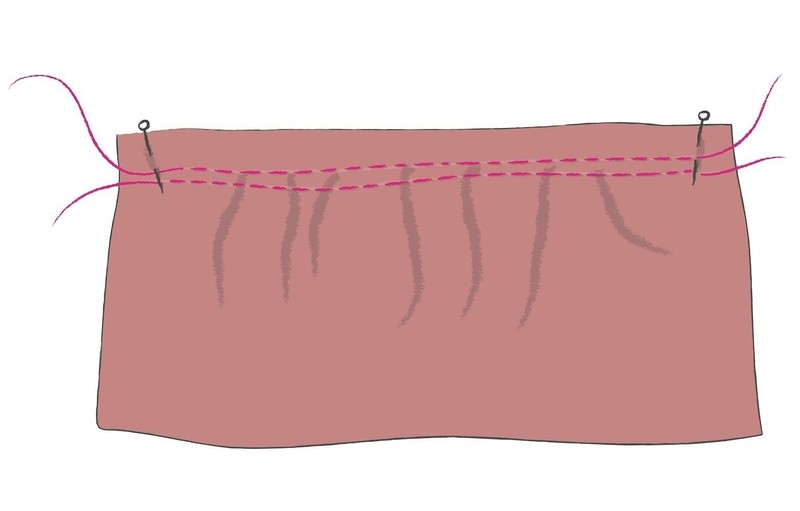
Use paper clips instead of pins when preparing leather for stitching, as pins would be very hard to insert and would also scar the leather.
Stitch the pleats
Machine-tack the pleats 5mm (. in) from the upper edge on each lower purse section.
-
 Luna D. favorited Snap Frame Purse
24 Apr 16:24
Luna D. favorited Snap Frame Purse
24 Apr 16:24
-
 Whitney I. favorited Snap Frame Purse
11 Aug 21:57
Whitney I. favorited Snap Frame Purse
11 Aug 21:57
-
 Kimya J. favorited Snap Frame Purse
28 May 02:53
Kimya J. favorited Snap Frame Purse
28 May 02:53
-
 RareJewel favorited Snap Frame Purse
21 Jun 07:14
RareJewel favorited Snap Frame Purse
21 Jun 07:14
-
 Jenn W. favorited Snap Frame Purse
05 Apr 17:38
Jenn W. favorited Snap Frame Purse
05 Apr 17:38
-
lydia a. favorited Snap Frame Purse
07 Feb 23:59
-
 Topaze D. favorited Snap Frame Purse
16 Sep 17:44
Topaze D. favorited Snap Frame Purse
16 Sep 17:44
-
 Steph. favorited Snap Frame Purse
16 Sep 11:59
Steph. favorited Snap Frame Purse
16 Sep 11:59
-
Steph. commented on Snap Frame Purse
16 Sep 11:59
-
 Emma H. favorited Snap Frame Purse
15 Sep 19:15
Emma H. favorited Snap Frame Purse
15 Sep 19:15
You Will Need
-
Step 1
Cut out fabric pieces and apply interfacing
Cut out the following pieces from the main fabric and interfacing: two lower purse
sections and two upper purse sections. From the lining
fabric cut out two lower purse and two upper purse sections
and one pocket. Transfer the pattern markings to the fabric.
Apply the interfacing to the wrong side of the main fabric
pieces following the manufacturer’s instructions. -
 Step 2
Gather the lower purse sections
On each of the two outer, lower purse sections
machine-tack two rows of gathering stitches
between the two marked dots, 5mm and 1.5cm (.
and ⅝in) from the top edge; leave long thread tails.
Pull up the gathers to fit the lower edge of the upper
piece, distribute them evenly and pin the gathered
edge to the upper purse section, right sides
together, matching the notches and side edges. Tack
if you wish, then stitch with a 1.2cm (1/2 in) seam
allowance. Pull out the lower gathering stitches. -
 Step 3
Add the trim
Before you sew the purse together you can add any decoration or
embellishment you like. For the purse shown, topstitch or handstitch a length of ribbon over the seam joining the upper and lower sections on the front and back sections.
To make a little bow cut a 12cm (5in) strip of ribbon. Fold the edges
in towards the centre and overlap them slightly; hold them together
with a few hand stitches. Wrap a 5cm (2in) strip of ribbon around the centre of the bow and hand-stitch it in place. -
 Step 4
Add tails to bow
Cut two 5cm (2in) strips of ribbon and snip out a triangle from one
end of each to minimize fraying. Hand-stitch these to one section of
the purse (to be the front), then sew the bow on top to hide the raw
ends. Add a button, if you like. -
 Step 5
Join front and back of purse
With right sides facing, pin (and tack) and stitch the
front and back lower purse sections together, starting at
the seam joining the upper and lower sections and taking
1.2cm (. in) seam allowance. Don’t forget to reversestitch
for security. -
 Step 6
Add depth to purse
With the purse still wrong side out, use your fingers to press the
seam allowances open at the side and bottom. Open the purse and
fold it so that the side seam is touching the bottom seam. To ensure
that the seams are aligned exactly, stick a pin though the middle
of the side seam and check that it comes through the centre of the
bottom seam; adjust it if necessary. -
 Step 7
Stitch across corners
Pin the seams together and then stitch across them as
shown, from one folded edge to the other where the line
will measure about 2cm (.in), reversing back over this
short seam to secure it. Trim off the excess fabric -
 Step 8
Make lining and pocket
Join the top and bottom lining sections with a 1.2cm
(.in) seam. Press the seam allowances towards the
lower section and topstitch close to the seamline.
Fold the pocket section in half with right sides facing and
stitch the side edges together, taking 1.2cm (.in) seam
allowance. Trim off the excess fabric and cut across the
corners at the folded edge. Turn the pocket right side out
and press it flat. -
 Step 9
Attach pocket and complete lining
Pin the pocket to one lining section, matching up the centre
points and aligning the raw edges; pin in place. Topstitch close to
the side and lower edges, remembering to reverse-stitch at the
top corners.
Sew the lining together in the same way as you did for the outer
purse in Step 5, but leave a 6cm (2 . in) gap along the bottom
edge for turning the purse right side out later. -
 Step 10
Pin outer purse and lining together
Match the top outer and lining sections of the purse with right sides
together, placing the lining piece with the pocket against the outer piece
with the bow, and pin them in place. -
 Step 11
Mark frame outline
Place the purse frame over one side of the lining and
draw around its outside edge to act as a stitch guide.
Stitch the lining and outer purse sections together
along this line. -
 Step 12
Join upper purse and lining
Stitch the lining and outer purse sections together along the marked line. Trim
the seam allowances to 5mm (. in) and notch the corners to reduce bulk.
Turn the purse right side out through the gap in the bottom of the lining. It may
take a bit of fiddling around to get the two layers correctly positioned against
each other. And you may want to press the seams flat along the top edges. -
 Step 13
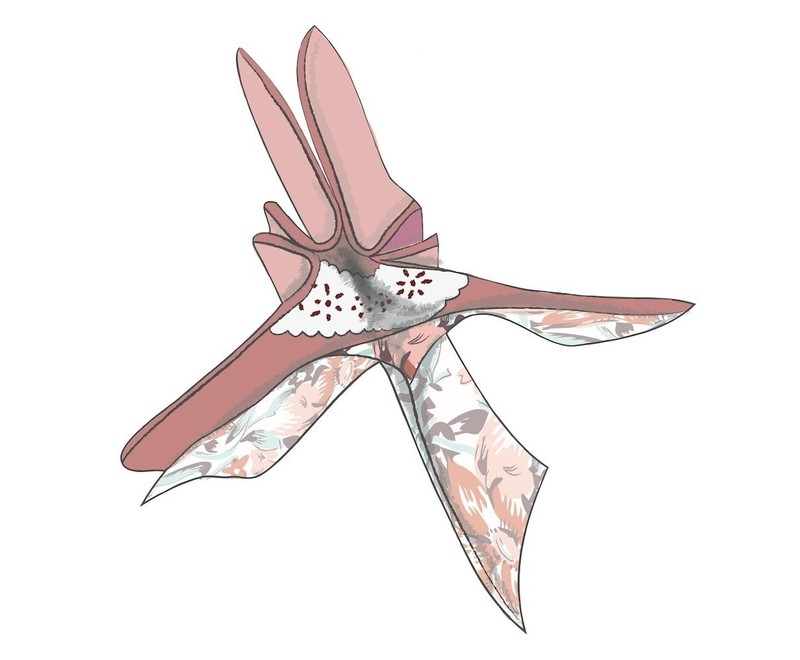
Attach purse to frame
Apply only a small amount of glue to the inside of the frame, then slip the
edge of the purse into it. Glue only one straight edge of the frame at a time,
holding it firmly with your fingers until the glue has set and the purse is
securely fixed before moving on to the next section. If your fabric is on the
thin side, you may need to insert string or cord into the frame to help hold
the fabric in place. -
Step 14
Variation Leather purse
Before cutting out the pieces as in Step 1 of the main version, cut a piece of interfacing slightly larger than the pattern pieces and iron it to the wrong side of the leather; draw around the templates with chalk, then cut out the pieces. (First interfacing and then
cutting makes it easier to get a clean cut.) Cut the lining pieces as for the main version.Form the pleats
Instead of gathering the lower sections of the purse, fold pleats in the leather, following the markings on the template. The folds should point out to the side edges. Hold them in place with paper clips as shown.


Comments

 1
Home Accessories »
Diy Jewelry Box
1
Home Accessories »
Diy Jewelry Box
