


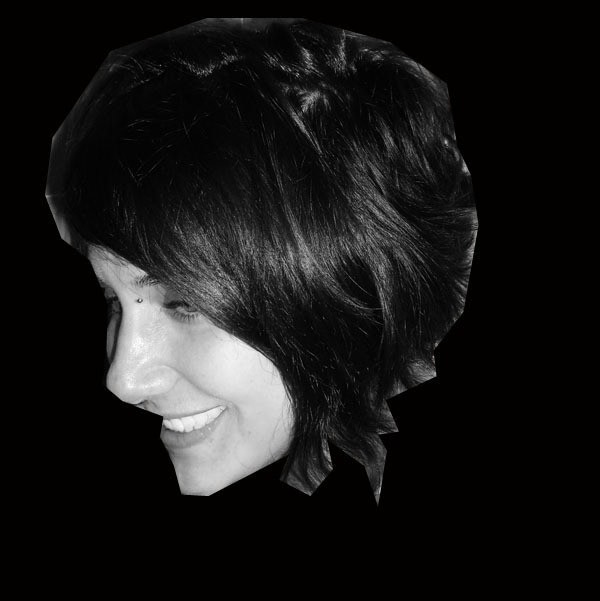
About
Portrait made from smoke brushes
I used Adobe Photoshop CS5 for this photo.
This website below is where is downloaded my free smoke brushes. Lots to choose from, and real simple to download.
http://photoshoptutorials.ws/photoshop-downloads/photoshop-brushes/real-smoke-photoshop-brushes.html
I also included other photos using smoke brushes :)
IF YOU HAVE ANY QUESTIONS PLEASE LET ME KNOW...
Tags
-
 Sveta favorited Smoke Portrait
04 Dec 17:53
Sveta favorited Smoke Portrait
04 Dec 17:53
-
 Nora E. added Smoke Portrait to Photography Ideas
05 Apr 02:45
Nora E. added Smoke Portrait to Photography Ideas
05 Apr 02:45
-
briannna t. favorited Smoke Portrait
20 Nov 03:47
You Will Need
-
 Step 1
1. Upload your photo of choice. Use something with a large file and sharp to see.
2. I used polygonal lasso tool to crop my head out. Then Ctrl+J to make a new layer.
3. Go back to background layer and fill the with black. -
 Step 2
1. Use the eraser tool in layer 1 to give the edges a smooth look and remove unwanted things.
2. Then Ctrl+T to re size and center the image.
3. Now you want to soften it, choose Noise > Median. Adjust the Radius value to around 5 to 7px. Click OK when you're done. -
 Step 3
This is what your image should look like now.
-
 Step 4
1. Desaturate this layer by going to Image > Adjustment > Desaturate.
2. Then use Filter > Stylize > Find Edges to create a sketched line effect.
3. What we will need is the opposite, so invert the color by pressing Ctrl+I and the line color will turn white. -
 Step 5
1. Make the head blurry by selecting Filter > Blur > Gaussian Blur. Adjust the Radius value to around 3-5px.
2. Remove the unwanted areas in the neck and hair by using the Eraser Tool.
3. Still using the same layer, press Ctrl+L adjust the shadow, midtones and highlight values to increase the image contrast so that the black area gets darker and white area gets brighter. When finished with Levels, click OK to apply the change. -
 Step 6
1. Duplicate Layer 1 by pressing Ctrl+J, then change the blend mode to Screen. The white lines are supposed to be brighter right now.
2. Create a new layer on top.
3. Using the Brush tool, choose one of the smoke brushes. Create the smoke shape with one click. Make sure your brush is set on white, but you can try different colors if you want.
4.ALSO you can use the Smudge Tool with 30% Strength to push and pull the smoke to the outline. -
 Step 7
The key to getting the job done is patience.
1. Remember to create a new layer each time you add new smoke.
2. After you are satisfied with your layers of smoke, go back to each one and use gradient map for color.
3. Don't forget to Flatten image and save. ENJOY!


 1
Books & Journals »
Locking Box And Journal
1
Books & Journals »
Locking Box And Journal
 2
Babies & Kids »
A Toy Kitchen For A Child
2
Babies & Kids »
A Toy Kitchen For A Child
 3
Origami Flowers »
Origami Orchid
3
Origami Flowers »
Origami Orchid
 4
Office »
Pretty Sketchbooks
4
Office »
Pretty Sketchbooks
 5
Charms & Keyrings »
Shugo Chara Inspired Pop It
5
Charms & Keyrings »
Shugo Chara Inspired Pop It

i will try this out too!!!
sooo cool!!!;-D
Amazing
I really like all the colors :p