

Silver Bezel Ring
Extract from Sea Glass Jewelry • By Lindsay Furber and Mary Beth Beuke • Published by Ulysses Press

About
Sea Glass Jewelry
Safety First: What does it mean to solder?
Soldering is a technique that joins two metals with a filler metal that melts at a lower temperature than the two metals that are being joined. In this discussion, we will be using
a hard solder technique with silver solder, which creates a more resilient joint than the soft solder technique. You will need a torch with a tank and regulator, rather than a soldering iron or handheld butane torch.
Create a space to work that is designed for success and safety. A well-ventilated room can be created by stimulating a cross-breeze—opening
a door and window will help circulate air. Use a fan to blow the air away from you. Always use eye protection. An uncluttered area with easy
access to necessary tools can be difficult to maintain while in the throes of creating, but it will save you heartache. Consider the table space and floor. Hot items might (and probably will!) be dropped on either. This is a crucial consideration so as to protect those surfaces and also not to start any fires.
-
 Victoria L. favorited Silver Bezel Ring
01 Jan 15:05
Victoria L. favorited Silver Bezel Ring
01 Jan 15:05
-
 Catherine D. commented on Silver Bezel Ring
28 Jun 12:56
Catherine D. commented on Silver Bezel Ring
28 Jun 12:56
-
 Lea Bee added Silver Bezel Ring to Loki look
30 Apr 16:23
Lea Bee added Silver Bezel Ring to Loki look
30 Apr 16:23
-
 Emma H. favorited Silver Bezel Ring
15 Nov 00:30
Emma H. favorited Silver Bezel Ring
15 Nov 00:30
-
 erin f. favorited Silver Bezel Ring
14 Nov 09:42
erin f. favorited Silver Bezel Ring
14 Nov 09:42
-
 ale_corason favorited Silver Bezel Ring
13 Nov 01:32
ale_corason favorited Silver Bezel Ring
13 Nov 01:32
-
 Leah. favorited Silver Bezel Ring
12 Nov 09:38
Leah. favorited Silver Bezel Ring
12 Nov 09:38
-
 Ulysses Press published her project Silver Bezel Ring
28 Aug 10:26
Ulysses Press published her project Silver Bezel Ring
28 Aug 10:26
You Will Need
-
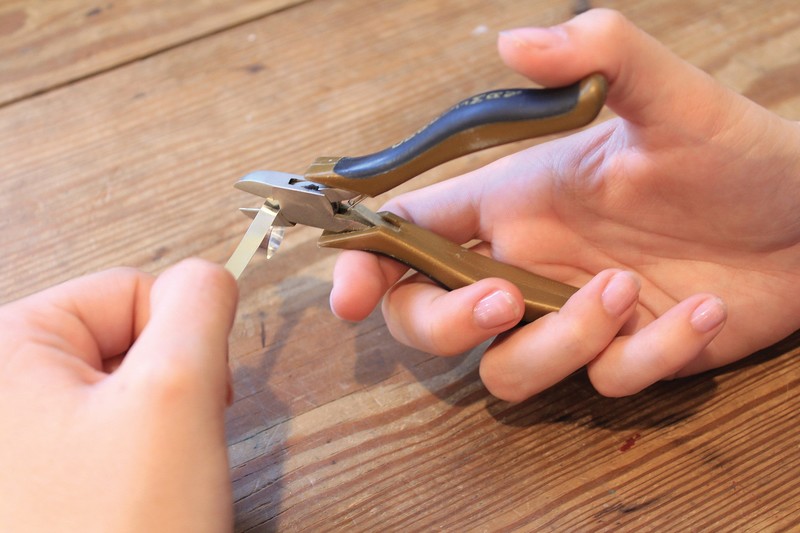
 Step 1
Steps to Create a Silver Bezel Ring
After choosing a piece of sea glass, you will measure the appropriate amount of bezel. Simply wrap the bezel wire around the edge of sea glass as tightly as possible. Using a permanent marker (the ink will come off during the silversmith process), mark the correct length of bezel and then snip with flush cutters. This should give you a straight cut. Remember that a tight fit will keep the sea glass in place once your piece is finished, so it is important to be exact in the measurements. Consequently, you may need to finesse the bezel’s seam by filing with the diamond files.
-
 Step 2
All silver needs to be cleaned prior to soldering. Use a small paint brush to paint flux over every portion of the bezel.
-
 Step 3
Place the bezel on the tripod stand (or on layers of soldering pads and blocks, depending on your method and tools). Always wear eye protection while using the torch.
Once the gas is turned on, use a torch striker to light the gas. The gas levels made need to be adjusted until there is a slight brushy sound. This means that the correct amount of oxygen is in the flame. Slowly move the flame across the bezel until the flux is fully dry, and then use your copper tongs to place the bezel into the warm pickle. If other metals are placed into the pickle, the pickle will spoil and need to be remade. Once the bezel appears clean, remove from the pickle and allow it to dry.
-
 Step 4
Next it is time to solder the bezel together at the seam. Bend the bezel so that the seam is flush. Wherever there is a gap prior to soldering, there will be a gap afterward as well, so work the bezel toward a tight fit. Use a small paint brush to paint the bezel with flux again and add a small piece of high solder on top of the seam. I set my solder inside the bezel so that the slight color difference between the two metals isn’t as evident.
Solder Sidenote
Solder works at varying degrees of temperature. Use the highest temperature solder for the bezel first, and then try never to reach that high of a temperature again. This technique allows initial solders to stay joined while in the process of making future solders. Turn on your torch and increase oxygen until there is a brushy- sounding flame again. While heating the entire bezel, keep the flame mostly focused on the seam area. This allows the piece to be heated through conduction and direct flame contact, which will produce a more evenly heated piece and, therefore, increase the likelihood of the solder “taking.” This simply means the solder melted to either side of a seam and made a hard connection. While the bezel is being heated, the silver will change colors. Often it will begin to look tarnished, but will gradually begin to look quite clean. As the bezel takes on a clean silver appearance, the solder should be about ready to flow. However, if the silver begins to turn red, it is time to remove the flame before your silver melts and ruins the piece. -
Step 5
Dip the bezel in and out of a glass of water, and then allow the bezel to rest in the pickle, warming pot, while the backplate is readied.
-
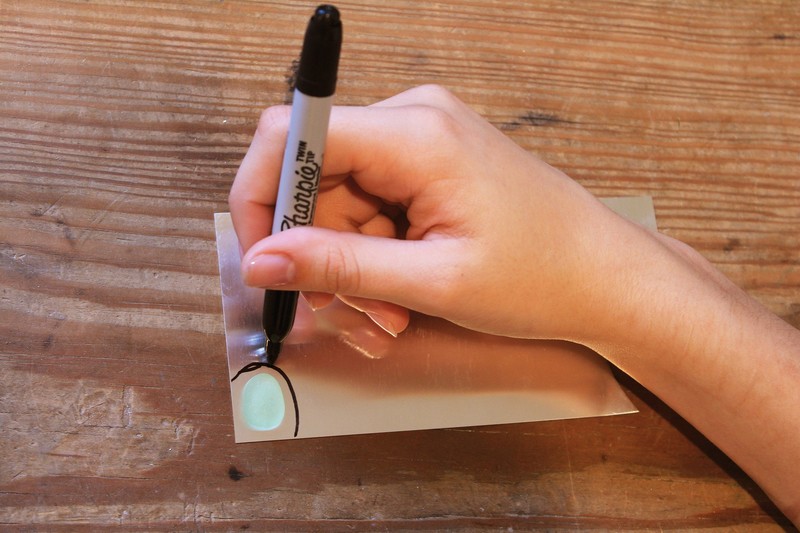
 Step 6
Backplate
Grab a permanent marker and trace an outline on the backplate around the sea glass. There are several possible methods for cutting the backplate. For unique designs, try a fine-toothed handsaw. For basic shapes, a strong pair of shears will suffice.
-
 Step 7
Clean the backplate through the flux, heating, and pickle process mentioned previously. Once the backplate is dry, flux it once more and set it on the tripod stand. Fit the bezel over the sea glass to ensure the bezel is formed in the correct shape. Then place the fluxed bezel on the backplate with medium solder next to the seam. Solder placed inside the bezel is less likely to show after the soldering process, compared to solder that is placed outside the bezel.
-
 Step 8
Once your flame is ready, begin heating the underside of your pendant. The backplate is a thicker gauge of metal and will take slightly longer to heat than the thinner bezel. While heating from the underside, the backplate gets a head start on the heating process, and the bezel still gets hot due to conductive heat through the metal. When the silver passes to the shiny stage, bring the flame back to the top side of the pendant and work the flame around the bezel, paying special attention to the solder. It may take more than one attempt to get your solder to flow all the way around the seam. Dip the pendant into the water and dump it into the pickle.
-
 Step 9
Refine the Edge
You can easily refine the backplate edge once the bezel is affixed. This allows more room for error during the previous processes. Use shears to clean up the backplate edge and save the silver in your scrap pile.Now the backplate should be ready for more sanding. Again there are a number of techniques for this step. Try using a flex shaft (a multi-purpose tool used to sand in tight spots and can also be used as a high-speed drill), bench grinder, or high-speed drill to sand down the edge. Fine sanding can then be done with your diamond files and sandpaper.
-
 Step 10
Once the sanding is completed, it is time to solder the shank to the pendant. The shank is commonly known as a ring band. Shank can come as either strips of wire that still need to be formed or as already premade shank.
A ring mandrel and soft mallet will help shape the shank to the correct size. Prepare the shank with the same cleaning process as used on the other silver.
Flux the shank and bezel. With the pendant facing down on the tripod stand, position the shank with easy solder near each seam. Use a third hand to stabilize the shank while torching. It’s important to keep the flame moving gradually to prevent one area from getting too hot and melting; but at the same time, solder flows toward heat and the flame needs to concentrate on the seam that is to be soldered.
-
 Step 11
Once the ring has been dipped in water and cleaned in the pickle, the sea glass can be set into the pendant. Push the burnisher into the bezel to create a tight fit against the sea glass. Do this around the complete circumference of the bezel.
After a little polishing, the ring should be complete!


Comments

 1
Books & Journals »
Locking Box And Journal
1
Books & Journals »
Locking Box And Journal
 2
Babies & Kids »
A Toy Kitchen For A Child
2
Babies & Kids »
A Toy Kitchen For A Child
 3
Origami Flowers »
Origami Orchid
3
Origami Flowers »
Origami Orchid
 4
Office »
Pretty Sketchbooks
4
Office »
Pretty Sketchbooks
 5
Charms & Keyrings »
Shugo Chara Inspired Pop It
5
Charms & Keyrings »
Shugo Chara Inspired Pop It
